Copy & Paste from Excel Cells to Individual Clipboards

I am having issues with Excel.

1 Like

Thank you for illustrating your goals so clearly. It makes offering assistance much easier.

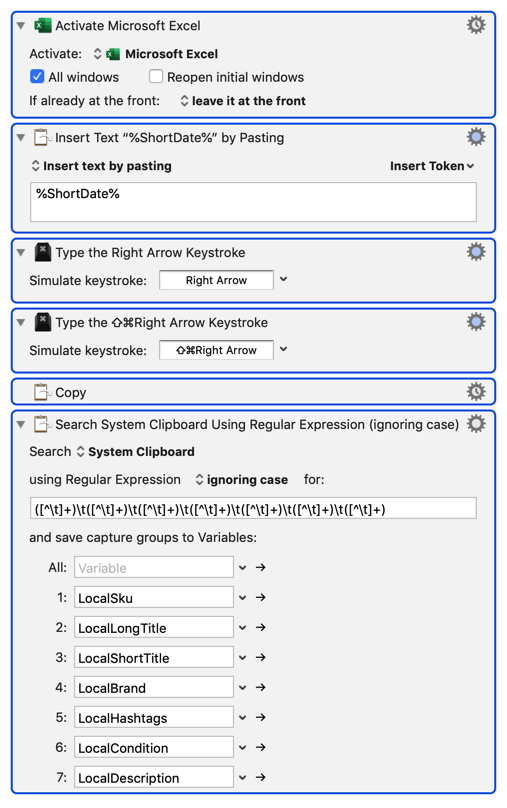
For your first question about getting data from Excel into named clipboards, I would say you actually don't need to use named clipboards for this use case at all. In this case, I would have your macro copy every relevant cell and process the resulting clipboard data into appropriate variables using regex:

image

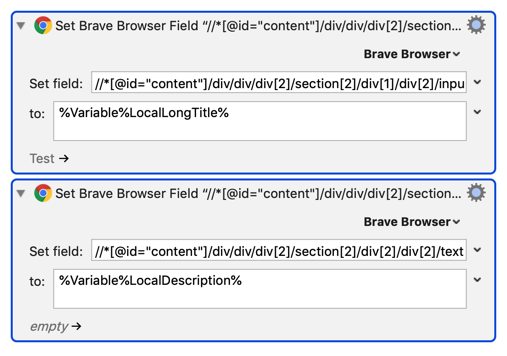
I can see from one of your screenshots that you're familiar with the Click Chrome Link action, so for the next step, instead of pasting the variables into each field, I would use the Set Chrome Field action to fill them in automatically:

image

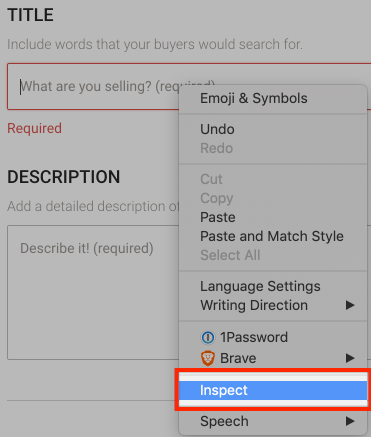
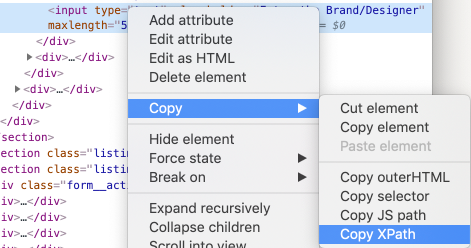
You can find out what to put in the "Set field" part of the action by right clicking the relevant field, selecting Inspect, then copying the field's xpath from the web inspector:

11%20PM
13%20PM

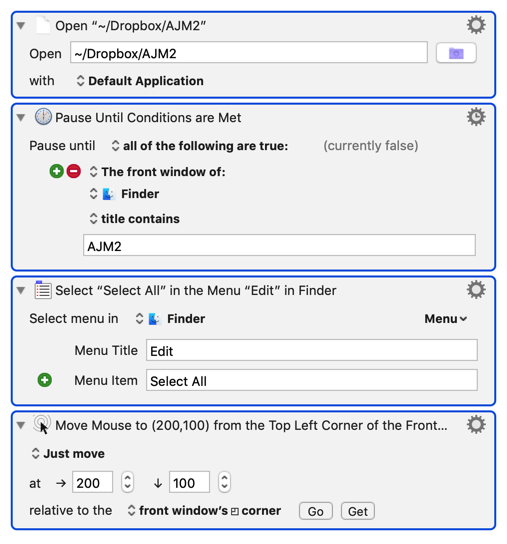
Your last request is tricky. There's almost certainly a better way to do this, but the first way I was able to come up with was to have KM open the folder in question, select every file within it, and move the mouse to somewhere near the upper left corner to make it easy to drag the files into Chrome yourself (you could try to automate this drag as well, but in my opinion, it would be very difficult to get just right and prone to failing with different images or window sizes, so I think the last step may be worth performing manually once the images have already been selected):

image

Here's the full macro I used to test this out as best I could. Assuming it works for you as well, you should be able to expand and modify it to suit your needs (namely, adding more Set Chrome Field actions to populate with the other variables).

Post New Poshmark Listing.kmmacros (7.2 KB)

3 Likes

Hey Ashley,

Gabe spent a lot more time and effort on this than you might realize.

Kudos -- you did a better job defining your task than a lot of folks do.

The one major thing you could have done to move things along more efficiently is to provide an example Excel worksheet populated with at least a few lines of data for people to test with.

(Non-Keyboard-Maestro file-types other than images must be zipped to be uploaded to the forum.)

Macros are built by testing, not talking (or writing) – so anything you can do to facilitate that will make it more likely for someone to spend their valuable time and volunteer to help you.


If you haven't read either of these, they're worth a couple of minutes of your time:

Tip: How Do I Get The Best Answer in the Shortest Time?

How to Post Your Macro to the Forum


Gabe has chosen to drive the UI and use the Clipboard to set and get the desired data.

While this can be an effective method (and is sometimes the only means available), I don't like using it when there's an alternative. (Especially with Microsoft applications that tend to clutter the Clipboard with copious invisible data-types that can stall a macro under certain circumstances.)

The following AppleScript will place the date in the selected cell, and it will extract the data from the seven cells to its right without using the Clipboard or changing the selection.

All extracted data is placed in Keyboard Maestro variables.


Emplace Date in Active Cell and Extract Data from Cells to the Right of It v1.00.kmmacros (6.2 KB)


For this sort of job AppleScript is very effective and not especially complicated (for a change).

I don't use local variables when developing, because I want to be able to see variable names and values in the variable inspection panel in the Keyboard Maestro preferences. So there's a need for housekeeping after the macro is run.

This AppleScript action will import into the macro currently being edited and should be placed at the end of the macro; it will do the requisite housekeeping.

Execute an AppleScript.kmactions (2.1 KB)

-Chris

5 Likes

This is awesome, thank you. But can you tweek it for me a little? I want to be more specific of which cells to be added.

-It is not allowing me to attach actual excel spreadsheet, but will highlight the cells that I need copied into www.poshmark.com fields.
Picture 1- shows where I need the date inserted and the highlighted cells that need to be inserted into www.poshmark.com.

-Open www.poshmark.com and I would like the copied cells to be pasted in this order.
*Listing Price, Origional Price, Brand, Description, Title.
*Click "No" Box, New with Tags
*After Description and Title are inserted, Click the Upload Photos Box and go to Dropbox.
*Open DropBox
*Search for the Dropbox folder by pasting the excel cell "SKU"
*Once the folder is found, open the folder, select all of the images in the folder and insert them into Poshmark.

image
image


Once Poshmark Completes the process, I would like to open up another tab in Chrome and go to www.Mercari.com and complete another process.

*Insert Title and Description
*Click "Good Condition"
*Insert "Listing Price"


Once Mercari is completed, open another Tab in Chrome and go to www.ebay.com
*Insert Short title and press the enter key
*It will automatically populate the title
*Select the dropdown box and select "Does not Apply". This can come from the Excel Spreadsheet under UPC or if there is a way to automatically click it.
*Add photos from my Dropbox and search for the folder
Labeled the SKU in Excel.
*Insert Brand
*Insert Item Description
*Insert Listing Price from Excel (Buy it now Price)


Here is what is added to ebay

Hey Ashley,

The Keyboard Maestro Forum will allow all native Keyboard Maestro file-types and image files to be directly uploaded, but other file-types must be zipped before uploading.

-Chris

Copy of Reseller Field Guide (Free to View_ Updated Mondays) Download Your Own Copy @ bit.ly_resellerfieldguide (1).zip (184.1 KB)

Here you go!!!!!

1 Like

Hi Ashley,

Thanks for the sample data; that made this much easier to test. Creating similar macros for those other sites is a major request, and not one I'm ready to undertake right now, but for the moment, I believe I've successfully managed to complete a macro for Poshmark (one that takes advantage of @ccstone's excellent AppleScript contribution; thanks for that, Chris!) to make it much more reliable and not require Excel to be the front app (though you will need to make sure the selected cell is in the Date column before running the macro). Start with this, let me know if it fails anywhere, and if it works for you, try duplicating it and modifying it for the other sites and see how far you can get.

Post New Poshmark Listing.kmmacros (30.0 KB)

In Action
08%20AM
I used a pre-defined folder path for the images in my test since I didn't have your kind of folder setup, but in the macro I've posted, it should automatically open the folder you need based on the SKU data from Excel.

I've already showed you how to find the Xpaths for the fields you want to set, and that process should be the same for those other sites; plus, once you run this macro and get the data from Excel, you can reuse those same variables where needed for the other sites. Once you get macros for other sites working, you can have this macro run them after the Poshmark process completes by adding appropriate Execute a Macro actions at the end of the macro. If you get stuck, then feel free to report back and I'll see what I can do as time permits.

2 Likes

Thank you so much for this, I really appreciate it. But the Macros to download is Using Safari and I use Chome. Can you switch it out for me. Thank you.

image
image

You're welcome. The macro I uploaded was set to use Chrome, but since I use a non-standard Chromium-based browser, I guess KM must have defaulted to Safari. At any rate, you don't need me to switch those actions for you; it's easy to do so yourself with the gear menu in the upper-right corner.

38%20PM

I have KM's Chrome settings set to Brave Browser on my system, but it should show up as Chrome for you on yours.

1 Like

I cant thank you enough for this. You are a genius! This is my first week using any sort of macros and it a whole different world. I'm learning as I go. Thank you again. This probably wont be the last time you hear from me.

1 Like

I have a question....I was able to automate all three sites, but for ebay.com, my Description is not being inserted. I did copy & paste the Xpath, but no luck.


Hey Ashley,

That's clearly not a valid Xpath.

Right-Click in the Description box and select “Inspect”.

Then find the correct code, right-click on it, and copy as Xpath.

You still will probably get a generic Xpath, but let's see.

-Chris

Hey Chris, Thats what I did and I keep getting the same thing.

Hey Ashley,

Did you try the “Google Chrome” pop-up menu in the action?

-Chris

I'm a rookie with this. What does that mean?

In the Google Chrome action:

The pop-up does NOT always give you any result (or the desired result), but it's a place to start.

Otherwise you have to learn enough about Xpath to compose your own.

-Chris

Glad to hear you've had success automating the other sites on your own! For the eBay description field, the Xpath was indeed less straightforward to find than the others, but I was able to get it after switching to the HTML editor instead of the standard one. Hopefully this will work for you as well:

//*[@id="wc0-w0-LIST_PAGE_WRAPPER__-OCS_DESCRIBE_SECTION__-DESCRIPTION__-descriptionField__-editorSource"]

1 Like