Use Case
- When you have more than one image that could appear on the screen, and you want to match the first one to appear using the KM Found Image Condition in an Action like Pause Until action.
- The current (as of KM 8.2.4) Pause Until Action has a design flaw that does NOT allow you to identify which image was found, and, even worse, does NOT always return the proper FoundImage token.
- Use this macro (or the Actions in it) to identify which image was found, and always get the correct FoundImage token.
- This macro also demonstrates how to limit the search area of the Found Image process to be the frontmost window.
- As of Ver 75.0.3770.142, Google Chrome has had a bug in it for ~1 yr+ that causes the KM criteria for "FrontMost Window" to fail.
- This macro provides a workaround to that bug by using the Frame of the FrontMost Window.
- You will need to CHANGE the images in the two IF/THEN Actions to use the images you want to match.
- You can duplicate one of the IF/THEN Actions if you need to match additional images.
The below macro provides an EXAMPLE of how to do this, using images for the Evernote Chrome Web Clipper "Save" button, at different zoom levels.
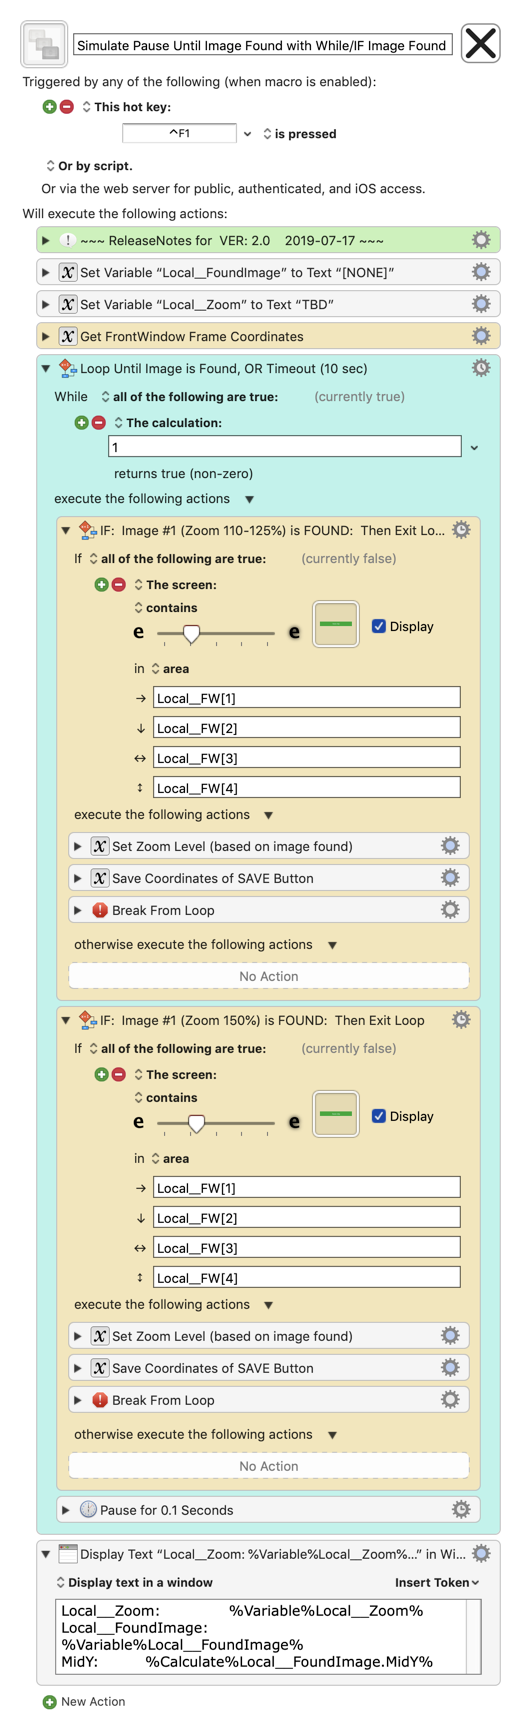
MACRO: Simulate Pause Until Image Found with While/IF Image Found [Example]
~~~ VER: 2.0 2019-07-17 ~~~
DOWNLOAD:
Simulate Pause Until Image Found with While-IF Image Found [Example].kmmacros (43 KB)
Note: This Macro was uploaded in a DISABLED state. You must enable before it can be triggered.
ReleaseNotes
This method works! 
Author.@JMichaelTX
It returns the correct image coordinates (%FoundImage%) for the actual image that is found.
This is a WORKAROUND to the design flaw in KM Pause Until using "any" Condition.
 It uses a KM "While" Action with separate IF/THEN Actions for each image.
IF the image is found, then then a variable is set to the %FoundImage% and it BREAKS from the loop.
I have adjusted the FoundImage "fuzz" for the first image so that it will match the Evernote Clipper "Save" button at both 110% and 125%.
The second image is set to match at 150%.
HOW TO USE
- In your Browser, invoke the Evernote Web Clipper
- Set Browser Zoom to 110%, and screen capture the green "Save" Button. Paste this into FIRST IF/THEN Image condition
- Set Browser Zoom to 150%, and screen capture the green "Save" Button. Paste this into SECOND IF/THEN Image condition
- Trigger this macro.