Toggle Network → Ethernet → Advanced → Proxy On / Off

You're welcome. I quite enjoy the opportunity to help people learn about the command line, as it is very powerful, but it can be very intimidating. The best way to learn is when you have a practical use-case, so this was a good opportunity.

Oh! My bad. I should have explained.

That folder does not exist by default. (The purpose of /usr/local/ is to be things installed by the user, not by Mac OS, so they will not interfere with each other. Basically, MacOS puts things in /usr/bin and you put things in /usr/local/bin.)

To create that folder you will need to use the sudo command which lets you do things as an "administrator" (sort of like you sometimes get asked for your password when installing apps).

These two commands should do what you need. After the first time you use sudo it will show you a "scary" warning about sudo which you can read but don't worry about it (the warning is mostly for users in a corporate or school environment where sudo is probably something they should not use).

You will be prompted for your password. Enter the same password that you use to log in to your account on your Mac:

(after you enter your password, sudo won't ask for it again for a few minutes, I think about 5… so don't be surprised if it only asks once)

sudo mkdir -p /usr/local/bin/

sudo chown "$USER" /usr/local/bin/

The first command will make a directory (mkdir = 'make directory') at /usr/local/bin/ and will make the "parent" directory /usr/local/ if it does not exist (mkdir -p = "make directory and any others that need to be made"). In this case "local" is the "parent" folder of "bin" in Unix parlance.

Without the -p you would have to use two separate mkdir commands:

sudo mkdir /usr/local/
sudo mkdir /usr/local/bin

The second command will "change" the "owner" (ch+own = chown = "change owner") of the folder /usr/local/bin to $USER which will be replaced with you're username. Try

echo "$USER"

to see what $USER is on your system.

By default it will be owned by root as that is the user for anything done by sudo. But if you want to be able to add things to that folder, you should be the "owner" of it.
2 Likes

thanks again VERY much !

1 Like

I spent the weekend trying in vain to figure out why Textbar only displays Proxy OFF , even when either both or one of the Internet connexions (wifi and Ethernet) proxy is ON.

I read your post over and over, repeated the terminal commands etc etc, but it never displays proxy ON.

On the positive side, i imagine that if proxy OFF is displayed it means that Textbar is at least executing your script

thank very again for your time and help

Try downloading https://files.luo.ma/temp/ProxyState.textbar which should leave a ProxyState.textbar file in your Downloads folder.

Open that in TextBar and it should (hopefully!) give you my script already embedded to use in TextBar.

(Sorry for the delay, I asked the developer how to do this and he just got back to me… turns out I just had to export it and it will embed my script automatically.)

Let me know how it goes!

1 Like

thank you very much for all your efforts !.
I reinstalled textbar and imported your script.
unfortunately, the script does not work: proxy always displays OFF, even when it is clearly on, and I clicked on textbar refresh. I tested for both wifi and Ethernet.
thanks again

Hrmmm… this is very strange. Probably the best solution is the one above about setting network location.

Did I ask what version of Mac OS you are using? I don't think it should matter unless it's significantly older…

I'm curious what these 4 shell commands would show when entered into Terminal when all the proxies were on, and then again when all were off:

networksetup -getwebproxy Ethernet 
networksetup -getsecurewebproxy Ethernet
networksetup -getwebproxy Wi-Fi
networksetup -getsecurewebproxy Wi-Fi

I'm guessing there's some difference between your setup and mine, but unfortunately I don't know enough to know what that is.

1 Like

Hello,

thanks very much for putting so much thought into this.

Please note that it is the Ethernet proxy that is important for me.

Ethernet proxy ON
networksetup -getwebproxy Ethernet
Enabled: No
Server:
Port: 0
Authenticated Proxy Enabled: 0

Ethernet Proxy ON
networksetup -getsecurewebproxy Ethernet
Enabled: No
Server:
Port: 0
Authenticated Proxy Enabled: 0

Wifi Proxy ON
networksetup -getwebproxy Wi-Fi
Enabled: No
Server: http://proxy.NAMEOFMYPROXY
Port: 8080
Authenticated Proxy Enabled: 0

WiFi Proxy ON
networksetup -getsecurewebproxy Wi-Fi
Enabled: No
Server:
Port: 0
Authenticated Proxy Enabled: 0

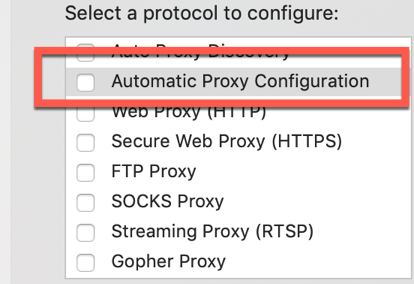
Just to be clear, this is the type of proxy I use, and to the right of it, I enter my proxy URL.

2019-07-27_15-48-15%20(1)

Ok, now turn on the proxy and re-run the 4 commands, so we can see the difference.

sorry: it was on. You mean off ?

If that's how the commands work when you are using Automatic Proxy Configuration then I guess networksetup will not work. Unfortunately I do not have access to a network with APC that I can test.

1 Like

thank you very much for your time and efforts