A macro to very quickly capture and rename screen and region screenshots

This macro was inspired by some similar discussions in these two threads:

I have a solution that seems to work and is incredibly fast, but as it's an entirely different approach, I think it may sidetrack the other treads, so chose to post it on its own. First, here's the macro:

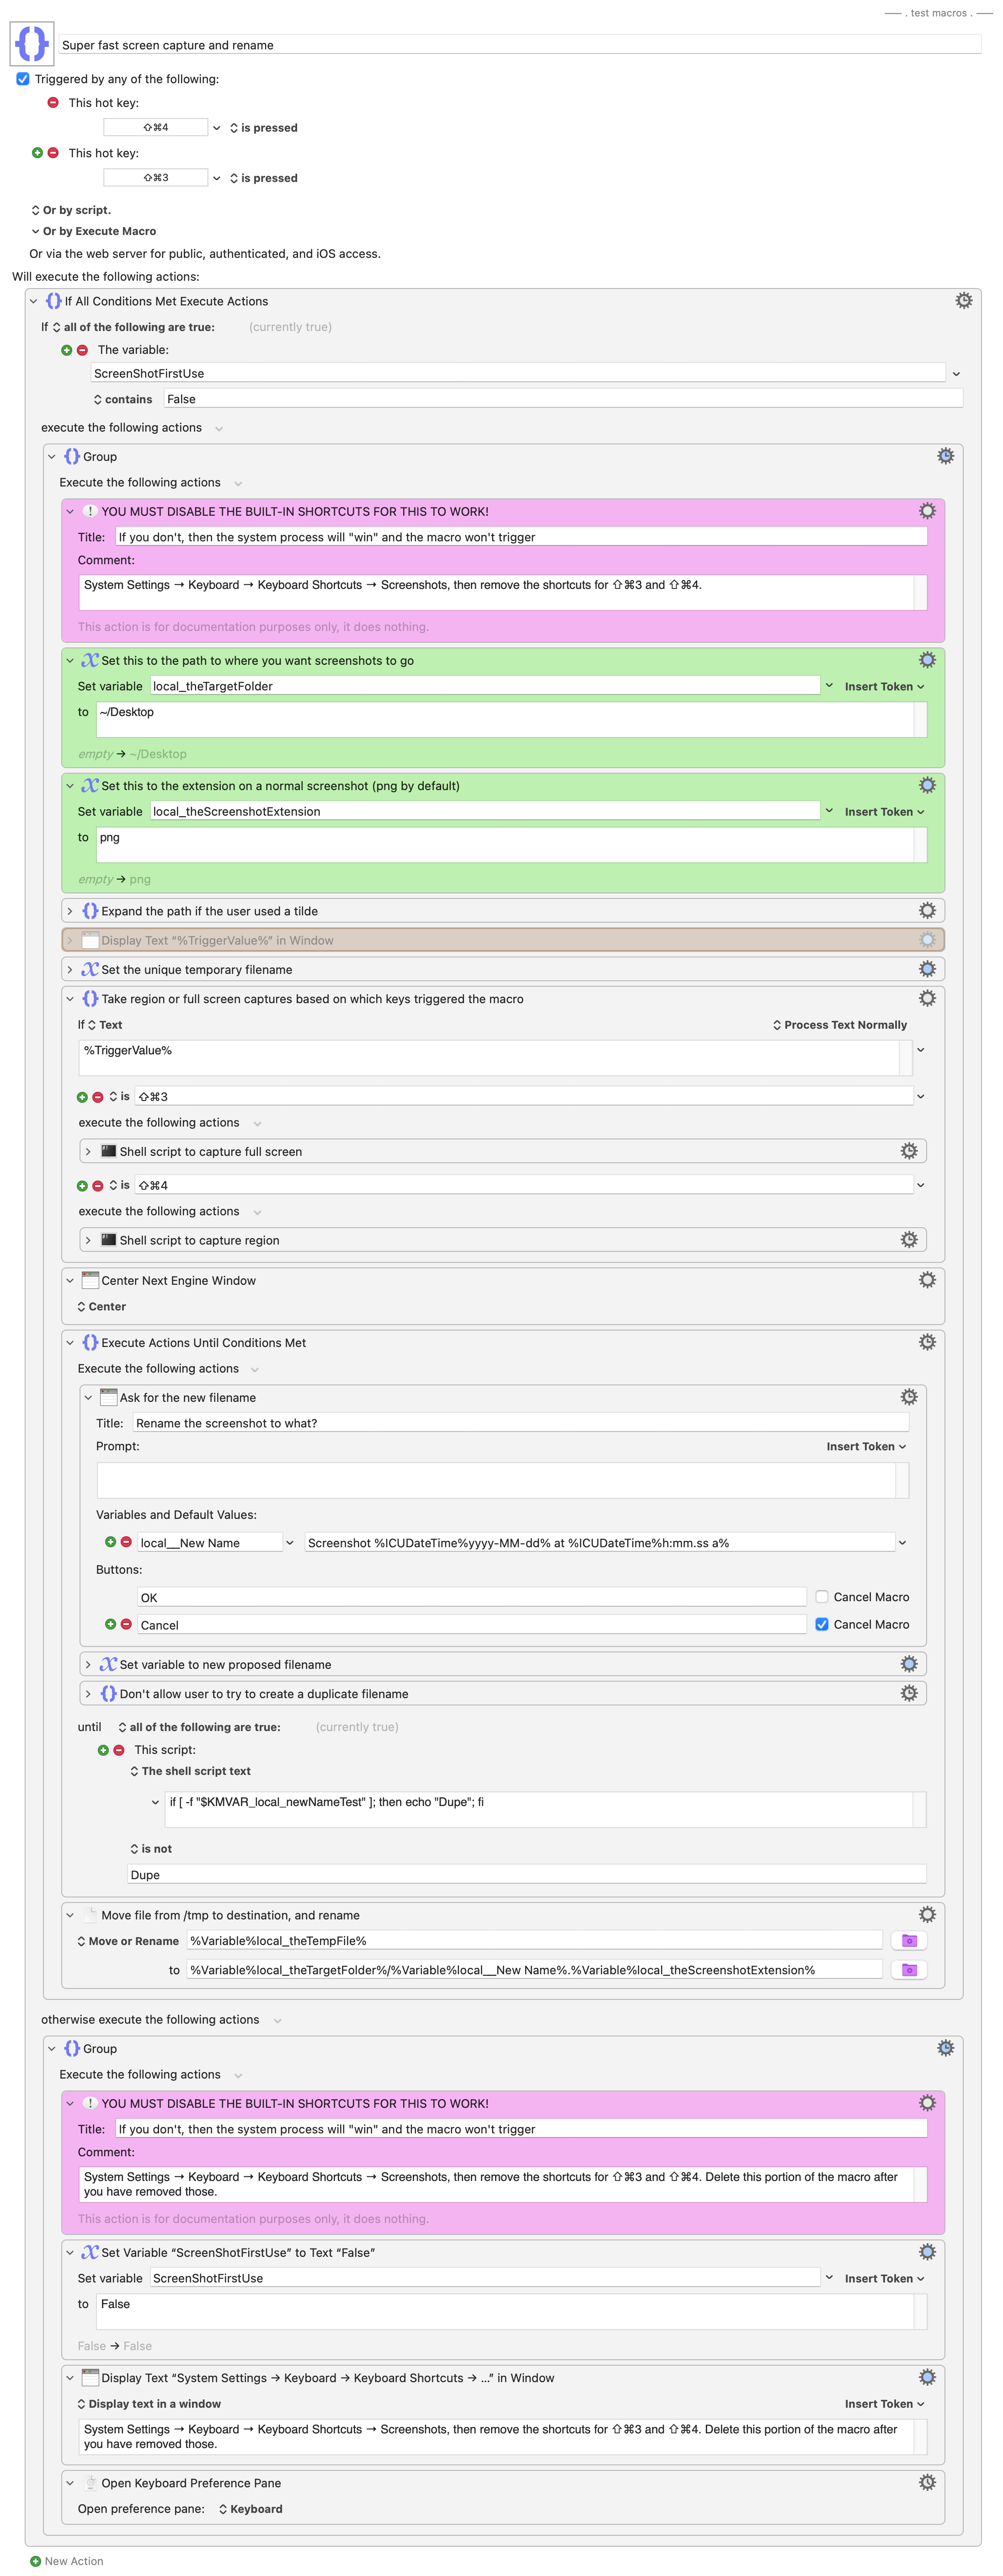
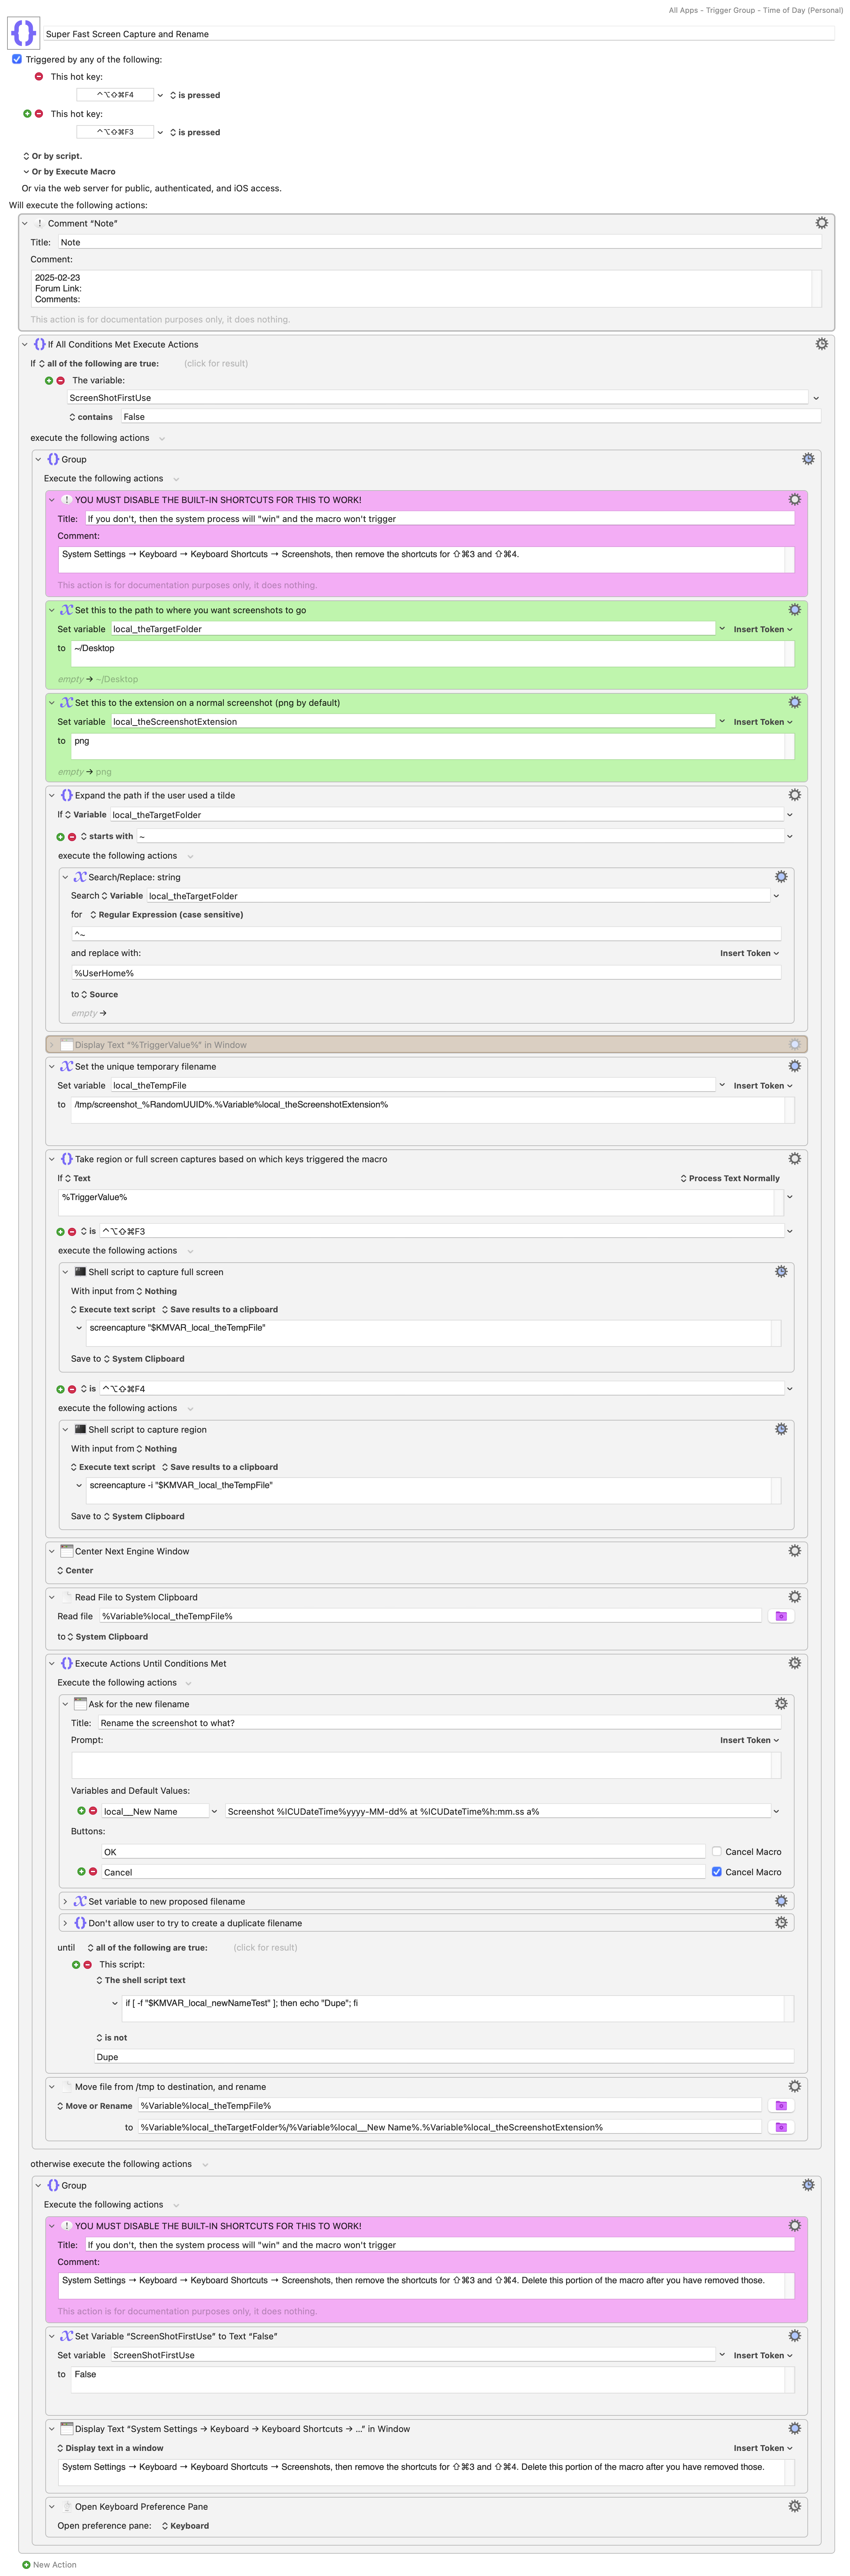
Super fast screen capture and rename.kmmacros (16 KB)

A screenshot lives within

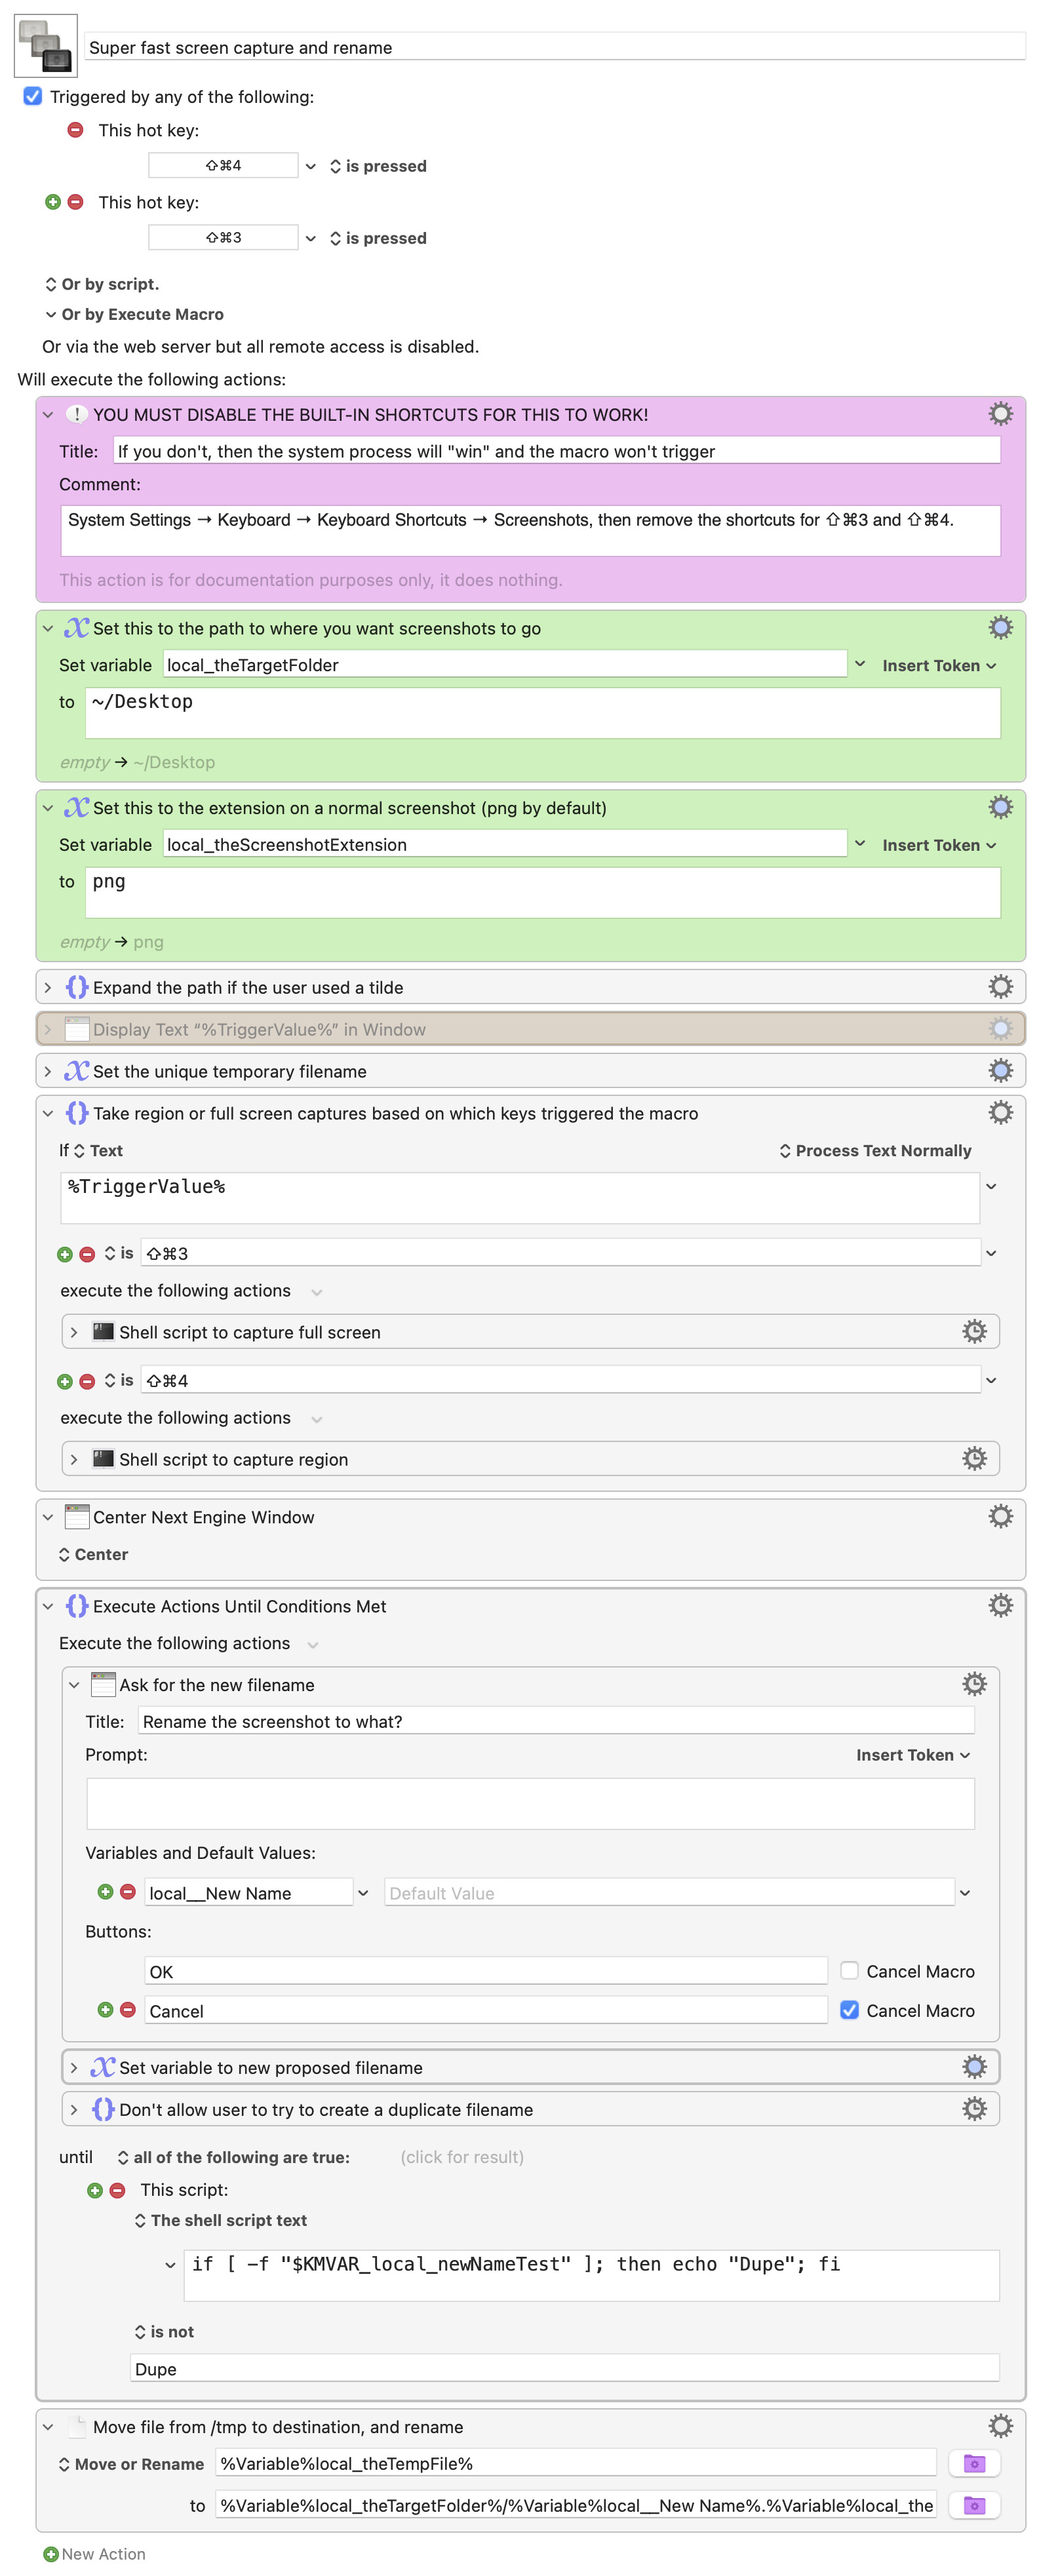
This macro takes over the built-in ⇧⌘3 (full screen) and ⇧⌘4 (region) shortcuts, so in order to work, you must disable ⇧⌘3 and ⇧⌘4. Do that in System Settings → Keyboard → Keyboard Shortcuts → Screenshots.

The advantage of this method is that (a) it's wicked fast, and (b) it doesn't have to use folder monitoring to find newly-taken screenshots. Instead, it's just a macro that's triggered when you take a screenshot, because it steals those keyboard shortcuts.

The macro has two variables you must set, both in green boxes. The first is the location where you want the final screenshots to go; this does not need to be the location used by the system's screenshot tool, and you can use tilde-style shortcuts if you want, as shown in the uploaded macro.

The second variable is the extension for your screenshot type. Unless you changed it using a Terminal command, this should be png, so leave it unchanged if you're uncertain.

With those things done, the macro fires on either shortcut, and then uses the proper screencapture Terminal command (based on checking %TriggerValue%) to capture either the screen or region to a file in the /tmp folder. An input box then lets you rename the file, and it's saved to your chosen location. (The macro will tell you and force you to pick a new name if you try to use an existing filename.)

In testing, I can capture and rename a screenshot in about a second, with most of that time being typing. This works because the Terminal command bypasses the preview icon and the associated delay that you get when you use the built-in tool.

I have some thoughts on enhancements, for instance an option to not rename the files and just use a format that matches the system's built-in style would result in a wicked-fast screenshot tool. I'll do that, though, only if there's general interest in such a feature.

-rob.

3 Likes

This is great and will now replace my default. I am trying to find a good OCR macro to put to command+shift+5. I

I was thinking the same thing and made your window default to that so an extra enter versus the way the system does it is all that is needed.

Good to note, I had changed mine to .jpg so an interesting way to get a png if I wanted to have a choice for whatever reason.

I added a little logic for a first time run which doesn't really seem to slow it down at least noticiably on my system on subsaquent use though it does throw an extra variable into your cue and won't help you on computers that you have Keyboard Maestro preferences synced. There might be a better way to do that.

Super Fast Screen Capture and Rename

Super fast screen capture and rename.kmmacros (25 KB)

2 Likes

Very nice changes!

-rob.

2 Likes

Okay so I remembered wrong on this. I knew that global variables synced between computers; since they are automatically put in the Global variables window regardless of whether or not they contain a value. I thought the values also synced between computers that synced "Keyboard Maestro Macros.kmsync"

Thankfully, in this case, the values do not sync so the first time you run it on any computer that sinks the file it'll prompt you, which is great.

1 Like

Whoa, I can't have those window shadows (⇧⌘4>spacebar>return)! Haven't checked yet, except to try them, but can I turn those off easily for either of the super fast macros?

The -o option supposedly doesn't capture the shadow, but I haven't tested it.

-rob.

1 Like

Yes, according to: screencapture Man Page - macOS - SS64.com

1 Like

OK, thanks! Well, I'm confused, because I added "-o" to that script (also just tried placing the "o" right behind the "-i" instead), and the shadow went away, but the dimensions of the snapshot jumped way up. I'll have to resize the image every time I take the snapshot. It appears that this will take me some time to investigate. Thanks again.

I wasn't following this thread closely, but dimensions jumping up is sometimes caused by users who change the default screen resolution in System Settings / Displays / Larger Text. One way to solve this problem is to scale the captured images using the following action after the screen capture:

image

The above action doesn't "scale" or "change" your image, it just changes an attribute of the image, so it's very fast. But it can be a pain figuring out what the numeric value would be. But once you discover the correct value, it's a simple solution.

2 Likes

If I can scale the image by 50%, that would fix it. I'll investigate. Thanks!

Which sounds like you have a Retina display, but aren't capturing that info in the screenshot -- when you open it your software defaults to 72dpi in the absence of information to the contrary. Use @Airy's action, setting both fields to 144.

1 Like

But I don't know where to put Airy's action in griffman's or skillet's macro so that I don't get an error. I tried putting it just after the Terminal command for screencapture. Where does it go? Should it reference a variable rather than System Clipboard? Thanks!

I get the "cannot get source image" error no matter how I try to pass a new screen snapshot to the "Set Image DPI" macro, even if I feed it the exact default path name for the png file and add a significant pause (which is what we're trying to avoid here anyway). Where can I find a robust example for the use of the "Set Image DPI" macro?

I shouldn't need more help right away. I'm working with a macro entitled "Copy and Resize Finder Images", so I'll see whether I can provide any of my screen snapshot renaming macros with actions from that macro to get the required results. Thanks for your help.

I would need to see what options you used for the screencapture command. The Set Image DPI action works only in clipboards, and usually (but not always) the screencapture command outputs to a file.

Using a clipboard, either the system clipboard or a named clipboard, is your only choice.

That's probably because you didn't place any image into the clipboard that your Set Image DPI action is referencing.

Any example may not suit your specific needs. Here's an example:

Notice how the first action places an image into the system clipboard (which I'm guessing you aren't doing in your macro) and the second action sets the DPI of the image in the clipboard to 144. Notice that this doesn't "scale" the image. It just modified an attribute to tell any application how to interpret the distance between each pixel. Some applications will honour that value, and some possibly will not.


Thanks! But this needs to get the image data however the screenshot is acquired. I think that's the difficulty. For example, if the macro just looks for the screen snapshot (watched folder scenario), and I make the change to the file before it is renamed, a loop is created because in essence a new snapshot has been observed by the system. I'm still working on that case as well as the method(s) proposed in this topic (screenshot by shell command), which appears to present a different problem, that of getting the shell command result into the resize image action. I may be close to solving it, but I may not be. I'll keep trying things. Thanks again.

The solution I offered is for clipboards with images. If you are using image files instead, then you may have to know the settings of each app that created the file. I'm not familiar enough with image files to be able to help you. They come from many different applications and the solution may need to be different for each application.

Thanks. I was able to solve it, but I'm using a refined version of my old "watched folder" AppleScript macro solution that I intend to upload here. I find that it's very fast, and also that I don't need to disable default Keyboard Shortcuts in Settings. If I disable those in favor of KM, it could create an additional issue for me if KM's status is unknown or KM is disabled. I'll post a note here if I'm successful (at uploading).

OK, here's mine. I'll still keep and use yours! Thanks!