In version 10, the Custom HTML Prompt action can now display transparent, windows without titlebars. This means you have total control over what you can display, so you can display overlays or other displays in exactly what way you want. Of course, this does mean you have to do a bit of work designing the look you want, using HTML, but you can use CSS or HTML’s Canvas, or any other web page features you’d like to display the page, including animations and live updating of information.
I’ve included two examples that display a transparent red and blue circle, using CSS or Canvas:
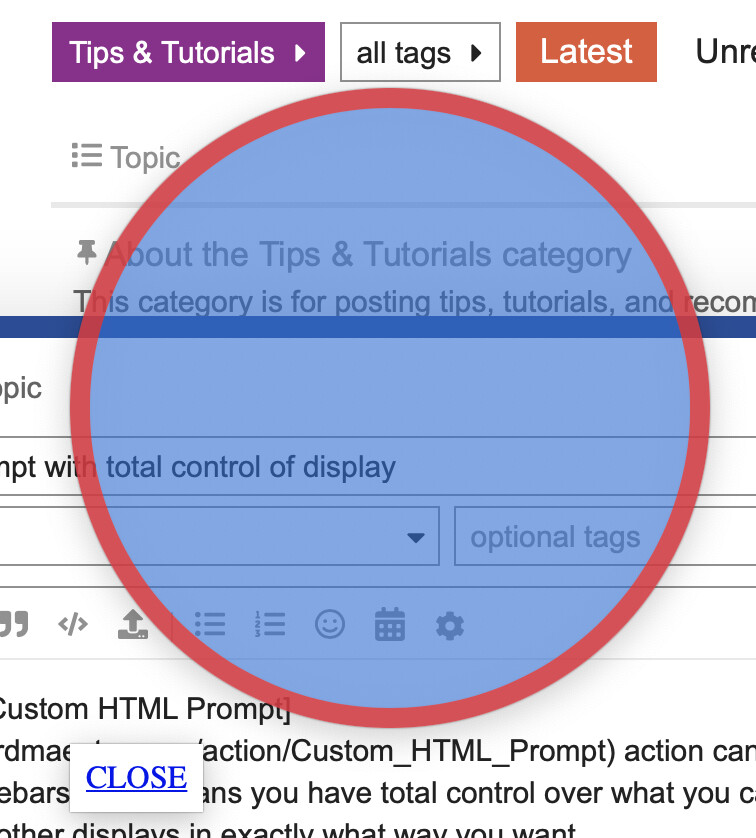
The first example uses basic HTML & CSS:
Custom HTML Prompt.kmactions (1.3 KB)
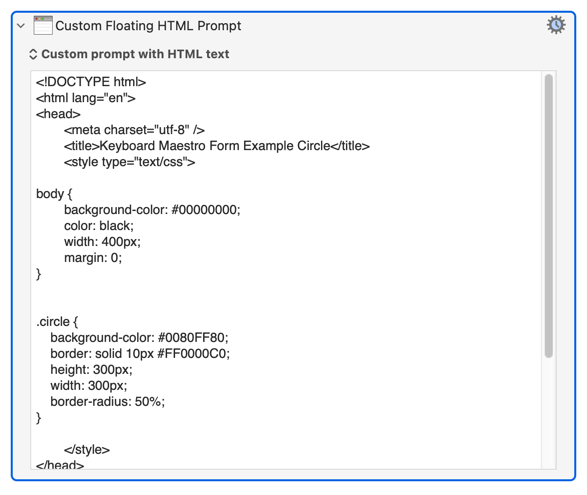
<!DOCTYPE html>
<html lang="en">
<head>
	<meta charset="utf-8" />
	<title>Keyboard Maestro Form Example Circle</title>
	<style type="text/css">

body {
	background-color: #00000000;
	color: black;
	width: 400px;
	margin: 0;
}


.circle {
    background-color: #0080FF80;
    border: solid 10px #FF0000C0;
    height: 300px;
    width: 300px;
    border-radius: 50%;
}

	</style>
</head>
<body data-kmwindow="SCREEN(Main,Left,20%),SCREEN(Main,Top,20%),400,600">
<div class="circle"></div>
<p>
<a href="#" onclick="window.KeyboardMaestro.Cancel('Cancel')" style="background-color: white; padding:0.5em">CLOSE</a>
</p>
</body>
</html>
And the second example is more or less the same, but uses the Canvas element and draws the graphics using JavaScript.
Note that Canvas fill will fill to the middle of the stroke line, so with transparencies this gives a slightly odd look, but there are lots of ways to get around this, and this is not designed as a tutorial in how to use HTML Canvas elements, there are lots of those on the web.
Custom HTML Prompt.kmactions (1.5 KB)
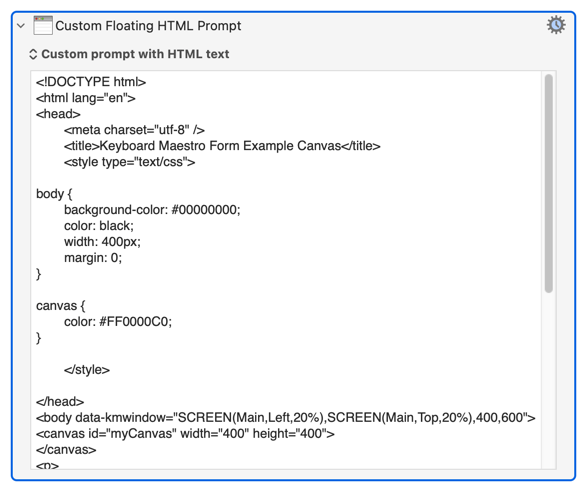
<!DOCTYPE html>
<html lang="en">
<head>
	<meta charset="utf-8" />
	<title>Keyboard Maestro Form Example Canvas</title>
	<style type="text/css">

body {
	background-color: #00000000;
	color: black;
	width: 400px;
	margin: 0;
}

canvas {
	color: #FF0000C0;
}

	</style>

</head>
<body data-kmwindow="SCREEN(Main,Left,20%),SCREEN(Main,Top,20%),400,600">
<canvas id="myCanvas" width="400" height="400">
</canvas>
<p>
<a href="#" onclick="window.KeyboardMaestro.Cancel('Cancel')" style="background-color: white; padding:0.5em">CLOSE</a>
</p>
<script>

var c = document.getElementById("myCanvas");
var ctx = c.getContext("2d");
ctx.beginPath();
ctx.arc(200, 200, 190, 0, 2 * Math.PI);
ctx.fillStyle = "#0080FF80";
ctx.strokeStyle = "#FF0000C0";
ctx.lineWidth  = "10";
ctx.fill();
ctx.stroke();

</script>
</body>
</html>
Using either of these techniques, you can display information or overlays or warnings or progress any way you desire.