Image Resizing Macro

Hi there

Please can someone help me create a macro so resize an image to Height: 580px (width can be anything), then opens the image in ImageOptim for it to be compressed using that free app's default settings.

Ideally, here's what I'd like to happen:

  1. I single click an image in a Finder location or on my desktop
  2. I hold down Command and press '2' - my shortcut combination
  3. The macro resizes the selected image to 580px high and overwrites the existing image, saving it in the same location.
  4. Then, automatically the image is opened in ImageOptim, compressed, saved and then ImageOptim is closed.

In other words, I'm looking to create a macro that will resize and compress an image.

Thanks

This is a basic draft. It will work for images with a height > 580px.

Updated download (2016-08-02):

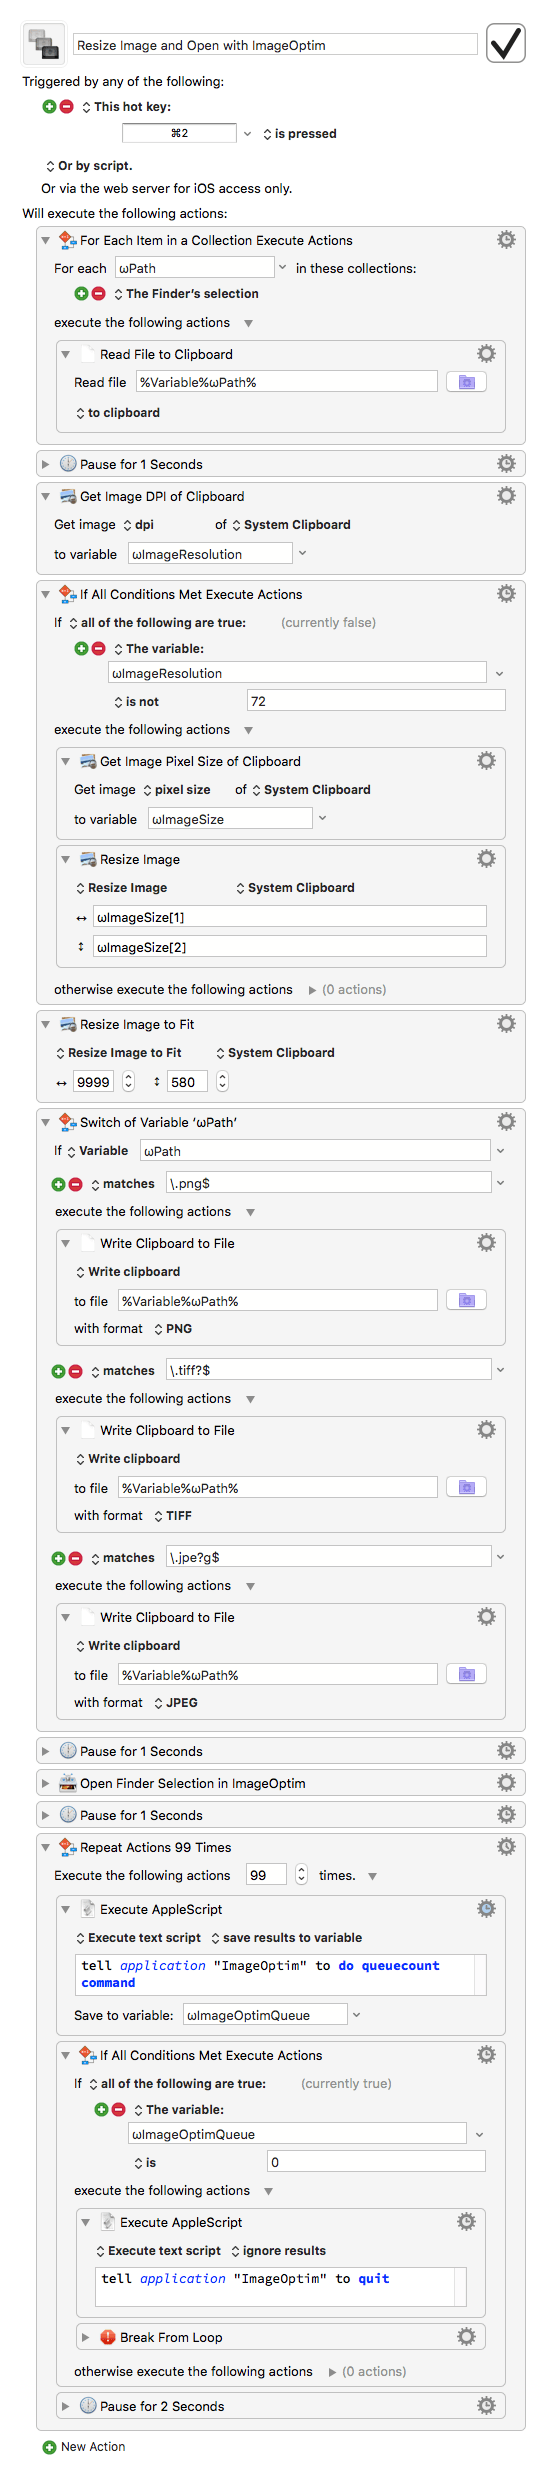
Resize Image and Open with ImageOptim.kmmacros (12.1 KB)

Edit: I added a switch for .png./.jpeg/.tiff

3 Likes

Thank you so much Tom - so to make this work for me, do I just double click the macro you included, then add my chosen short cut key?

No need to double-click it, just add whatever trigger where it says “New Trigger”.

For example from the “New Trigger” menu select “Hot Key Trigger”, then just type your desired hotkey into the field, for example ⌘2

Should look like this (at the top of the macro):


I think he meant "double-click the .kmmacros file" in order to import it.

Yes, well, thanks: single-click the link for downloading the macro, then double-click the downloaded macro for importing it, then add your personal trigger to the macro. I was —stupidly— assuming that people know that macros are importable from the link.

Edit: to make it easier: I added the the hot key trigger to the macro, so single-click the link below, double-click the downloaded macro (it will be imported to KM), and fine. Hit ⌘2 to execute the macro.

Edit: Download link in the first post updated…

@eranbeard, did you try my PNG Optimizer macro? Way better than ImageOptim.

(Shameless self promotion.)

thanks Tom. The reason I was clarifying what to do after importing the macro and creating the short cut key is that the macro doesn’t seem to execute properly. I downloaded your new version which you kindly created for me, but the same error appears - I screen shotted it, although it’s been truncated. Any ideas what the issue may be?

Yes, I’ve seen this, too. Happens for me when the height already is ≤580px.

but when the image is greater than 580, this is the error I get

https://www.dropbox.com/s/es3txl3p2h7rzyg/Banners_and_Alerts_and_Image_resizing_macro_-general-_Keyboard_Maestro_Discourse_and_Win_your_FREE__100_for_Pok%C3%A9mon_Go.jpg?dl=0

Tried it with a couple of PNGs and can not reproduce the error.

The image is OK? (Can you open it with Preview for example?)
You have tried it with different images, right?
Have you tried it in different locations (folders)?

BTW, ImageOptim doesn’t read TIFFs. Didn’t know this. (Resizing works fine though.)

Yes I’ve tried with several different JPGs. I don’t use PNGs much, so they’re not relevant in my workflow.

Different folders/locations too… :frowning:

I tried it again, with JPGs this time. Can not reproduce the error.

However, in the process I discovered another potential source of error: The KM resizing action doesn't like images with a resolution other than 72ppi. But in that case I get the “Resize Image failed to scale by 1.000…” error (not the “cannot get source” error).

This problem can be solved by “resizing” the image to its original dimensions, just before the Resize Image to Fit action:

You can download the complete macro with the Resize action added from the updated download link in my first post.

1 Like

I don’t know what you are referring to. If you have a bug with resizing an image, email me the image and the action so I can look at it. Preferably email me an image file, and a sequence like:

Read File to Clipboard
Resize Image on System Clipboard

Peter, thanks for forcing me to have a closer look into this. It’s actually a bit more complicated, and I remembered that I already had this “problem” in a slightly different context.

If the error appears depends on the actual image dimensions and on the actual resolution. But the calculation for the error threshold is quite simple: resize height ≥ image height/(image resolution/72).

That’s why it works as expected with the “normalizing” actions from my post above.

I’ve sent you a mail with a minimal macro and a couple of test images in different resolutions. Instructions in the mail.

I leave it up to you if this is a “bug” or “non-intuitive behavior” :wink:

1 Like

Thanks for your efforts Tom, but all this macro seems to do for me is run the image through ImageOptim - the dimensions stay the same. I’ve attached an example image I’m trying it on:

Yes, when the Resize action fails with a “cannot get source” error (as you mentioned above) the image won’t be resized. The problem is that I didn’t see this error not one single time, and I have no idea how I could reproduce it.

In addition, the image you uploaded seems to be OK and the latest version of the macro resized it flawlessly to 580px height.

***

What I currently don’t understand is how the image can be run through ImageOptim after the Resize action has failed. The Resize action is set to “Failure Aborts Macro”.

***

Another thing I noticed is that the height of your example picture is 1160px, and according to the JFIF header it has been stored at 144ppi.

Can you verify if the original height of the image was in fact 1160px, or maybe a little more, like 1200 or so?

(I’m asking because 1160px = 580px*144/72, which corresponds to the formula in my post above.)

***

Could you also verify that you are really using the latest version of the macro, that is, the one with the actions for resetting the image to 72ppi.

(When you import a new version of a macro that already exists in the KM Editor, it can be confusing, because both are enabled. It already has happened to me, too, that I downloaded a new macro version and than accidentally disabled or deleted the new one in KM Editor.)

Or, if you are not sure, do just this:

  1. Delete all old versions of the macro in KM Editor; delete all old versions of the .kmmacros file in your Downloads folder.
  2. Download the new one from the updated link in my first post.
  3. Double-click the .kmmacros file in your Downloads folder.

Hey Tom

I really appreciate all your help but this is getting way too complicated. All I want is a simple way to convert any image with a size over 580px wide to 580px wide. If it makes things simpler, we can remove the ImageOptim element.

Previously I’d have dropped the image on a Photoshop droplet I have on my desktop that automates the task. I created a macro that did this, but for some reason my computer’s CPU went through the roof after I ran it (something to do with pausing untill Photoshop had completed I think).

Is there a simpler way to accomplish this?

Hey eranbeard,

Well, it’s you how decides if you want to drop your project.

Until now I wouldn’t call it “complicated”. I would rather say the “cannot get source” error has stopped you in the tracks before the project had a chance to become complicated ;-).

As mentioned, I cannot really help you with this error. Since you get this error with various images and in various different locations on your disk, something big must be wrong. You should maybe even consider reinstalling KM. (BTW, you are using a more or less recent version of KM, right? Not version 4 or 5 or so?)

However —as said— it remains the mystery how the macro can continue after this error with the ImageOptim part. Because of that my suspicion was that either you are inadvertantly using an old version of the macro, or that the macro has been changed or damaged somehow.

That’s why I recommended you to start over with a fresh download of the current version of the macro.

If with “too complicated” you mean the informational content of some of the posts here, then let me assure you, you can completely ignore…

  • post 12 (the shown actions are integrated in the latest macro version)
  • posts 15 and 16 (these were not meant for you and don’t affect your current problem)

If it makes things simpler, we can remove the ImageOptim element.

You can remove this part entirely without problems. But it won’t help you because it’s not involved into the image resizing action at all. It’s just the second half of the macro which will be executed after the first one has finished.

But removing it won’t harm either.

Is there a simpler way to accomplish this?

There is an app that is specialized in all kind of batch image manipulations. It’s called GraphicConverter and it costs $40. This is a bargain, especially if you do this kind of stuff often (e.g. resizing, scaling, cropping, adjustments, effects; either in batch mode or individually. It can even crop JPGs losslessly, i.e. without recompression).

So you could…

  1. set up a batch action in GraphicConverter (this is simple: you set the input and output folder and add the appropriate action, in this case: “Scale (Long Edge)”,
  2. then drag all the resized images in the output folder into ImageOptim.

Highly recommended :slight_smile:

1 Like

For the next versions, I have adjusted the resizing actions so they always operate on pixels, regardless of DPI.

2 Likes