A few years back, I wrote a simple macro timing tool to help optimize some routines I was writing. This worked great, and I'm still using it today. At least, I was until I realized I wanted a better timer…
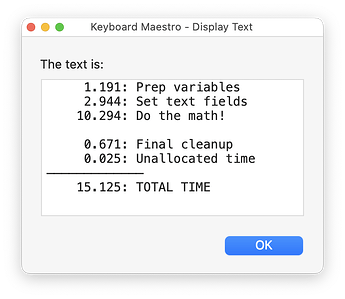
The main limitation on the previous timer was that you had to stop and start it each time you wanted to use it. I wanted a timer I could start at the beginning of the macro, and then have it record task times for various sections of the macro, and generate a report at the end, something like this:
It needed to be simple to use, and have minimal overhead (as shown in the "unallocated time" line)… and yes, that's a screenshot of my new MultiTimer, which meets both those criteria. It works very similarly to my first timer, in that it uses passed parameters in the Execute Macro routine to decide what to do.
────────────────────────────────
__ MultiTimer 1.4 Macros.kmmacros (576 KB)
────────────────────────────────
May 12 2024: Version 1.4: I added a new parameter, endquiet, which suppresses the final report. If you start the macro with startquiet-silence and end it with endquiet, you won't see anything onscreen at all. But the total time taken will be available in the instance_TimeTaken variable. (This variable is available regardless of parameters used.)
I also moved the documentation out of the main macro into its own Read Me, and did a bit of cleanup and clarification of that documentation.
Previous versions
Nov 11: Version 1.3: Adds the ability to set the desired precision in the output—see the example below for how to do that. I couldn't figure out how to do this, but Peter helped me out with the complex substitutions required to pull it off—thanks!
Nov 9: Version 1.2: This is basically a total rewrite, as my misunderstanding of the Calculation action's With Format option caused the macro to break for those who use commas as decimal separators. Basically, if you use the With Format option, you can't use that variable in a future calculation, as it will fail if it's got a comma in it. The macro now uses display variables and calculation variables to work around that issue.
There are also new start modes, including startquiet-window to have the final total time taken message appear in a window, and startquiet-silence to not see that time taken message at all (you'll still see the report).
Finally, if you preface a task name with a + sign, i.e. +Added up all costs, then a blank line will be inserted in the report above that task name (the plus sign won't show in the report).
Oct 20: Version 1.1: This contains one very nice improvement: If you call the timer with start### or startquiet###, the timer will be disabled.
Why did I add this feature? Because after using my new timer for a few days, I realized I didn't need to see the timers every time. But with a dozen or more calls to the timer scattered in my code for various tasks, it was a real pain to disable every single call to the timer. Now I can disable the timer by simply changing the start value in one call, and enable it again just as easily by removing the pound signs.
Oct 19: Version 1.0: Initial release
────────────────────────────────
HOW IT WORKS
It first checks for the 'start' keyword variations to start the timer. Add three #s anywhere in the first timer call, and you'll disable the timers. (See above for why that's useful.)
Any time it's called with a parameter that doesn't match one of the 'start...' or 'end' keywords, MultiTimer records the time since the last such call (or since timer start). And it uses the parameter as the description of the event it tracked. Add a plus sign to the task name to insert a blank row above it in the output.
USAGE
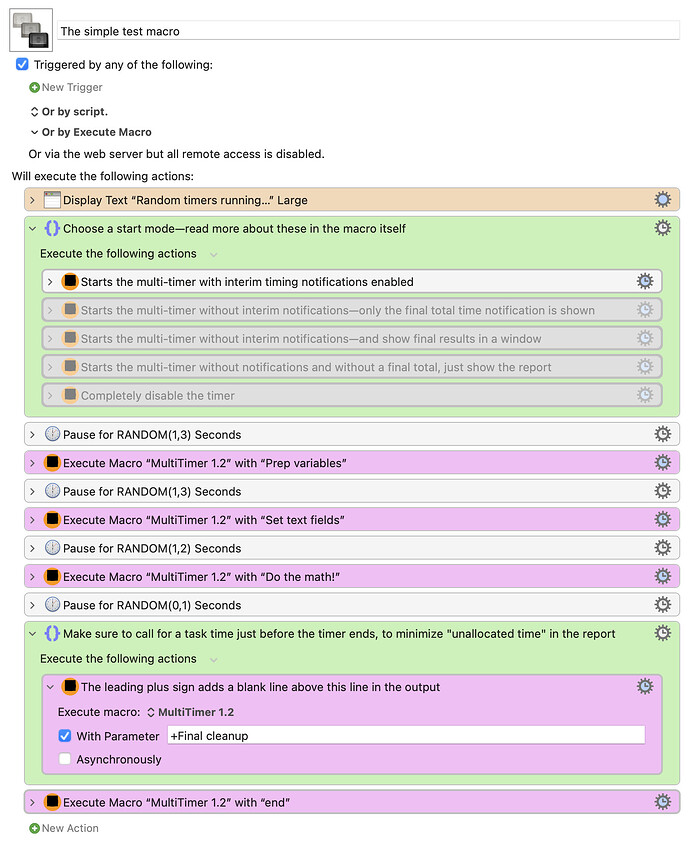
This is all much harder to describe than it is to use; here's how it looks in the included demo macro that created the above report:
With MultiTimer, I now get a report on how long each section of the macro took to execute, and by using passed parameters as the description for those events, pasting one macro call is all it takes to get a new task added to the report.
As much as I liked my first macro timer, this one is a much better tool to help me understand where to focus my time on performance improvements in complex macros.
SETTING PRECISION
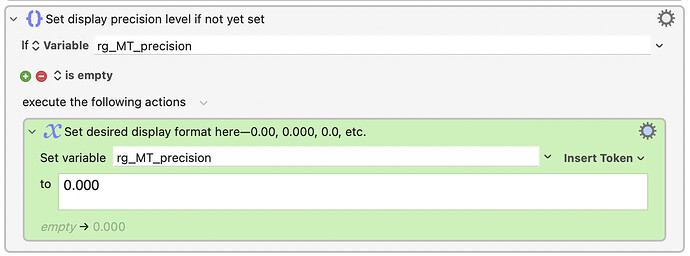
Version 1.3 includes the ability to set the precision of the results—0.00, 0.00, etc. This requires changing two things in the macro: The precision itself, and the required padding. The precision is set at the top of the macro:
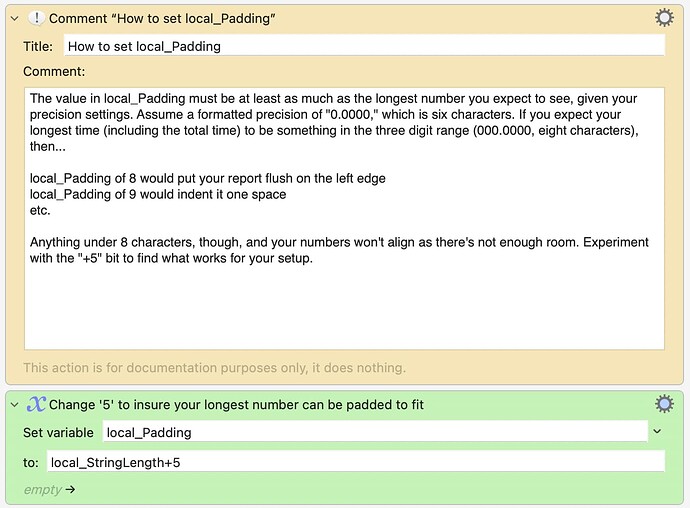
You also need to set (or at least check) the amount of padding, and that's much further down in the macro, in the section that handles the end parameter:
The comment text explains why this value is important, but basically, you need to set enough padding to allow the macro to align all your numbers at their stated precision, based on the length of the largest value.
It's tricky to explain, but easy to see in action with the test macro, so play around with the random times (in the test macro) and padding values (in the macro itself) to see how it works.
-rob.


