Install Image Magick from ports:
$ sudo port install ImageMagick
Install Tesseract from ports:
$ sudo port install tesseract
Install language files for Tesseract, eg.:
$ sudo port install tesseract-eng
Drop the "Get Text From ScreenShot.zip" file on the Keyboard Maestro
application dock icon to install it.
Upgrading
You must delete the "Get Text From ScreenShot" folder from
"~/Library/Application Support/Keyboard Maestro/Keyboard Maestro Actions/"
before installing the upgrade.
$ rm -rf ~/Library/Application\ Support/Keyboard\ Maestro/Keyboard\ Maestro\ Actions/Get\ Text\ From\ ScreenShot
Usage
Add "Get Text From ScreenShot" action from the "Third Party Plug Ins"
action category to your macro.
Specify the area to inspect and what you would like to do with the output.
Parameters:
X: absolute, screen X coordinate
Y: absolute, screen Y coordinate
Width: distance, in pixels, to move right of X
Height: distance, in pixels, to move down from Y
Results paths: specify a variable or clipboard for text
###Change Log
2014-12-11 Initial version
2014-12-19 Cleanup and documentation (README.txt)
2014-01-14 0.0.1 released
2014-01-15 0.0.2 use $PATH to find tools
2014-01-16 0.0.3 added User Interactive checkbox
                 added Remove Newline options (None, All, Join, Trailing)
                  - "None" will make no changes to tesseract output
                  - "All" will remove all newlines
                  - "Join" removes all newlines, then joins lines with spaces
                  - "Trailing" removes trailing newlines
                 reworked newline munging to avoid perl call
Wow, this is awesome! One note: I used brew to install tesseract & imagemagick. just had to change the /opt/local/bin in the script to /usr/local/bin. Not sure why the which based fallbacks didn't work.
Also, I went ahead & created a macro that utilizes this plugin. It waits for the user to click the top left, then bottom right of a region, feeds these coordinates to the plugin, then outputs the OCR'd text to the clipboard.
I've pasted it below as text & a screenshot. Thanks!
OCR Text to Clipboard
Triggered by any of the following:
The Hot Key C is pressed
Will execute the following actions:
Comment ‘Info’
This macro utilizes the "Get Text from ScreenShot" plugin found here:
It will wait for 2 clicks from the user, corresponding to the top left corner and bottom right corner of the area you would like to OCR. Afterwards, it will pop up the text in a notification, and place it onto your clipboard.
Notification ‘Click the & ’
Subtitle: of the text you want to OCR.
Pause Until All Conditions Met
The calculation ‘MOUSEBUTTON()’ returns true (non-zero)
Set Variable ‘xx’ To Calculation
MOUSEX()
Set Variable ‘yy’ To Calculation
MOUSEY()
Highlight Target at MOUSEX(),MOUSEY(),50,50
Animate and display for 1 seconds.
Pause Until All Conditions Met
The calculation ‘MOUSEBUTTON()’ returns true (non-zero)
Set Variable ‘width’ To Calculation
MOUSEX()-xx
Set Variable ‘height’ To Calculation
MOUSEY()-yy
Highlight Target at MOUSEX(),MOUSEY(),50,50
Animate and display for 1 seconds.
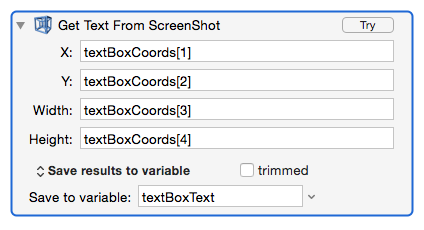
Get Text From ScreenShot
X: xx
Y: yy
Width: width
Height: height
Save trimmed to variable ‘ocrtext’.
Notification ‘OCR'd Text’
%Variable%ocrtext%
Set Clipboard to Text
%Variable%Vocrtext%
Set Variable ‘yy’ to Text
%Delete%
Set Variable ‘width’ to Text
%Delete%
Set Variable ‘height’ to Text
%Delete%
Set Variable ‘xx’ to Text
%Delete%
Set Variable ‘ocrtext’ to Text
%Delete%
"which" searches the path, as stored in the PATH environment variable. The PATH you use in the Terminal is based on your shell profile settings (eg .cshrc, .profile, etc). The PATH you get when you run a script within Keyboard Maestro is based on what the OS sets for Keyboard Maestro, and thus is typically very simple, usually just "/usr/bin:/bin:/usr/sbin:/sbin"). This is because Keyboard Maestro invokes the shell as a non-interactive shell, and the shell does not process any of those profiles setting files when invoked in non-interactive mode.
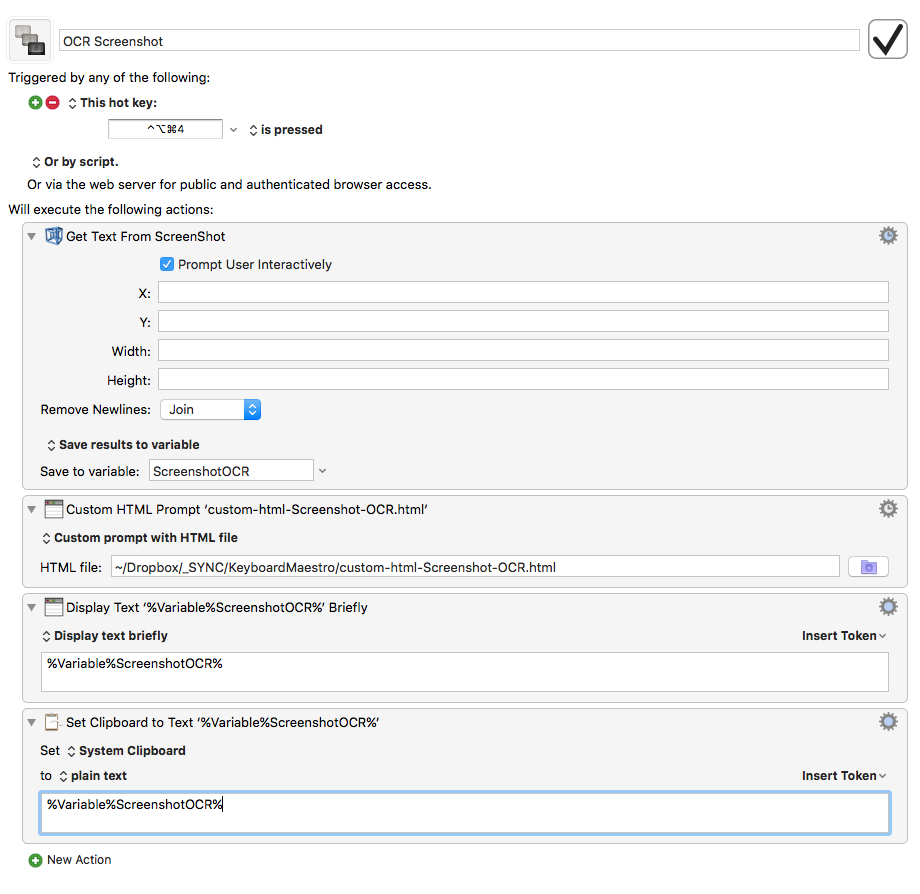
I added a "Prompt User Interactively" checkbox. When checked, the user can select the area they'd like inspected. Ideally, this checkbox would grey-out the coords fields below, but I don't think that's possible.
I also tweaked how it handles newlines, to give the user more control over how they're dealt with.
I know it is an old post, but I have only just discovered Tesseract and since installing it and this plugin, I have found it quite useful and use it regularly.
It is especially useful (and more reliable) copying text from webpages. There seems to be a weird behaviour where Chrome will sometimes copy the text you have highlighted, and sometimes it doesn't.
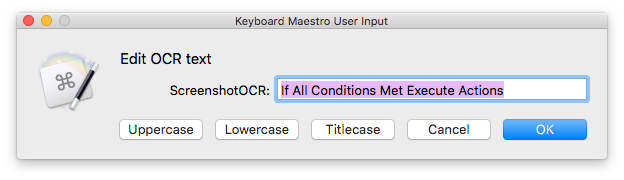
Here is a Custom HTML Prompt I use that gives me the option to edit the text and/or change the case before sending it back to Keyboard Maestro.
The same thing can easily be done all within Keyboard Maestro (see the screenshot at the end of this post) but I couldn't find a way that allowed me to edit the text using a multiline field.
Demo
Download Macro and HTML file (includes two macros one with the HTML stored in the macro, one using the external HTML file)
He mentions some tools like http://brewformulas.org/Poppler which includes pdftotext as a useful way to extract already OCR’d PDFs and Abbyy which is what they used since Tesseract doesn’t handle tabular data. Their Mac version is pricey and is always a step or two behind the Windows version, but I’m interested in learning more API programming and feel that their cloud OCR service could be a really good automation candidate (ocrsdk.com).