Well, it was the wellknown Error 40, (me) that caused the whole mess.
Importing your macro it landed in its own group.
I enabled the macro and checked the shortcutkey was correct.... AND... it was just 5 minutes ago I realised thatt the GROUP should ALSO be enabled...
why this took so long... well in my tinkerings with Scrivener I dived deeep and hmmm happened to tickle one of its 'Dark' settings so BOOM scrivener crashed, and once up again it needed to rebuild indexes... and I had 4 projects open... sigh
So tomorrow I'll promote you fine Macro to my special group.
I dont know where you live, but This calls for a (virtual) Carlsberg.
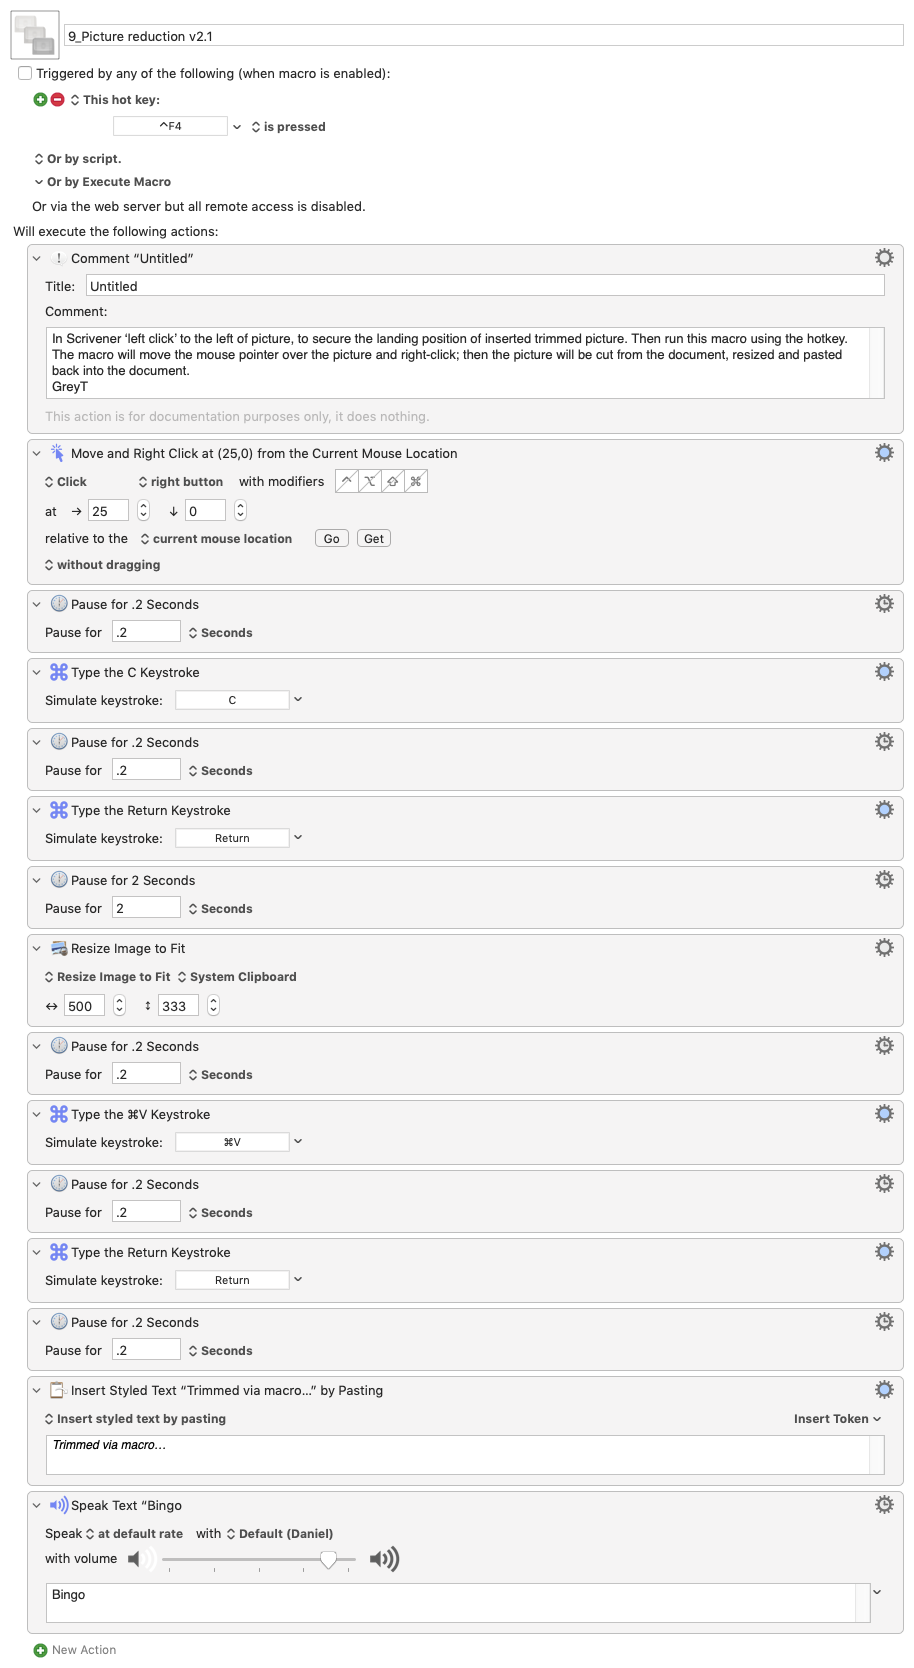
I haven't been happy with the way you have to manually move the mouse pointer over the picture before running this macro after you've clicked to the left of the picture when KM can do this for you quite easily.
So I've done one last tweak to produce hat is now v2.1 of the macro.
The "tweak" is the first action now moves the mouse pointer 25 pixels to the right (which hopefully is within the area of the picture) before performing the right-click.
So, to run the macro all you need do is this:
Left click your mouse at the left of the picture (as usual)
Found out that I dont realy need to move mouse, I can just use arrowkeys...down/up will do, and then run the macro...COOL
And inspired by your macro I made a shorter morphed version, to show, temporarily, the size of a picture. If I consider it needs resizing I just run your macro... without having to move cursor
I think I got the KM-infection so I have made a combo with a choice in it, and it works.
The keys used are realtive to my right hand (I use mouse by left hand, and the keyboard has numeric pad on the right side too).
Only thing on the aestetic side is that the "diagnostic description" may be close to picture or at a slight distance, depending on the formatting of the imported text (space before/after paragraph) but that I can accept.
Hi
After a lot of usefulness, I 'think' I need a small trimming og your macro, but due to (my) age or whatever I cant really pinpoint a macro solution!
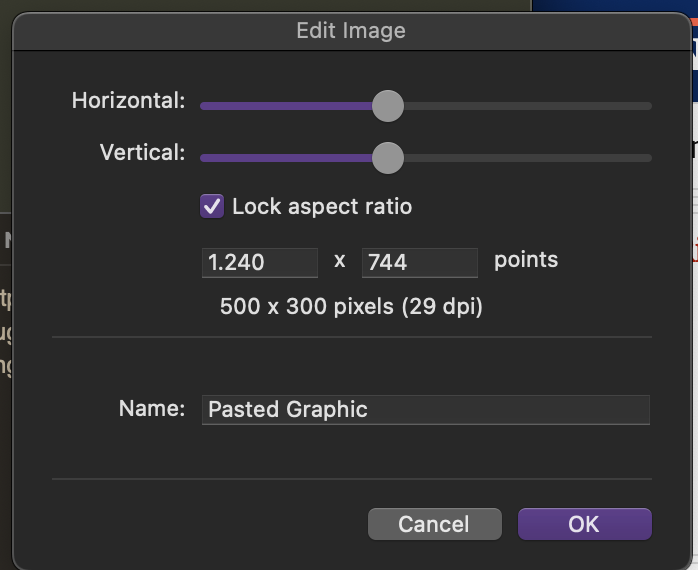
'The ting is that, depending on the pixelsize of the original picture, the endresult shown will keep/remember the size and then reduce the dpi... it will fit into my document, but sometimes the quality is sort of "thin"... so in these instances I simply use the manual "scale image" so it will be shown as the expected 500 pix.
Is there a (simple) way to achive this???
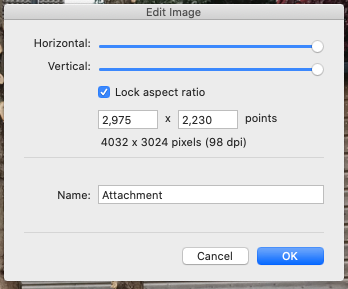
I attach a screenshot of a reduced by your macro, so I want the 1.240 pix to be 500 pix
Hi Palle - I'm having trouble understanding the problem so I thought I'd just outline my thinking to you.
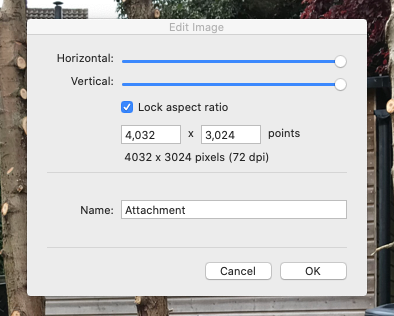
Here's a screenshot of the Scrivener Scale dialog for an image of mine in its original state:
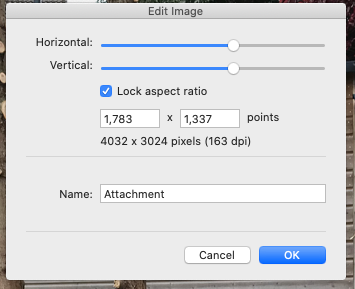
And now here's the same dialog after I've moved the sliders to scale down the image size:
As you can see - where I've scaled down the image size the dpi has increased and not decreased as in your screenshot.
By way of explanation, since "dpi" relates to how a graphic is printed (on paper or the screen) a larger dpi will print smaller for a given pixel size. For example, an image that measures 72 pixels will result in a print that's 1 inch in size at 72 dpi. If I then print that same 72-pixel image at 36 dpi, it will produce a 2-inch print - that is larger and not smaller. (My apologies if you already understand this...)
So what's happening is, so far, what I would expect given we're talking about "scaling" an image.
Now it gets strange. Having saved my document then going back to the image and bringing up the Scale dialog this is what I see:
OK - it's the same as the previous one. If, however, I now try to scale the image back to its original size by moving the sliders to 100% I get this:
Which is plainly incorrect and I would say this is a bug in Scrivener. If this is what you're experiencing, then do report it as a problem to L&L.
I'm still a bit puzzled because I'm not sure what you meant by "thin": maybe you can post an example? And I'm not yet sure how I can help you tweak the KM macro appropriately.
Hi again
Maybe its an error 40... me not not really grasping what I try to explain
But basicly (no matter what the reason for the "error" is)
I simply want to add these steps ( or the effect of them):
rightclick on picture
Scale immage...
manually enter 500 (points) in the left box
click OK (or press enter on keyboard)
I have tried this both before and after running the macro, it seems to give same results.
My goal is to keep the size (in MB) of picture Small/decent. Some webpages will sport fullframe photos, at 40MB each, and as I may have mentioned before, I was not aware of this so my project inflated way up in size (GB).
I keep most pictures as reference only, not for optimal quality.
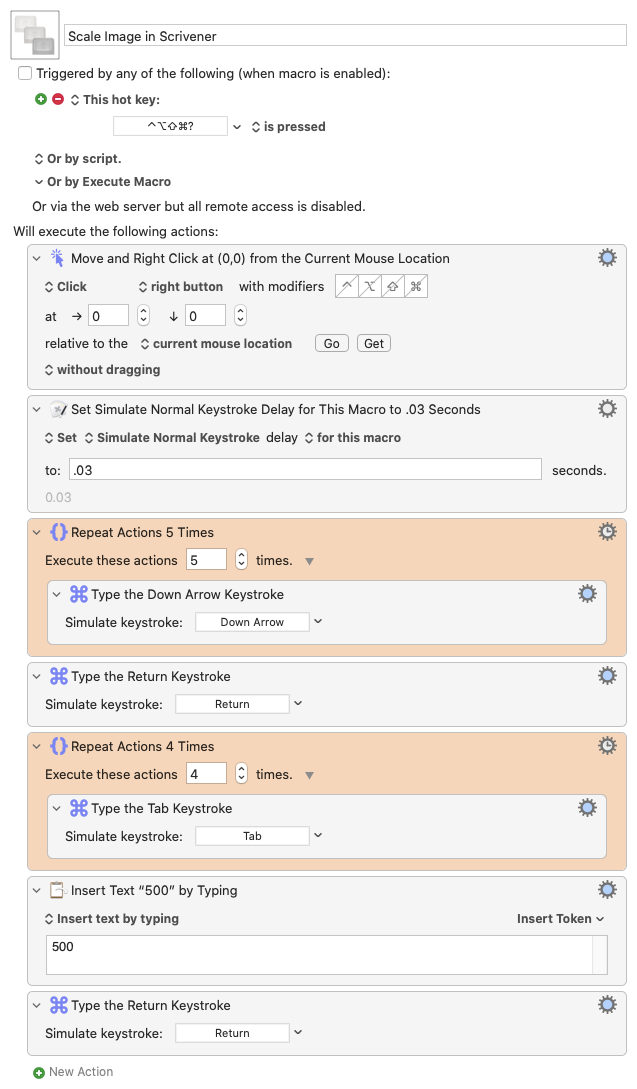
OK. I already have a macro for scaling images in Scrivener. Here it is:
Download Macro(s): Scale Image in Scrivener.kmmacros (5.7 KB)
(Updated in a later post.)
Macro-Image
Macro-Notes
Macros are always disabled when imported into the Keyboard Maestro Editor.
The user must ensure the macro is enabled.
The user must also ensure the macro's parent macro-group is enabled.
System Information
macOS 10.15.7
Keyboard Maestro v10.2
It's in a macro group called "Scrivener" so make sure it's moved to an (enabled) group of your own and change the hot key trigger to one of your liking.
Make sure your mouse pointer is over the image you want to scale before triggering the macro.
Looking at your original macro v2.1 I just wonders if this step could be trimmed to something other than "system clipboard"? because otherwise it is the exact size I need/expect
Well yes it can be trimmed to anything that is of a clipboard nature - like a named clipboard. So I guess the answer is "no", not for this purpose.
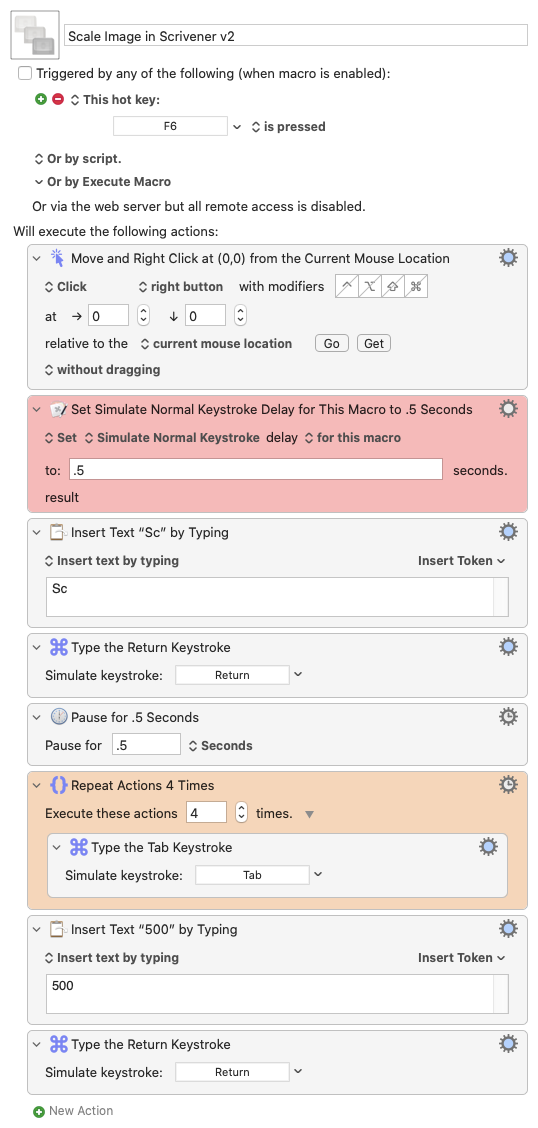
Well that's puzzling. Whenever something like that happens to me it's usually caused by timing issues - you know, the Mac can't keep up with the typing speed. So I've modified the macro I just posted. Here it is:
Macros are always disabled when imported into the Keyboard Maestro Editor.
The user must ensure the macro is enabled.
The user must also ensure the macro's parent macro-group is enabled.
System Information
macOS 10.15.7
Keyboard Maestro v10.2
Note: As before move the macro into the macro group you use for Scrivener and also changed the hot key from F6 to one of your own choosing.
I've put in quite long delays in this macro so you can see what it is doing. Once you're satisfied that it's working, edit the red-coloured action and change the value from 0.5 to something more reasonable like 0.1 . You could go even less to 0.05 which works on my fast-ish Mac, but your Mac will be different.
BINGO and thanks
this version works, and I have (also) put it at the end of the first macro, and reduced timing to 0.1 SEC... so new inputs will get full treatment, and previous "leftover pictures" can simply be set to the desired 500 points
speedy?
well I am running it on a Mac Studio M1 Max so I am fairly up to speed
Hi
It is remarkable to see the new macro is working, and very confusing for my actual macro knowledge, because I have never used “Inser text…” nor “Set Simulate…” nor “Repeat action…”. In reality I have always stuck to the basic (oldschool) options, sort of ‘record all the mouseclicks/ keystrokes” and then kept every ‘window’ at exact size and placement.
beginning with KM I let myself be challenged to learn new tricks, and that is fun.
so my question is: how did you know that ’Sc’ would find the rigth place for the ‘ Tab’ to work?
GreyT
ps: I have changed the value to 550 so I can know by its slightly wider shape than the default 500 that this picture has been treated by the’tiffle-action’
Whenever a contextual menu like that is showing you can usually just type one or two characters of the item name so I tried it in Scrivener and found that Sc was needed to specify Scale Image… since typing just S on its own selects the earlier menu item that begins with an “S”.
Once the scale image dialog is showing I just tapped my Tab key until I got to the width field and that told me how many times I had to set the Repeat action to.
Easy when you know how!
If you can manually type something on the keyboard to achieve an end result then it’s easy to get KM to tyoe the same key sequence to get the same result.
Good to know... that there are more options... and forum-members that can support me.
As it is now, It works excellent and makes my use simpler and straightforward.
Shortcut key combos have been trimmed so now I use these, simple and handy combinations:
1: ctrl pagedown runs both macro (via tiny twoline macro)
2: alt opt pagedown runs the trimmed by... macro
3: cmd pagedown runs the new size macro
Update on using the 2 "tiffle" macros.
Using them gives me substantial benefits while working with my rather large Scrivener Projects.
It is quite natural now, to select and treat any picture in the document, knowing the digital size will be reduced, and keeping the final visual size (I have settled for 505 in with).
To get some facts on size-reductions, I used a project from 2022, which as such is in fixed number of documents:
Projectsize: 14.640 MB (before)... 14.300 MB (after)
Number of all documents: 3.665
Number of "tiffled" documents: 166
This gives a reduction of about 48% for the 166, and about 2% for the whole project.
so now it is indeed time for to tiffle