Michael Tsai’s EagleFiler is a long-standing and excellent organizer/archiver for mails, web pages or any other kind of documents or information.
EagleFiler also has a handy Capture feature, which allows you to quickly import a web page or a file to an EagleFiler library. You usually trigger the Capture with a the Capture key (default: F1).
Capture is perfectly fine if you have exactly one EF Library. If you have several libraries you’ll come across a problem: The Capture always saves to the frontmost library. Chances are good that this is not the library where you want to save the item to.
To get the item into the desired library EF offers two options, both of them rather clumsy:
More…
- You choose the library from the Drop Pad: Problems: it’s not a floating window; it adds the additional step of going through a pop-up menu to select the library. ➜ If you want to improve the Drop Pad’s behavior try my Raise EF Drop Pad macro.
- You initiate the Capture as “Capture with options”: it also adds the additional step of going through a pop-up menu.
That’s where these macros comes in.
The idea for the macros comes from a post on the EF forum.
What the macros do
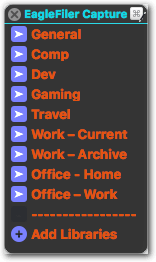
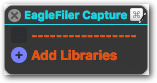
They show you a palette with all your EF libraries.
 ➜
➜
By clicking on a library you perform a Capture directly to that library:
- A normal click on a library triggers a Capture to that library.
- A Control-click triggers a Capture with options .
- A Shift-click triggers a Quick note (Quick entry).
You can also perform Import actions (to get only the selection):
- A Command-click triggers the EagleFiler: Import service.
- A Command-Control-click triggers the EagleFiler: Import with options service.
Note…
The two Import actions rely on the default shortcuts for the service workflows (⌘% and ⌥⌘%). If you have changed the shortcuts, see section “Hints and troubleshooting”.
Configuration
The macros come as a macro group. By default the group is set to show the palette for one action when you press F2. (After clicking the palette goes away.) You can change the trigger in the macro group settings.
To customize the modifier keys for Quick note, Capture with options, Import, etc., open the EagleFiler Capture macro und set the keys in the green actions.
Examples for more customization…
- Display the palette always until F2 is pressed again.
- Make the palette appear under your mouse pointer or put it at the edge of the screen.
- Make the palette shrink or not shrink.
- Change the theme of the palette.
How it works
The macros work like this:
-
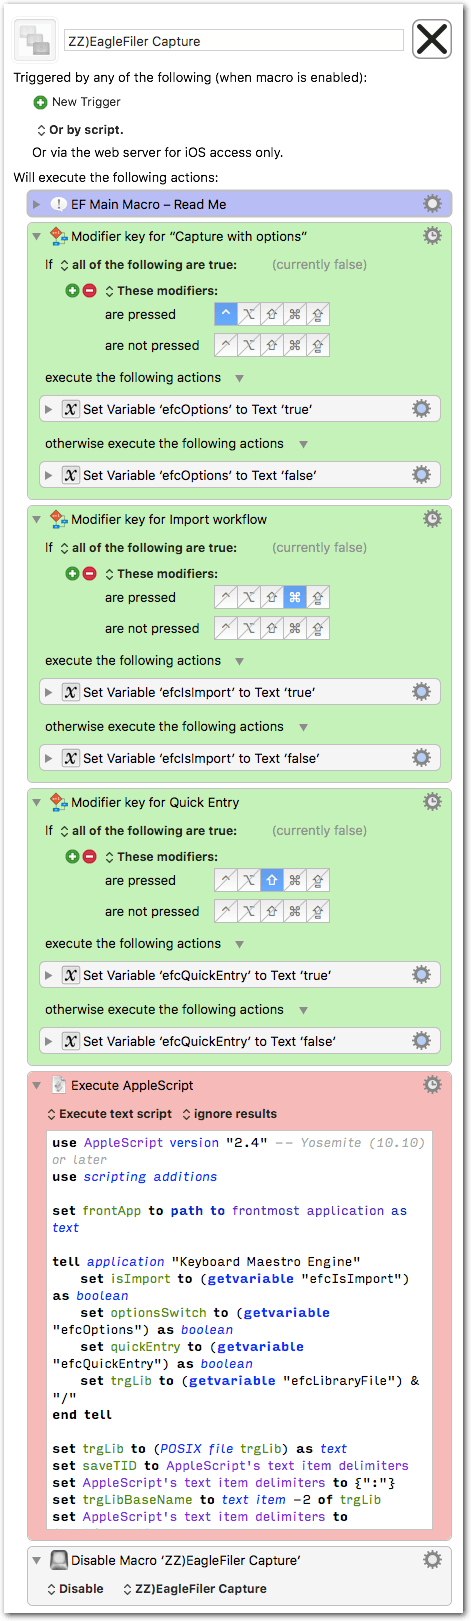
There is one main macro, called EagleFiler Capture.
-
It does all the work: it checks for modifier keys and performs the desired action. Normally you shouldn’t have to touch this macro.
-
There are several library macros.
-
These are the macros that appear in the palette. Their only job is to activate the main macro and to tell it to which library the Capture should go.
-
Each library macro corresponds to one EF library on your disk.
First setup
After installing, the macros don’t know where your EF libraries are.
The virgin palette looks like this:
…and the macro group like this:
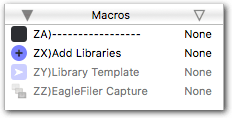
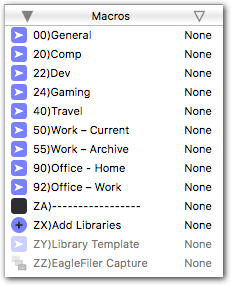
To make the whole thing work, we need to have the same number of library macros as we have EF libraries, and each of them must hold the path to a specific EF library.
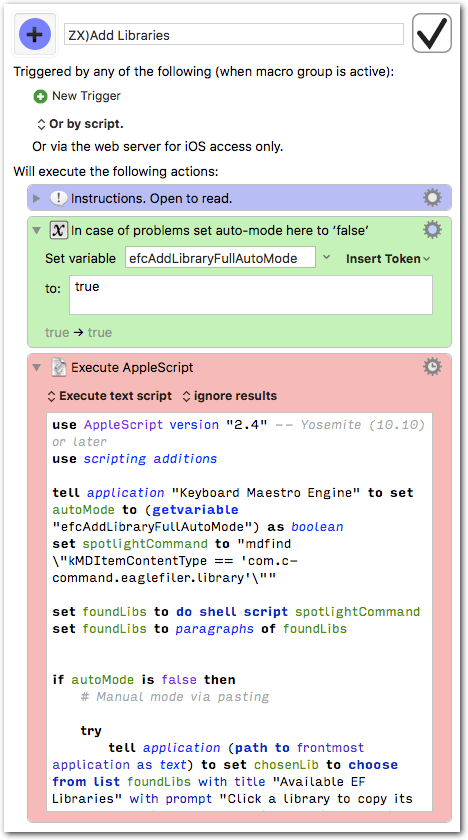
Helper macro Add Libraries
To make the setup easy the macro group contains a helper macro, called Add Libraries. It’s visible in the palette.
So, let’s build our library macros:
-
Type the hotkey (default F2) to show the palette.
-
Click the Add Libraries macro in the palette.
- Now you should see a window like this:
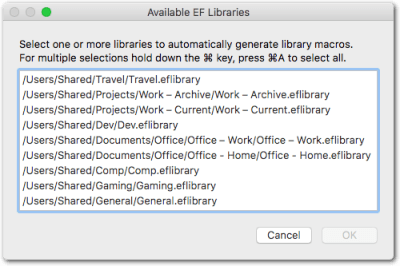
- It shows you all your EF libraries.
- Now you should see a window like this:
-
Choose the libraries you want to add (⌘-click for multiple selections) or select all (⌘A) and click the OK button. The helper macro now starts its magic to automatically generate the library macros…
Details…
In auto-mode the helper macro…
- duplicates the Library Template macro,
- inserts the path of the EF library into the duplicated macro,
- renames the duplicated macro to the name of the EF library,
- and repeats this for each library you had selected.
The macro group should now be populated with library macros:
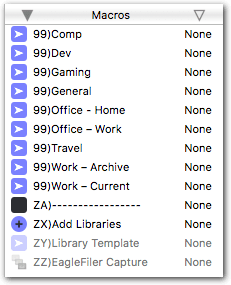
As you see, all new library macros are prefixed with “99)”. You can change the prefixes so that they appear in the desired order:
 ➜➜➜
➜➜➜
Ok, that’s all.
When you create a new EF library in the future, just launch the Add Libraries macro again to add the new library.
Hints and troubleshooting
- The Import functionality relies on the default shortcuts for the EagleFiler: Imports (⌘%) and EagleFiler: Import with options (⌥⌘%) services. If you have changed these shortcuts, do the following to adapt the macro:
More…
- Open the EagleFiler Capture macro in KM Editor.
- Go to the red action that contains the AppleScript.
- Scroll to the bottom of the script and look for the two instances of
keystroke "%". - Set the correct shortcuts and the correct modifier keys there.
-
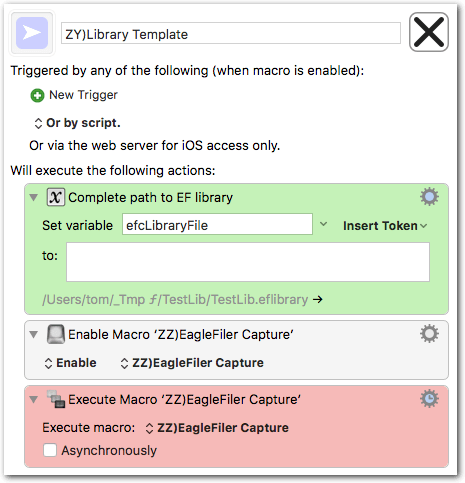
The EagleFiler Capture and the Library Template macro are disabled. Leave them disabled. They will automatically be enabled when needed.
-
Do not rename the ZY)Library Template macro.
-
For the Add Libraries macro to work your EF libraries must be in a Spotlight-enabled directory.
-
The Add Libraries macro relies heavily on UI scripting. I have tested it on two computers with Sierra and El Capitan with KM 7.3.1. But that does not mean it will run on your computer, too. (The Capture macro itself does not rely on UI scripting.)
-
If Add Libraries fails to auto-generate library macros, do this:
- Activate KM Editor manually and try again.
- If it still fails you always have the option to completely disable automatic mode:
- Open the Add Libraries macro in KM.
- Go to the green action (“In case of problems…”) and replace
truewithfalse. Now the macro will work in manual mode.
[details=Adding libraries in manual mode…]
- Launch Add Libraries.
- You’ll see a list of your EF libraries, as shown above.
- Select an item (in manual mode you only can select one) and click OK.
- The library path gets copied to the clipboard. Nothing more happens.
- In KM Editor duplicate the Library Template macro.
- Paste the path into the text field of the green action (“Complete path to…”) of the duplicated macro.
- Rename the duplicated macro to the name of the EF library.
- Repeat for every EF library.[/details]
-
To capture to the same library as the last capture you can click the separator.
-
Duplicate the separator to organize the libraries in the palette.
EagleFiler Capture Macros.kmmacros (24.8 KB)