Anyone know of a way to invert the colors of a screenshot image before sending it to OCR? The Tesseract OCR is only trained on dark text on a light background and performs pretty horribly when it is light text on a dark background.
@Ryan_P, Did you find the solution?
About controlling Preview via Applescript: Help: Change the Color of the Selected Object in Preview
I also have this same question and problem. It's a serious limitation of the OCR feature for automation purposes.
I am wondering if anyone got any further with this? I.e. Automating the Inversion of Captured Images prior to applying OCR?
Currently applying OCR via Keyboard Maestro to this image:

Returns: "21/"or "paw" "Pv" i.e. different and wrong every time.
Applying OCR to the same image, inverted:

returns the answer "217" consistantly.
I am wondering if there is any Script that could be called by Keyboard Maestro to invert a captured image before applying the OCR?
It's exactly the same question asked at the head of this thread but so far no answers other than manually inverting the image each time.
(I've tried searching for AppleScripts that might do this and could be incorporated into Keyboard Maestro but again no luck so far.)
Hi Zabobon
If you have Imagemagick installed it can be done with this macro.
OCR inverted screenshot Macro (v9.2)
OCR inverted screenshot.kmmacros (2.3 KB)

2 Likes
Thanks @JimmyHartington - I looked for Imagemagick but the installation of it seemed a bit scary for me as I wouldn't know what I was doing following the installation steps...
But maybe your approach can work with other Apps. Ideally making use of Preview. Keyboard Maestro has some image manipulation built-in but not inverting.
For installation of commandline tools I use the package manager Homebrew.
So first install homebrew from this link: http://brew.sh
Then run the command brew install imagemagick in terminal.
1 Like
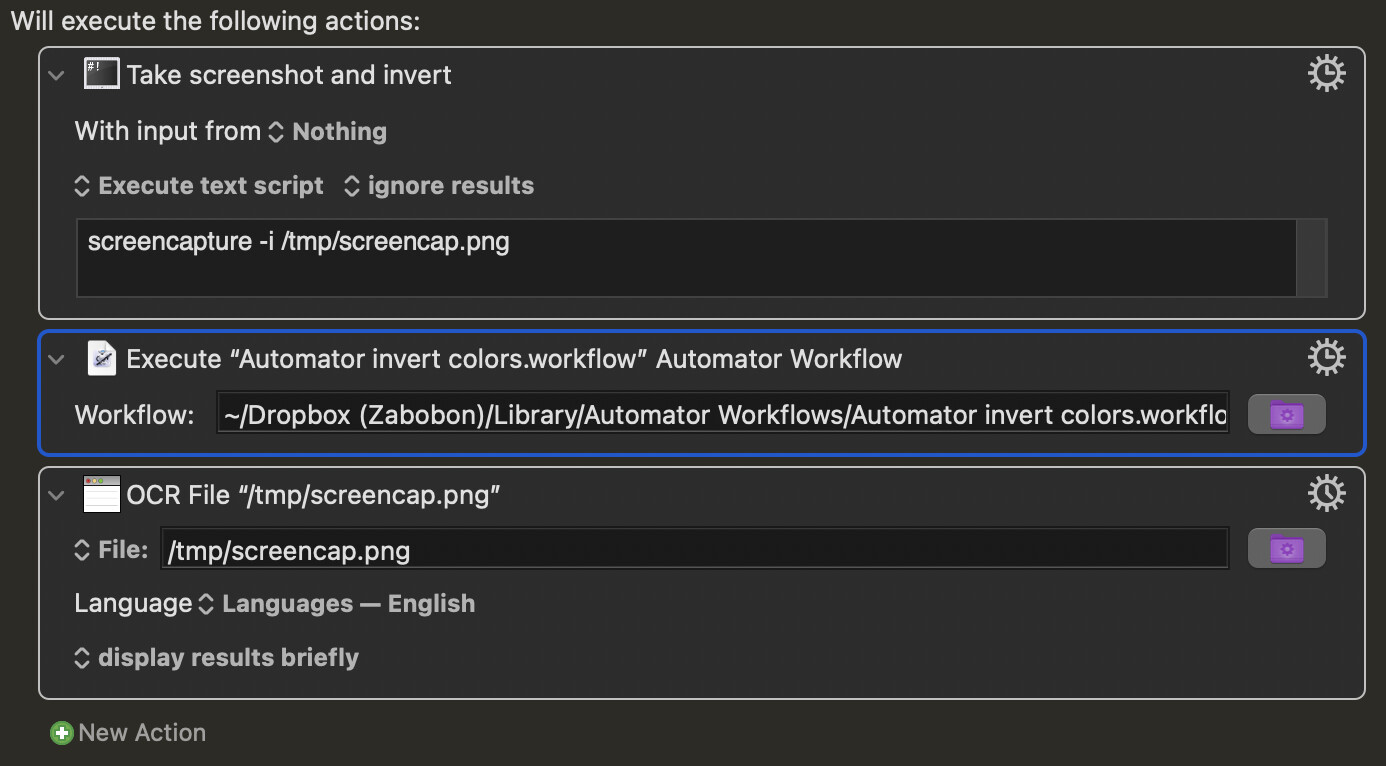
I found on my system Automator has the ability to invert colors of an image with a Quartz filter.
So in the macro below I use the attached Automator workflow to invert the colors of the image which is screenshot.
Automator invert colors.workflow.zip (33.3 KB)
OCR inverted screenshot Automator Macro (v9.2)

3 Likes
Wow! Perfect! Thank you so much @JimmyHartington
This works without any new software having to be installed!
After downloading your Macro and Automator Workflow I unzipped the Automator invert colors.workflow.zip and put the .workflow file with my other Automator Workflows in a folder in Dropbox. Then I pointed Keyboard Maestro to that Automator file in the second of your Macro's Actions.
Thanks again - I'd say this Solves the question that @Ryan_P started this thread with. 
1 Like
This has been working reasonably well for me, with appropriate customizations for where I want the temp file and the automated workflow to be saved.
However, it glitches aesthetically for me. Reading dark on light text can be nearly a 1-action macro, reading the image from the clipboard and writing the text to the clipboard.
Does anyone know of any way to apply that quartz filter to the clipboard instead of a temp file?
Hi @August - since I posted the post above yours, I've stopped using this method and now use Keyboard Maestro in combination with Monterey's amazing OCR capabilities. Of course you have to have Monterey to have it work.
I've found it can not only deal with light letters on dark but can extract text from pretty much any image - like a Google Map. It even deals with strange gothic fonts and handwriting.
This:

Gets this:
INTRODUCING
Cambridge
DECORATIVE, BOLD AND STRONG
GOTHIC FONT
And this:

Still gives this:
INTRODUCING
Cambridge
DECORATIVE, BOLD AND STRONG
GOTHIC FONT
Here is a link to how I implement it. There are other methods posted on the Forum.
You can even make it a subroutine and call it from any other Macros that needs OCR. I have it as a subroutine of a Macro I use when making notes on a video edit and the info I need to capture is in captions over the video. In that case it is set to grab from a particular area of the movie frame where the caption always is. Before using the Monterey Shortcut/Keyboard Maestro combination it was hit and miss.
But, as I said already, you have to have Monterey for it to work ![]()
3 Likes
Thanks for this, works great as a Quick action
The above solution has stopped working for me after upgrading to Catalina.
And unfortunately, Zabobon's improvement doesn't work in Catalina either.
After months and months, I finally upgraded my hard disk and was able to upgrade from Mojave to Catalina only to find that one of my favorite KBM macros, Capture and Invert OCR, stopped working. I finally discovered that the Quartz Composition Filter approach no longer works. When I try it, the modified file is blank. I get the same with other QCF filters like Blur and Dent, no image. I also found this reference which says that the Quartz Composition Filter method has been deprecated in Catalina:
https://apple.stackexchange.com/questions/405534/10-15-7-from-where-can-the-quartz-image-filters-be-accessed
So it's not supported in Catalina but the replacement is not available until Monterey, and my Mac harward is a few months too old to run Monterey. Feh!
At this point it looks my "simplest" solution may be to use GIMP which has a completely scriptable command line interface. There's a built in function to call that will invert the file colors. What could be simpler? I can put it all into KBM as a shell script.
Well, scripting in GIMP is done in a "LISP-like"! language called Scheme, and Script-Fu is the GIMP flavor of Scheme. Loading a file, running the function, and saving the file are not just three simple steps, there's a whole new barely-human-readable language and syntax and way of thinking to learn. Everything is a list and the car function gives you the head element of the list and the cdr function gives you the tail, the rest of the list. So to get the third parameter of a function or a list you do something like this in the interactive editor:
=> (set! color '(255 127 63))
(255 127 63)
=> (car (cdr (cdr color)))
63
I'm sure I'll figure it out eventually. LISP! Whoda Thunk?!
I got the Pre-OCR image inversion to work in Catalina using GIMP.
How I did it may be useful to others who want to do scripted or batch image processing with KBM.
The new flow is:
- Interactively capture a region on the screen and save the image in a temp file. This does not change from the previous macro version.
- Run
gimpon the temp file to invert it, using a script that defines a function than can run non-interactively, reading and saving a file. This replaces the Execute Automator Workflow action with an Execute Shell Script action. - Run the KBM OCR action on the file and save to the clipboard. This does not change from the previous macro version.
Here's how that GIMP shell script command works.
There are two script folders that GIMP reads from when it starts up, a system folder and a user folder.
- The system folder is
/Applications/GIMP-2.10.34.app/Contents/Resources/share/gimp/2.0/scripts-- this is full of useful sample scripts, many of which are in the GIMP UI menus. - The user folder is
~/Library/Application Support/GIMP/2.10/scripts-- this is where your personal scripts go.
In the personal folder I created a text file called GimpScriptsForKBM.scm with the following contents:
(define (simple-invert filename)
   (let* ((image (car (gimp-file-load RUN-NONINTERACTIVE filename filename)))
          (drawable (car (gimp-image-get-active-layer image))))
     (gimp-drawable-invert drawable 0)
     (gimp-file-save RUN-NONINTERACTIVE image drawable filename filename)
     (gimp-image-delete image)))
It doesn't matter what the filename is, as long as it has the .scm extension. GIMP will load definitions from every *.scm file in that folder.
This file defines a function, simple-invert, with only one parameter, the filename. It gets the image from the file, runs the pre-defined (gimp-drawable-invert function on that, and saves the file. It hard-codes the choice (0) as the second argument to that function that the inversion will not use the "linear inversion" method.
To actually use that simple-invert function I run a GIMP command line in a KBM Execute Shell Script action as Step 2 above (replacing the former Execute Automator Workflow action):
/Applications/Gimp-2.10.34.app/Contents/MacOS/gimp -i -b '(simple-invert "/tmp/screencap.png")' -b '(gimp-quit 0)'
This is where the simple-invert function defined in the *.scm file gets used.
I got the Pre-OCR image inversion to work in Catalina using GIMP.
How I did it may be useful to others who want to do scripted or batch image processing with KBM.
The new flow is:
- Interactively capture a region on the screen and save the image in a temp file. This does not change from the previous macro version.
- Run
gimpon the temp file to invert it, using a script that defines a function than can run non-interactively, reading and saving a file. This replaces the Execute Automator Workflow action with an Execute Shell Script action. - Run the KBM OCR action on the file and save to the clipboard. This does not change from the previous macro version.
Here's how that GIMP shell script command works.
There are two script folders that GIMP reads from when it starts up, a system folder and a user folder.
- The system folder is
/Applications/GIMP-2.10.34.app/Contents/Resources/share/gimp/2.0/scripts-- this is full of useful sample scripts, many of which are in the GIMP UI menus. - The user folder is
~/Library/Application Support/GIMP/2.10/scripts-- this is where your personal scripts go.
In the personal folder I created a text file called GimpScriptsForKBM.scm with the following contents:
(define (simple-invert filename)
   (let* ((image (car (gimp-file-load RUN-NONINTERACTIVE filename filename)))
          (drawable (car (gimp-image-get-active-layer image))))
     (gimp-drawable-invert drawable 0)
     (gimp-file-save RUN-NONINTERACTIVE image drawable filename filename)
     (gimp-image-delete image)))
It doesn't matter what the filename is, as long as it has the .scm extension. GIMP will load definitions from every *.scm file in that folder.
This file defines a function, simple-invert, with only one parameter, the filename. It gets the image from the file, runs the pre-defined (gimp-drawable-invert ...) function on that, and saves the file. It hard-codes the choice (0) as the second argument to that function which specifies that the inversion will not use the "linear inversion" method.
To actually use that simple-invert function I run a GIMP command line in a KBM Execute Shell Script action as Step 2 above:
/Applications/Gimp-2.10.34.app/Contents/MacOS/gimp -i \
    -b '(simple-invert "/tmp/screencap.png")' \
    -b '(gimp-quit 0)'
This is where the simple-invert function defined in the *.scm file gets used.
Blimey. I learned LISP in the late ‘70s for a project I was doing that involved natural language processing. I never imagined finding it being used for end-user scripting since it’s hardly what I’d call intuitive. Good on you @August ![]()
1 Like
Does GIMP open or does it run silently?
If you run the gimp -i -b ... command in a terminal, it reports that gimp has started and when it completes, but the -i option tells it to not open an interactive UI, which makes it well-behaved for shell scripting. When I run it in a KBM Execute Shell Script action, I set "ignore results" so I don't see the terminal output.
It does not seem to affect an interactive GIMP session. There are supposedly ways to "register" user-defined functions with GIMP so that it they appear in the interactive UI menus like any other GIMP command, but I don't know if that's compatible with the RUN-NONINTERACTIVE parameter. There are ways to create a dialog so that you can do things like pick a filename, etc., but I didn't explore that because I didn't need them for this task. There are examples of this in the /Applications/GIMP-2.10.34.app/Contents/Resources/share/gimp/2.0/scripts folder.
I'll write up some more general notes on what I learned about scripting GIMP from KBM to go beyond this specific usage and put it in the Tips and Tutorials section of the Forum.
For instance, if you open the GIMP UI and then go to Filters > Script-Fu > Console, that opens an interactive console for running Scheme commands like these. In that Console, there is Browse button that opens a Script-Fu Procedure Browser where you can search for procedure names. Searching for "file" gives 178 results, including gimp-file-load used here, which lists the three required parameters and includes an explanation for why the filename must be supplied twice.
1 Like
I've created a tutorial, "Notes on Scripting GIMP with KBM " in the Tips & Tutorials section.
I welcome feedback on whether it's useful, questions, comments, etc.
1 Like