I had a problem with a KBM macro where the solution required being able to run a software filter on an image initiated by a command line or script, not a GUI. But almost all image manipulation programs, including the archetypal PhotoShop, seem to require interaction with the graphical user interface to be able to do anything at all. Was there a system out there that supported scripting?
The Problem, and the State of the Art
I found three possible solutions all using free software:
- ImageMagic,
- BIMP (a batch-mode add-on to GIMP),
- and the built-in batch mode of GIMP. (GIMP is the Gnu Image Manipulation Program, deliberately created to be a free alternative to PhotoShop.)
While ImageMagic and BIMP look promising, and may be better tools for more complex problems, I found sample code for the GIMP batch mode that required only a little modification to do what I needed to do. I described that solution in Inverting Image Colors Before OCR.
This post describes how I got there, with lots of notes about how to use GIMP's scripting tools. I have not explored anything close to all the possibilities, but I hope this gets you off to a basic working start.
GIMP is a powerful tool and can do many of the "magic brush" kinds of things that PhotoShop can do. It also supports a form of scripting that can manipulate images transparently, without ever having to open up a GUI app. This makes it very useful for image changes that you want to happen silently, in the background.
You can't do the same with PhotoShop. While PS can be run with JavaScript, the GUI has to be open and be the frontmost app. It would be the same trying to use KBM to script all the menu option choices for PhotoShop. Running in the background or manipulating an image on the clipboard in the middle of another task are way beyond what PhotoShop can do (according to the best info I could find in the Adobe Support Community).
A Solution Based on an Existing Tutorial
With a little Googling, I quickly learned that running GIMP from a script is called "batch mode". The GIMP doc has a tutorial on using GIMP Batch Mode. That was my starting point. That tutorial has a couple of sample code examples that show how to apply a filter first to a single file and then to several at once, such as all the files in a particular directory.
The GIMP interface for running scripts is called Script-Fu and can be found near the end of the GIMP Filters menu in the GIMP GUI. There is an interactive console where you can try scripting commands and run scripts on your working image layer or your current selection of the image. The scripting language is Scheme, which is based on LISP. There is also support for Python and a Python-Fu entry in the Filters menu. The GIMP doc has a tutorial on Basic Scheme.
It turned out that the simple example given in that Batch Mode tutorial was a great template for what I wanted to do. Here's the Scheme code. I've made some slight modifications to the indenting and line breaks to make it a little clearer, at least to me.
(define (simple-unsharp-mask
                filename
                radius
                amount
                threshold)
    (let* ( (image (car (gimp-file-load RUN-NONINTERACTIVE filename filename)))
            (drawable (car (gimp-image-get-active-layer image))))
        (plug-in-unsharp-mask RUN-NONINTERACTIVE
                image drawable radius amount threshold)
        (gimp-file-save RUN-NONINTERACTIVE image drawable filename filename)
        (gimp-image-delete image)
    )
)
I'll walk you through it, after I put it into the context of how it gets run.
How GIMP Scripts Get Run
This code defines a "filter script" and there are two specific locations where GIMP (on Macs) looks for script definitions when it starts up, a system folder and a user folder.
- The system folder is
/Applications/GIMP−2.10.34.app/Contents/Resources/share/gimp/2.0/scripts— this is full of useful sample scripts, many of which are in the GIMP UI menus. - The user folder is
~/Library/Application Support/GIMP/2.10/scripts— this is where your personal scripts go.
GIMP loads all files in those locations that have the .scm Scheme file extension. When you save the above sample script in the above user folder, in a *.scm file, your script definitions get read when GIMP starts up.
Note that it doesn't matter what the file name is in that folder. Gimp looks in every .scm file. When I tried it with the tutorial sample code, I used TutorialSample1.scm.
To use batch mode with any filter you have defined or any of the pre-defined functions, you give the command as an argument to the -b option of the gimp command. In the GIMP tutorial, to apply the simple-unsharp-mask to an image, for instance foo.png, you are told to run the command:
gimp -i -b '(simple-unsharp-mask "foo.png" 5.0 0.5 0)' -b '(gimp-quit 0)'
How the Simple Filter Works
In the definition above, simple-unsharp-mask has four arguments: filename, radius, amount, and threshold, which are here as values in the command line. In this form, this gimp command needs to be run in the directory that contains foo.png because it's a relative path name.
The -i option says to not open an interactive GUI. We want this to run invisibly. The -b options is a batch command and in this case there are two of them.
Note that my saved filename, TutorialSample1.scm, isn't mentioned in this command. When you start GIMP, it reads all the files that are in the two script folders. By saving TutorialSample1.scm in ~/Library/Application Support/GIMP/2.10/scripts, my definition of simple-unsharp-mask is available to GIMP.
The first -b option contains the command to run simple-unsharp-mask with appropriate parameters. Let's walk through what that does.
The simple-unsharp-mask function uses gimp-file-load to set the image variable from the filename and then uses gimp-image-get-active-layer to define the drawable variable from the image. Then it runs the plug-in-unsharp-mask function using the image and drawable that it created plus the other parameters that we gave it in the -b option on the command line. It saves the transformed image and drawable back where it got them and deletes the image from GIMP's memory.
The second -b option quits GIMP.
When I tried running the above command, I ran into a minor snag. I couldn't just run gimp on a Terminal command line. The command is not in my search path.
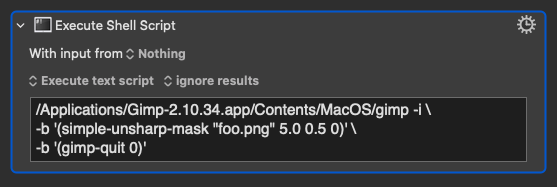
I could create a shell alias for the command, or I could add a symbolic link into a directory that is in my $PATH, but since my goal is to use this within a KBM macro, I decided to just use the full path to the gimp command:
/Applications/Gimp-2.10.34.app/Contents/MacOS/gimp
With that, I had a shell command that would run the Unsharp Mask plugin filter on any filename that I specified. Here's the KBM version:
To modify that simple-unsharp-mask script to do the negative-image inversion that I needed in the first place was then a matter of changing the function name, the parameters, and the predefined filter function.
Walking Through the Code in Deep Detail
Of course that took being able to read the Scheme definition code in word-by-word detail. So let me give you a hand with that. Here's that code again:
(define (simple-unsharp-mask
                filename
                radius
                amount
                threshold)
    (let* ( (image (car (gimp-file-load RUN-NONINTERACTIVE filename filename)))
            (drawable (car (gimp-image-get-active-layer image))))
        (plug-in-unsharp-mask RUN-NONINTERACTIVE
                image drawable radius amount threshold)
        (gimp-file-save RUN-NONINTERACTIVE image drawable filename filename)
        (gimp-image-delete image)
    )
)
Looking at the sample code, the entire thing is inside a pair of parentheses. You can have more than one of these define structures in your file, defining a whole library of functions, if you want, each within its own parentheses pair. Here we have just one.
A function definition has three parts, the magic word define and two parenthesized blocks, the first with the names of the function and its arguments and the second that does the work.
For my simple invert filter, I only need a filename, so that first block can be simplified to:
(define (simple-invert filename) ... )
The definition of simple-unsharp-mask follow a pattern I've seen frequently in *.scm scripts, it lays out the function's parameters one per line. Personally, I like that style; it makes it very easy to read the rest of the script and easily tell what's a provided parameter and what's not.
The second block of the definition has four steps. In the first, the let* keyword initiates variable definitions for image and drawable.
Both of the variable definitions use the LISP magic word, car. The GIMP Basic Scheme tutorial has a section describing "car, cdr and friends" which is helpful. It includes the note:
For the Script-Fu, writer one of the most important uses of the
carfunction is to access the returned values from the built-in GIMP functions. All GIMP functions return a list and even if the list contains only one element it must be accessed bycar.
That term, car, made no sense to me and that confusion made it hard to make sense of the Scheme code. I eventually found out that it originally stood for "Contents of Address Register" which was based on the now-ancient IBM hardware that LISP was originally written for. It's companion command, cdr, derives from "Contents of Data Register". Knowing that has made it easier for me to hold on the concepts that car gives you the head of a list and cdr gives you the rest of it.
When the let* keyword defines image, it runs car on the result of running the gimp-file-load function.
So what does gimp-file-load do? if you open the GIMP UI and go to Filters > Script-Fu > Console it will pop up a small Script-Fu Console window like this:
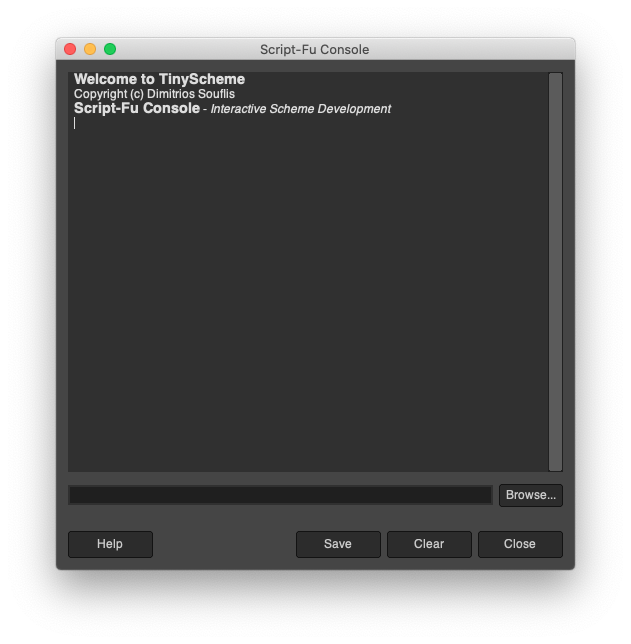
The text entry field at the bottom has the Browse button at the right. If you click that button, it opens the Script-Fu Procedure Browser (SPB).
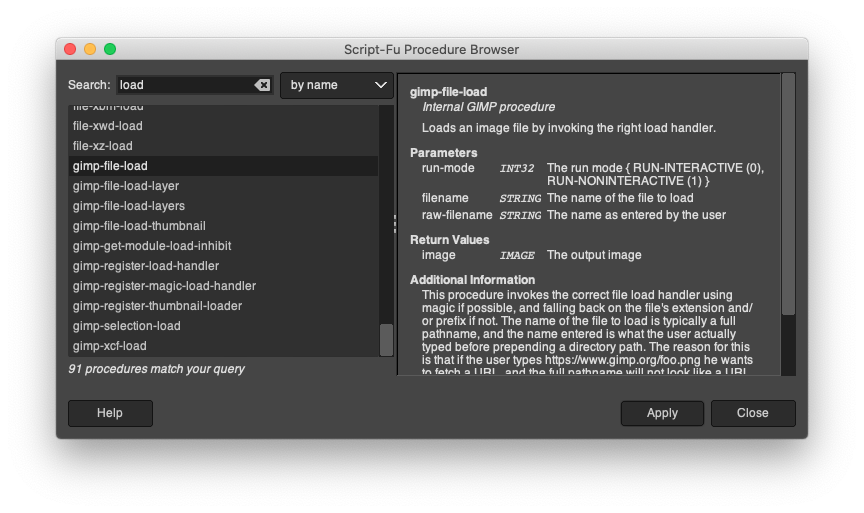
In the above Procedure Browser window, I have searched for the term "
load" and scrolled down to gimp-file-load to see documentation on this procedure, including why the filename parameter must be given twice.
After the image is defined, based on the loaded contents of filename, then another car operation gets the result of giving the image to the gimp-image-get-active-layer function, and that defines the drawable variable. In my simple-invert function, these operations, loading the file and getting the active layer, can be used exactly as they are in the example from the tutorial.
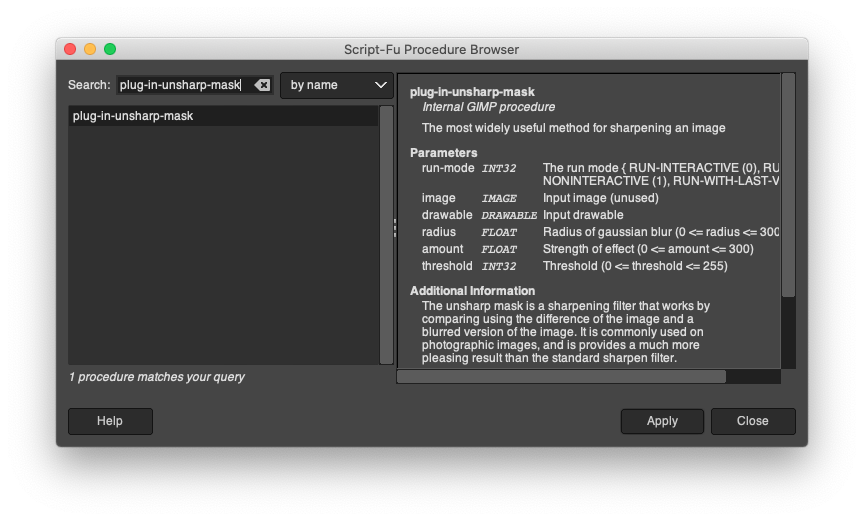
The first command after the let* variable definitions is the core of the operation. The plug-in-unsharp-mask function gets the same arguments as the simple-unsharp-mask that is defined here, except that it gets the image and the drawable instead of the filename.
You can see documentation for plug-in-unsharp-mask in the Script-Fu Procedure Browser.
This is the procedure I wanted to change in making my
simple-invert function. I searched the SPB for "invert" and got four results. One inverted the color but not the brightness, one was for inverting a selection mask, one was deprecated, and the fourth, gimp-drawable-invert, seemed like exactly what I wanted. I changed that line of code to:
(gimp-drawable-invert drawable 0)
The last two steps in the second part of the define function are gimp-file-save and gimp-image-delete. That saves the transformed file and then deletes the image from GIMP's internal memory.
I'm not sure, but I think that if GIMP is not otherwise open then the gimp-image-delete may not be necessary because the second batch command on the shell command line closes this instance of GIMP. If you want to be able to use the script on a file, whether or not you're also using the GIMP GUI, then you might need this. It was part of the sample script that I simply kept because it made sense that it was there and didn't seem like it could hurt anything. The description of gimp-image-delete in the Script-Fu Procedure Browser was not really helpful in understanding why this command is needed.
Beyond This Example
I hope this walk-through of using GIMP from a KBM Execute Shell Script command gives you ideas for other script-based manipulations you might do to image files. Watermarking is an obvious possibility. Adding text to an image based on the filename or image metadata is another.
And please keep in mind that Scheme is a full scripting language. It can present dialogs for the user to interact with, do calculations and have conditional decisions. There a lots of example functions in the system scripts folder, /Applications/GIMP−2.10.34.app/Contents/Resources/share/gimp/2.0/scripts.