Move Mouse Cursor in Circle Around the Center of Screen With Constant Speed

Dear friends,

I am facing the most tricky KM case ever to me. I am operating a special software. In this software, if you want to adjust any parameter, you need to hold the left mouse button, then move the mouse cursor around the center of the screen slowly. A complete circle means 100% change. a half circle means 50% change. Very hard to do and definitely not designed for human. So I cost a lot of time to achieve this in KM but cannot find a way.

First step:

Click a parameter button. Very easy to do in KM

Second step:

Hold left mouse button. very easy to do in KM

Third step:

Move mouse cursor along a circle around the center of screen with slow speed. CANNOT FIND A WAY.

Fourth step:

Stop drawing the circle at any degree of 360. CANNOT...

I am not a programmer. Searched Google many days without success. Hope friends here can help.

Thanks a lot.

Here I found a script that could be used in KM:

#SingleInstance, Force
pi			:= 3.14159

; Middle of the circle X
startX		:= A_ScreenWidth/2
; Middle of the circle Y
startY		:= A_ScreenHeight/2
; Radius of the circle
r			:= 100
; Number of points you want to stop at on the circle
numOfPoints	:= 16

Loop, % numOfPoints
{
	; The Equation of the Circle is:
	; (x-a)^2 + (y-b)^2 = r^2
	; Written in parametric form:
	; x = a + r Cos(t)
	; y = b + r Sin(t)
	; Where a is the circle center x coord, b is the y coord, r is radius, and t is your radians
	
	; Caclulate rads
	t	:= (2/numOfPoints*A_Index) * pi
	; Set x
	x	:= startX + r * Cos(t)
	; Set y
	y	:= startY + r * Sin(t)
	; MouseMove based on those new coords
	MouseMove, % x, % y, 5
}

Perhaps someone can translate this to Javascript for Automation?

How close to a circle does it have to be -- can you get away with drawing a line through 12 points (think hour marks on a clock) or 60 (like the minute marks)? The fewer you can get away with, the easier it is to program.

Similarly, "slowly" needs to be defined. What is too fast, what is too slow?

Please – always tell us what software you're working with.

OK -- since it's Friday, and since scripting is fun, here's a "proof of concept"...

There's no "click and drag" in AppleScript and, AFAIK, you can't "click-multiple drag-release" in KM -- so we have to turn to a third-party solution. I've used cliclick which you can down from here or its Github page, where there's also instructions on usage. Because it's a command line utility we can easily create the command in AppleScript and use "do shell script" to run it -- I'm sure you could do similar in KM.

cliclick is unsigned code -- the usual warnings apply, and you'll probably have to grant it permission to run and give Terminal "Accessibility" rights in System Preferences->Security & Privacy->Privacy. If you don't feel happy about any of that -- walk away now!

Since we're emulating a human drawing a circle, or part of, we don't have to draw an exact circle -- an approximation will be good enough. Join 3 points and get a triangle bounded by our ideal circle, join 6 for a hexagon, etc -- the more points you use, the more of a circle it will be (and the more processing involved, obviously). (I'm hoping @drdrang will jump in at this point and remind me what the proper name of the lines we're drawing is!)

I tested this by having an empty PowerPoint slide ready with the freehand drawing tool selected, hitting the run button in Script Editor, then switching to PowerPoint during the initial 5 second delay -- you can use whatever drawing tool you have handy, but watch out for curve smoothing etc making things look better than the actual emulated action.

Make sure your circle will be contained by your canvas! I bear no responsibility if you mess up your coordinates and drag "My Very Important File" to the Trash :slight_smile: A quick-and-easy way to get the coordinates you want is to Command-Shift-4, move the cross-hair around while noting the {x,y} numbers, then hitting Esc to cancel the screen capture.

The script is pretty much self-documenting. Set the "resolution" (number of sides) and the time to draw your full circle in lines 7 & 8; your centre point, radius, starting offset and how much of a circle to draw in lines 12-15. If you've put cliclick anywhere other than "/usr/local/bin" then change line 32 to suit (and if you've used anything other than cliclick you'll need to change the whole command-building section to match your utility's expected syntax).

Click Script Editor's "Run" button, switch to your drawing program, complain to me when it doesn't work :frowning:

That's the big spiel, so here's the script. Enjoy!

-- This pause is so you can run the script in Script Editor then switch
-- to an app that allows freehand drawing by mouse-drag -- I used PowerPoint
-- Make sure the tool is selected and everything else is ready!
delay 5

-- Define the "resolution" and time to draw of our full circle
set fullCircleSlices to 24
set secondsToFullCircle to 12

-- Define the position (x,y of centre point), radius (pixels),
-- starting offset (degrees), and how far round to draw
set circleCentre to {x:600, y:600}
set circleRadius to 100
set startDegrees to 0
set degreesToDraw to 270

-- Work out how many slices needed, and delay per slice
set numOfSlices to round (fullCircleSlices / (360 / degreesToDraw)) rounding up
set degreesPerSlice to degreesToDraw / numOfSlices
set msWaitPerSlice to secondsToFullCircle / fullCircleSlices * 1000

-- build the list of points to drag "through"
set pointsList to {}
set atDegrees to startDegrees
repeat numOfSlices + 1 times
	set newX to round (x of circleCentre) + (circleRadius * (sine_of(atDegrees))) rounding toward zero
	set newY to round (y of circleCentre) - (circleRadius * (cosine_of(atDegrees))) rounding toward zero
	copy {x:newX, y:newY} to end of pointsList
	set atDegrees to atDegrees + degreesPerSlice
end repeat

--build the command
set theCommand to "/usr/local/bin/cliclick dd:" & x of item 1 of pointsList & "," & y of item 1 of pointsList
repeat with i from 1 to ((length of pointsList) - 1)
	set theCommand to theCommand & " w:" & msWaitPerSlice & " dm:" & x of item i of pointsList & "," & y of item i of pointsList
end repeat
set theCommand to theCommand & " du:" & x of item -1 of pointsList & "," & y of item -1 of pointsList

-- and run the command
do shell script theCommand


-- sine and cosine functions
on sine_of(x)
	repeat until x ≥ 0 and x < 360
		if x ≥ 360 then
			set x to x - 360
		end if
		if x < 0 then
			set x to x + 360
		end if
	end repeat
	
	--convert from degrees to radians
	set x to x * (2 * pi) / 360
	
	set answer to 0
	set numerator to x
	set denominator to 1
	set factor to -(x ^ 2)
	
	repeat with i from 3 to 40 by 2
		set answer to answer + numerator / denominator
		set numerator to numerator * factor
		set denominator to denominator * i * (i - 1)
	end repeat
	
	return answer
end sine_of

on cosine_of(x)
	repeat until x ≥ 0 and x < 360
		if x ≥ 360 then
			set x to x - 360
		end if
		if x < 0 then
			set x to x + 360
		end if
	end repeat
	
	--convert from degrees to radians
	set x to x * (2 * pi) / 360
	
	set answer to 0
	set numerator to 1
	set denominator to 1
	set factor to -(x ^ 2)
	
	repeat with i from 2 to 40 by 2
		set answer to answer + numerator / denominator
		set numerator to numerator * factor
		set denominator to denominator * i * (i - 1)
	end repeat
	
	return answer
end cosine_of
3 Likes

How nice is that! Thank you for this nice macro and pointing us (me) to Cliclick. This can be a very handy util!!!

BTW: I only got three quarters of a circle (not that it really matters).

Because you ran the script "as-is":

set degreesToDraw to 270

Set that variable to the number of degrees you want, eg

set degreesToDraw to 360

for a full circle.

1 Like

1 Like

I think I am successful with this case all in KM, no additional coding script needed. But I don’t think my English is good enough to explain. But reading your passionate reply, makes me share something here.

The software I am facing is QTake HD. See the picture below.


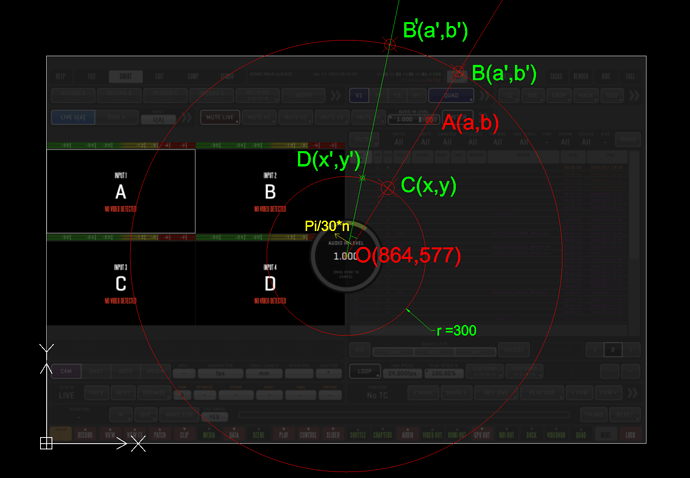
The button is at point A(a,b). Press and hold the button, you will see a wheel appear at the center of the screen. The center of the wheel is (864,577).
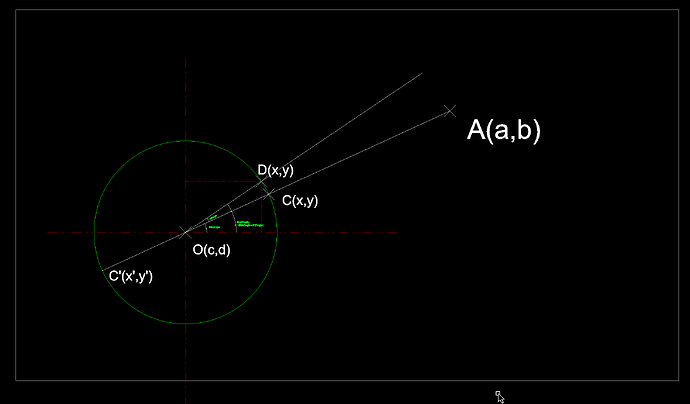
When you see the wheel, you can rotate the cursor to change the value. But you cannot start doing this at Point A. Because if the Button is close to the edge of your screen, for example, at Point B, when you rotate, you will go out of screen(Point B’). So you need to move cursor to Point C, it’s on a small circle, which I set radius to 300.
When you go to Point C, you can begin rotating. My starting point is Pi/30. Because it’s (2π
/60), means I need to move the cursor 60 times to draw a complete circle. I also make it multiply by n. Set n to 1, you need to move 60 times to get a 360. Set n to 0.5, you need to move 120 times to get a 360. So this n can help us change the speed the cursor drawing the circle.

NOW we have three challenges.
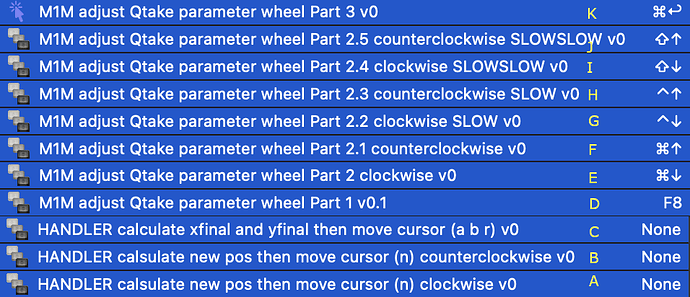
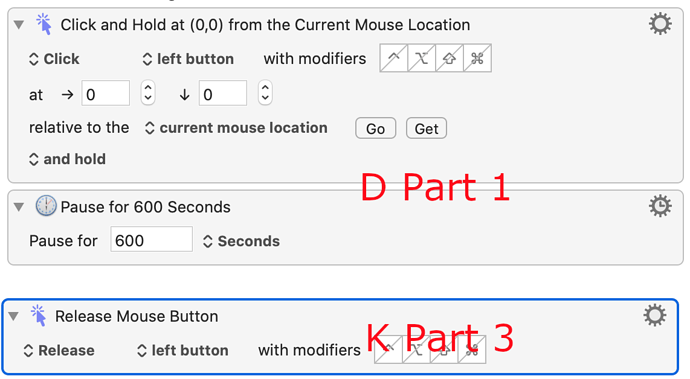
The FIRST one, mentioned in your post, “ you can't "click-multiple drag-release" in KM”. But actually, I think you can. Please see the picture below.


We move mouse cursor over the targeted button. In KMM D, Part 1, we click and hold, activate the parameter wheel.
Then we use combined keyboard shortcuts with up and down arrow key to rotate the cursor – draw the circle in Part 2 – E F G H I J.
Then we Release mouse button in K, Part 3.

The SECOND one, is how to move cursor from Point A to Point C. Actually it’s math problem.
You need to solve the function:
(b - y)/(a - x) = (y - 577)/(x - 864) and (x - 864)^2 + (y - 577)^2 = r^2 for x, y
You can do this online.

the result is that:
x=(-√((a-864)^2r^2(a^2-1728a+b^2-1154b+1079425))+864a^2-1492992a+864b^2-997056b+932623200)/(a^2-1728a+b^2-1154b+1079425)

y=(577a^3+577(√((a-864)^2r^2(a^2-1728a+b^2-1154b+1079425))-932623200)-b(√((a-864)^2r^2(a^2-1728a+b^2-1154b+1079425))-575301312)-1495584a^2+577a(b^2-1154b+2572417)-498528b^2)/((a-864)(a^2-1728a+b^2-1154b+1079425))

===

x=(√((a-864)^2r^2(a^2-1728a+b^2-1154b+1079425))+864a^2-1492992a+864b^2-997056b+932623200)/(a^2-1728a+b^2-1154b+1079425)

y=(577a^3+b(√((a-864)^2r^2(a^2-1728a+b^2-1154b+1079425))+575301312)-577(√((a-864)^2r^2(a^2-1728a+b^2-1154b+1079425))+932623200)-1495584a^2+577a(b^2-1154b+2572417)-498528b^2)/((a-864)(a^2-1728a+b^2-1154b+1079425))

three days ago, I don’t think I can do this in KMM. But actually you can. You can just put this crazy monster in Move and Click KM macro.

The THIRD challenge is that move the cursor from Point C to Point D. still a math problem. But the result is that.

Move cursor clockwise:
rCOS(thisAngle-(πn/30))+864
r
SIN(thisAngle-(πn/30))+577
Move cursor counterclockwise:
rCOS(thisAngle+(πn/30))+864
r
SIN(thisAngle+(πn/30))+577

do same thing like what you did in KMMacro C.

Even though you don’t have QTake software, but I hope the KMMacros I shared here can help you understand these thoughts. Thanks.
KMMs about adjust QTake parameter wheel_Backup_20220424_1023_v0.kmlibrary (68.8 KB)

2 Likes

In which case, I can only apologise -- I had assumed that KM behaved the same as AppleScript's UI interaction. I should have read the manual better!

Nice job solving it on your own and using only KM.

I redo all this. make it works on every Mac.

What does this macro do?

  1. you set the circle center position on the screen. you set the radius of the circle. you set how many operations can finish a full circle.
    (you define a circle on your screen. the default one is center (500,500) radius (200). the default speed is press trigger button 30 times can draw a complete circle)
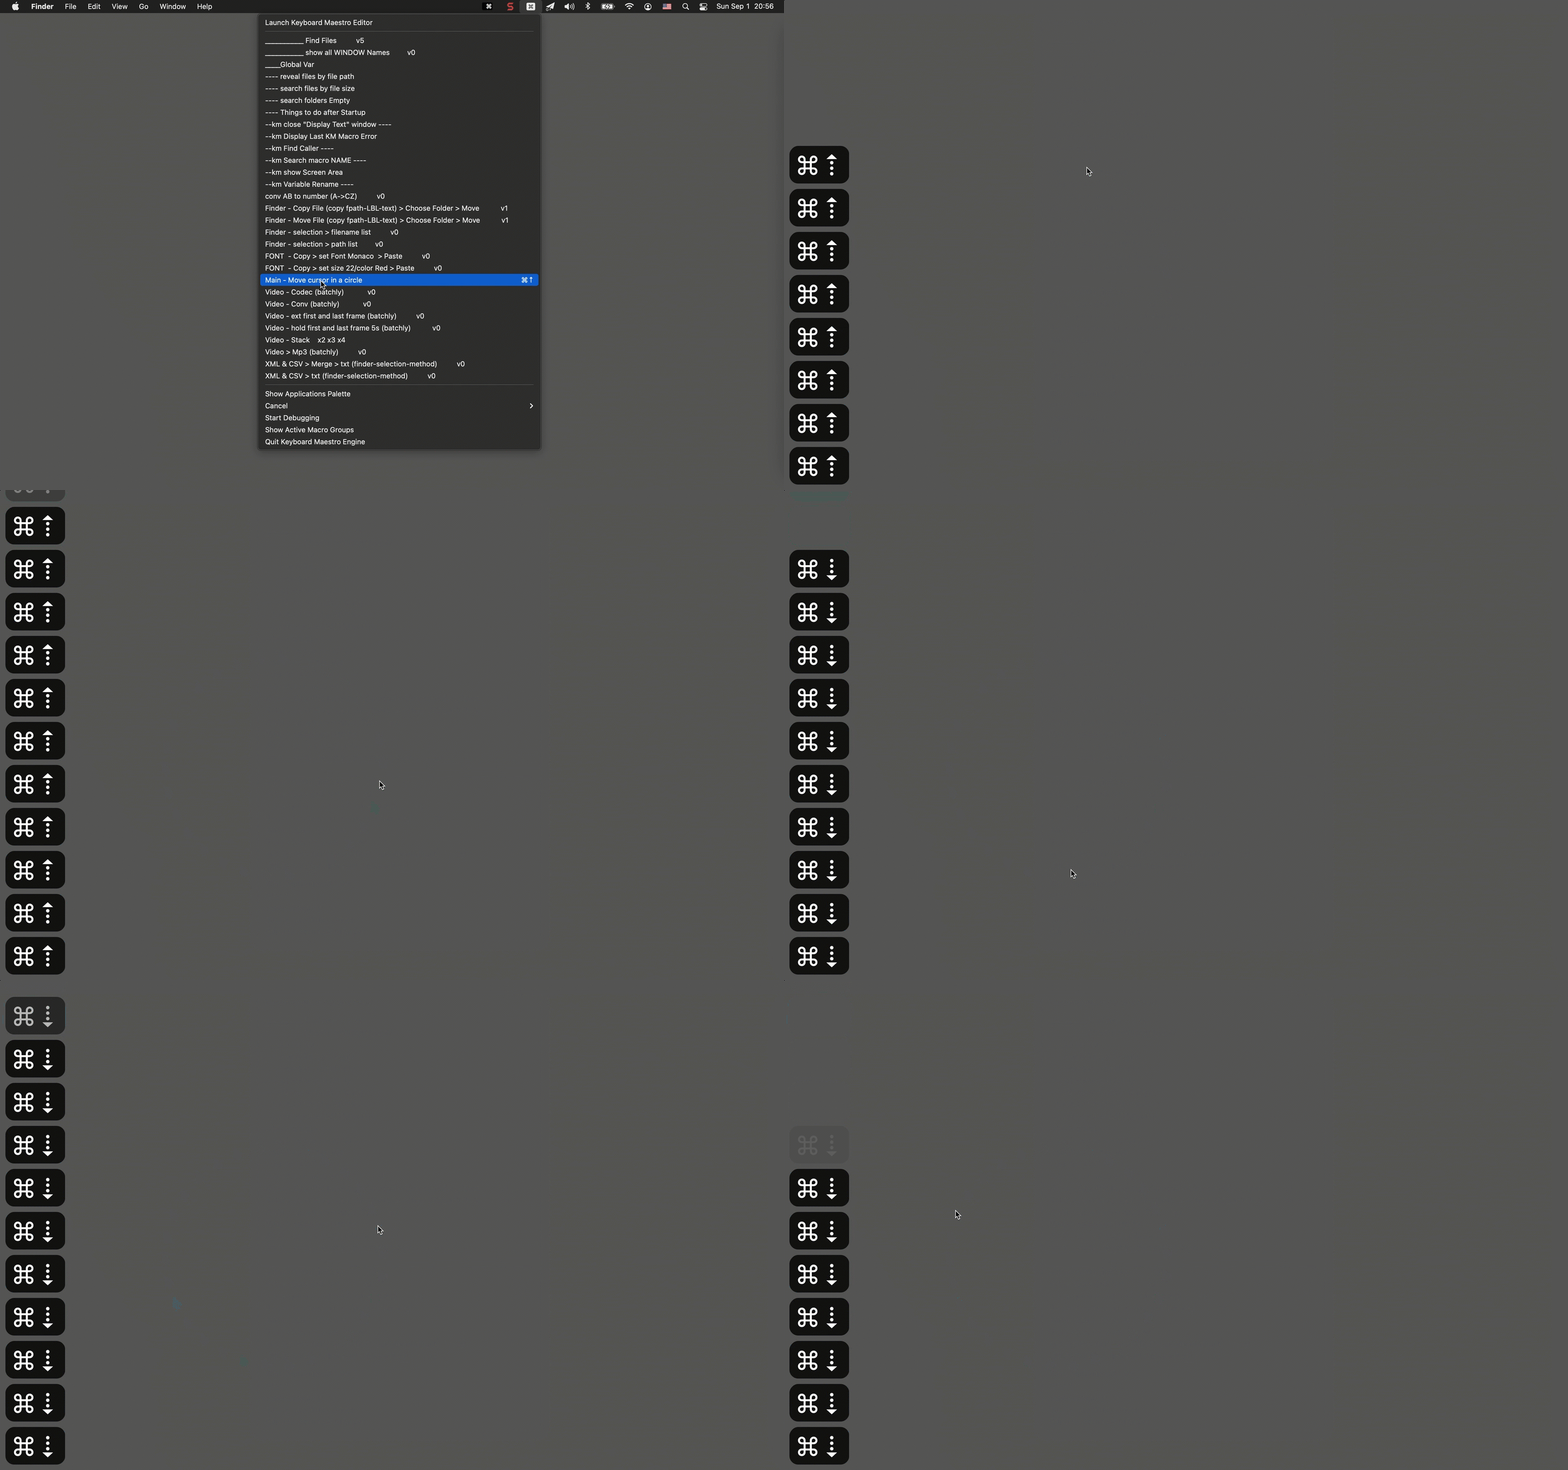
  2. trigger the macro in status menu, the cursor will move to the closest point on the predefined circle.
  3. trigger the macro with hot key ⌘↑ and ⌘↓, cmd+uparrow means you want to move the cursor CCW. cmd+downarrow means you move the cursor CW.

the demo gif:
move cursor in circle v0

the macros:
Move_MouseCursor_In_Circle Macros_____Backup_20240901_2108.kmlibrary (46.6 KB)


include two subs and one Main.

the idea step by step:


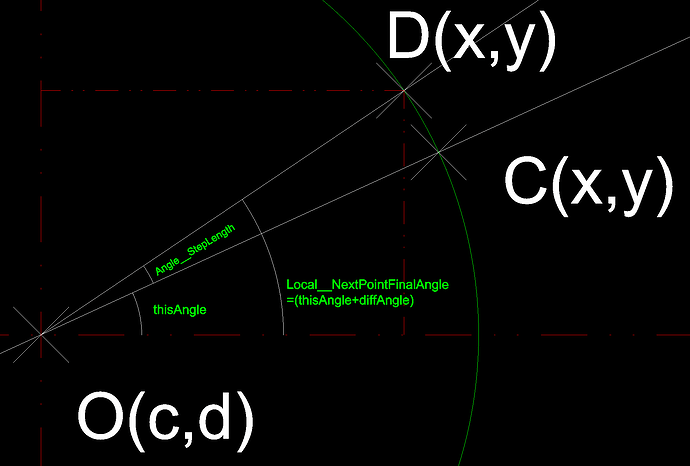
we set the center point O(c,d) and the radius r. then we define a green circle on the screen.
we need to move the cursor into the circle - the orbit. so

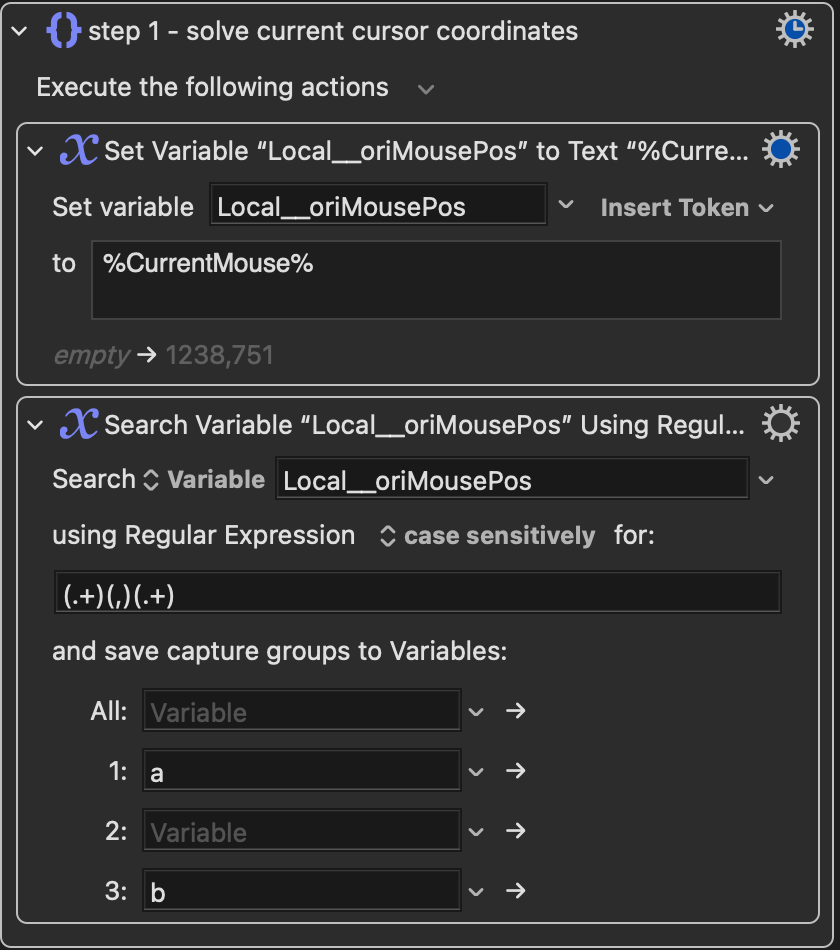
step 1 (in sub 1): solve the current cursor coordinates (a,b):

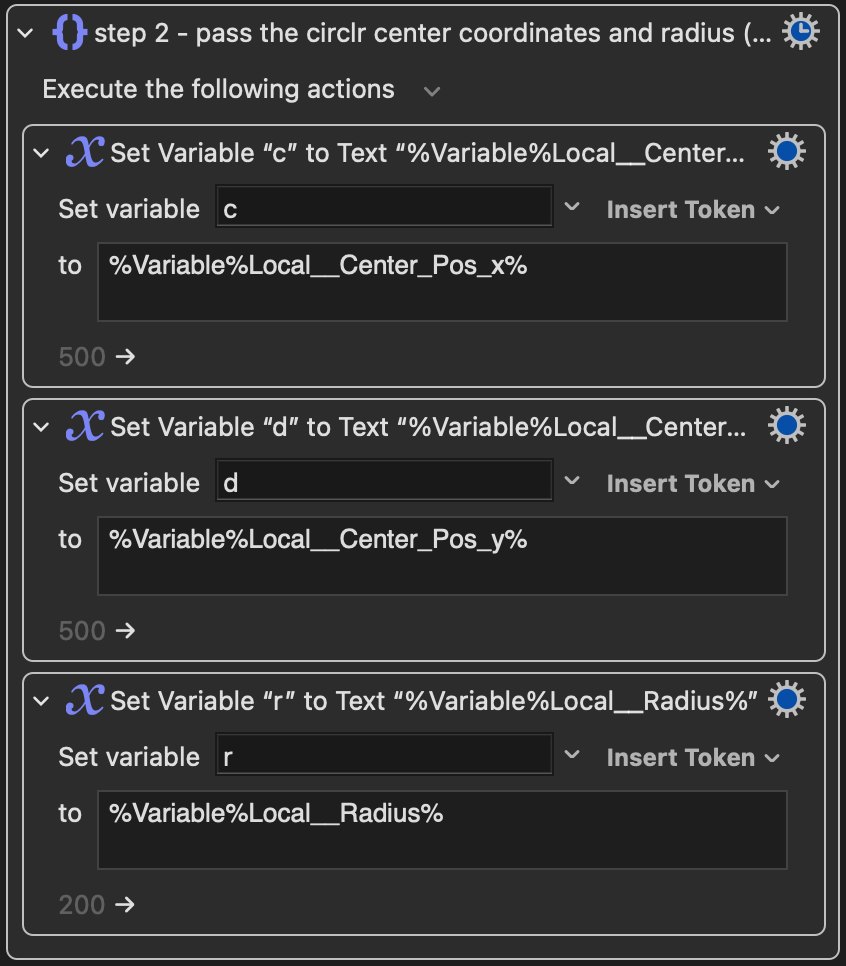
step 2 (in sub 1): let km know c,d,r of the orbit.

now we need to move the cursor into the orbit. what we know is a,b,c,d,r. what we want to know is x,y
it's an mathematical problem.
we need to solve this function:

(a-x)/(b-y)=(x-c)/(y-d)
(x-c)^2+(y-d)^2=r^2
(x-c)(x-a)<0
(y-d)(y-b)<0
r>0

we can do this on website:

(input it like this:
(a-x)/(b-y)=(x-c)/(y-d) and (x-c)^2+(y-d)^2=r^2 and (x-c)(x-a)<0 and (y-d)(y-b)<0 and r>0 for x,y
)

(NOTE that we can get two result. point C and point C'. on the above image we can see, we need to find which point is closer to point A. we need to use mathematical method to solve this)
step 3 (in sub 1): solve C(x,y)

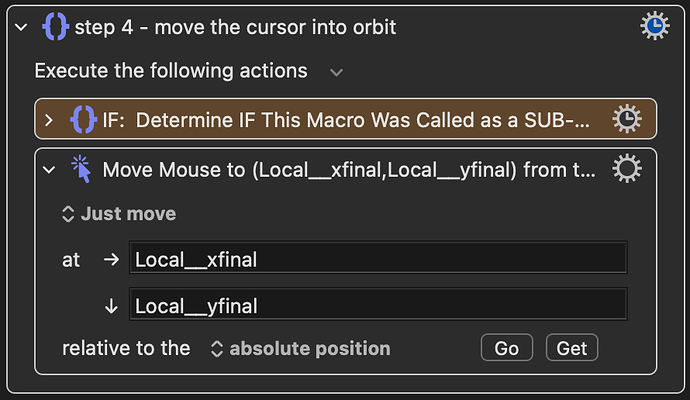
step 4 (in sub 1): move the cursor from A to C.

looks like we did what need in the title of the subroutine. but actually we have two more things need to do.


in the above image, we can see. we need to calc the angle thisAngle.
i decide use point A and O - use a,b,c,d to calc the radians value of thisAngle.
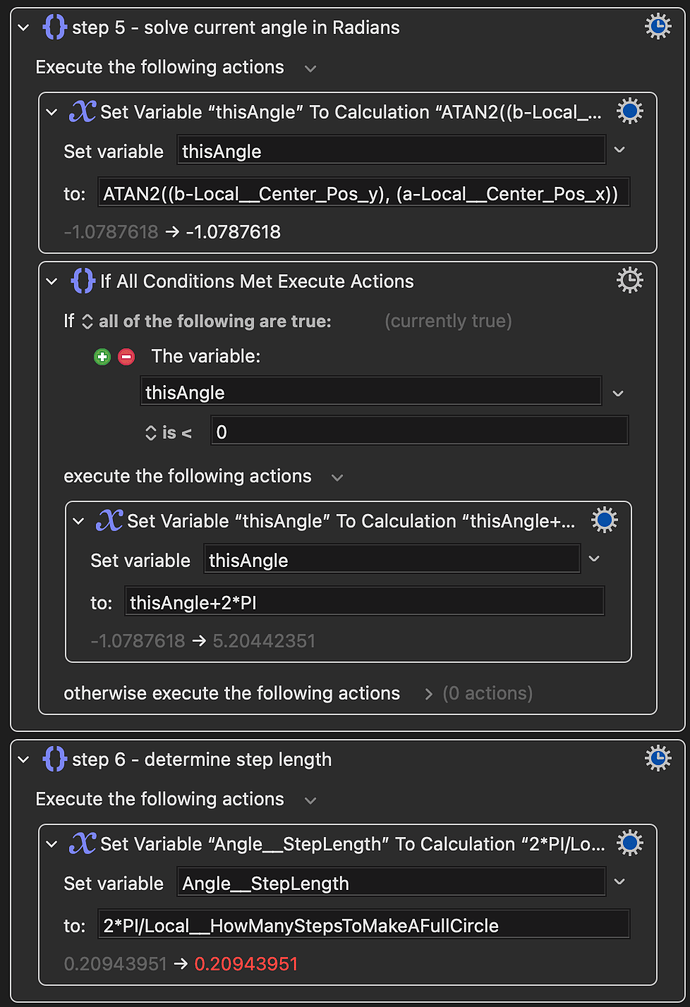
step 5 (in sub 1): calc thisAngle:

step 6 (in sub 1): calc Angle__StepLength
and we also need to solve the step length of the cursor movement.
in the above image, we see when cursor move from C to D. means the radius doesn't change, only the angle to the point O changes. we have a angle increment. i call it Angle__StepLength.
i define a vaiable. Local__HowManyStepsToMakeAFullCircle. means how many operations can draw a complete circle. all in radians. the defaut value is 30. means press hot key 30 times can draw a complete circle with the cursor. the radians of a full circle is 2*PI. so the Angle__StepLength = 2*PI/30.
in the above image. we know

the center O(c,d),
and the radius r,
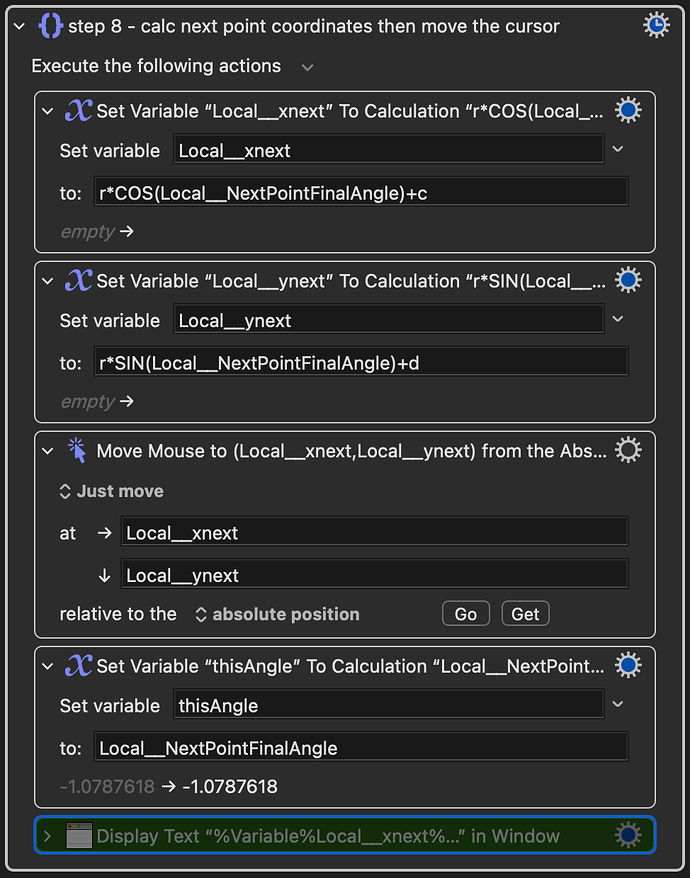
and the new angle Local__NextPointFinalAngle.

we can get the coordinates of new point D.

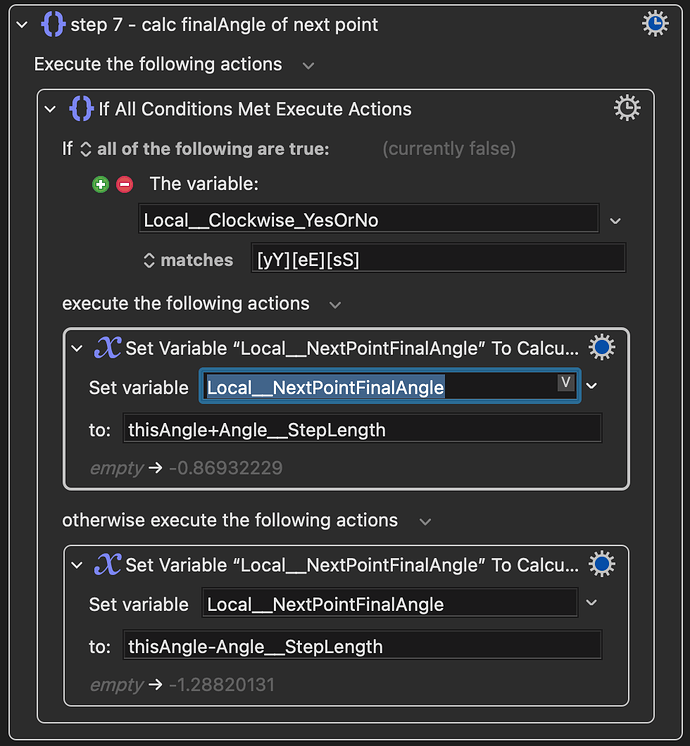
step 7 (in sub 2): calc the Local__NextPointFinalAngle


NOTE here I introduce parameter Local__Clockwise_YesOrNo to determine clockwise or reversed clockwise moving direction.

step 8 (in sub 2): calc the next point D coordinates then move the cursor.


NOTE that in the very end need to refresh the thisAngle. since the cursor has been moved.

now I use a mother macro - Main to manage.


(by the way, just find that if we use status menu trigger the macro, the %TriggerValue% will be empty, i think this is not perfect)

I hope i make my idea clear.