Navigating a set of arrows in a panel

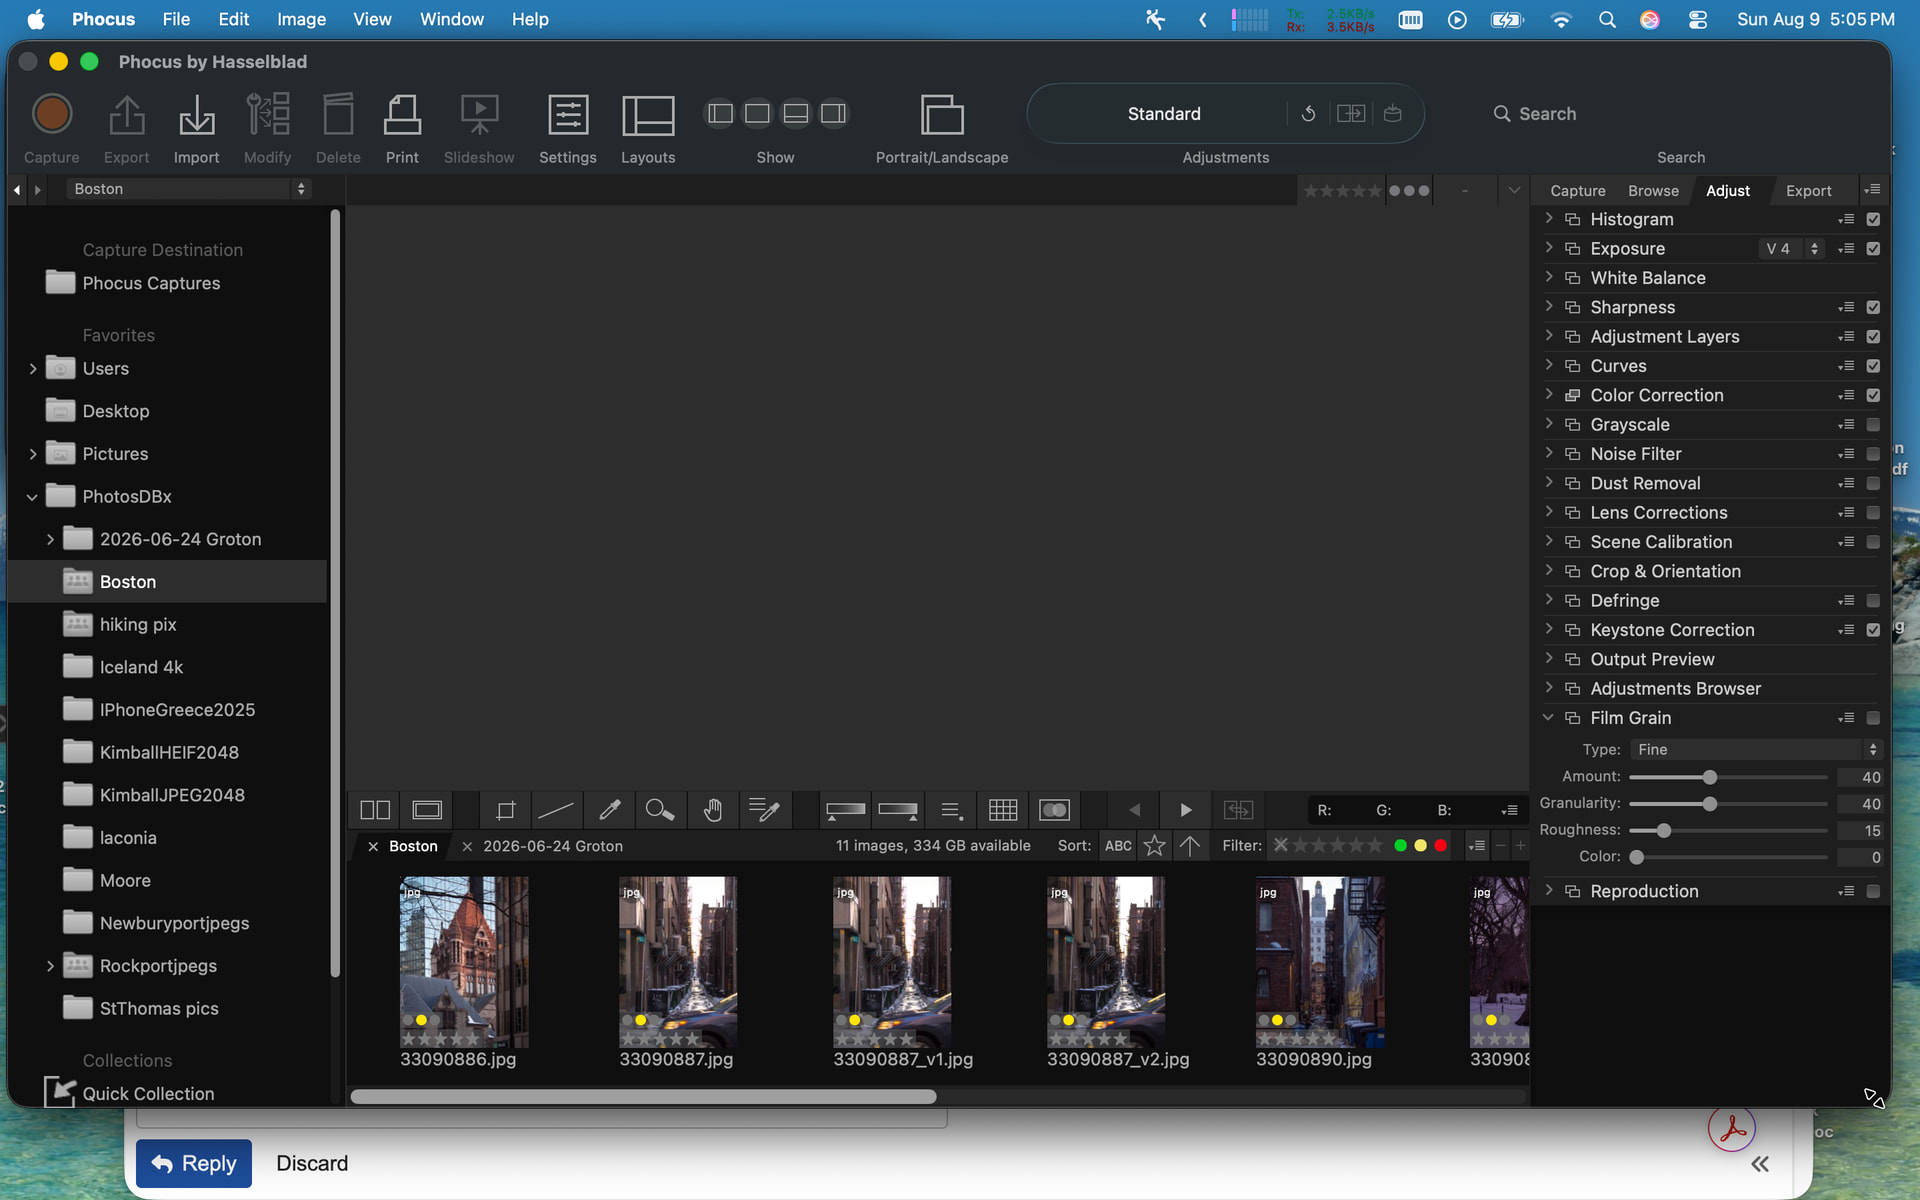
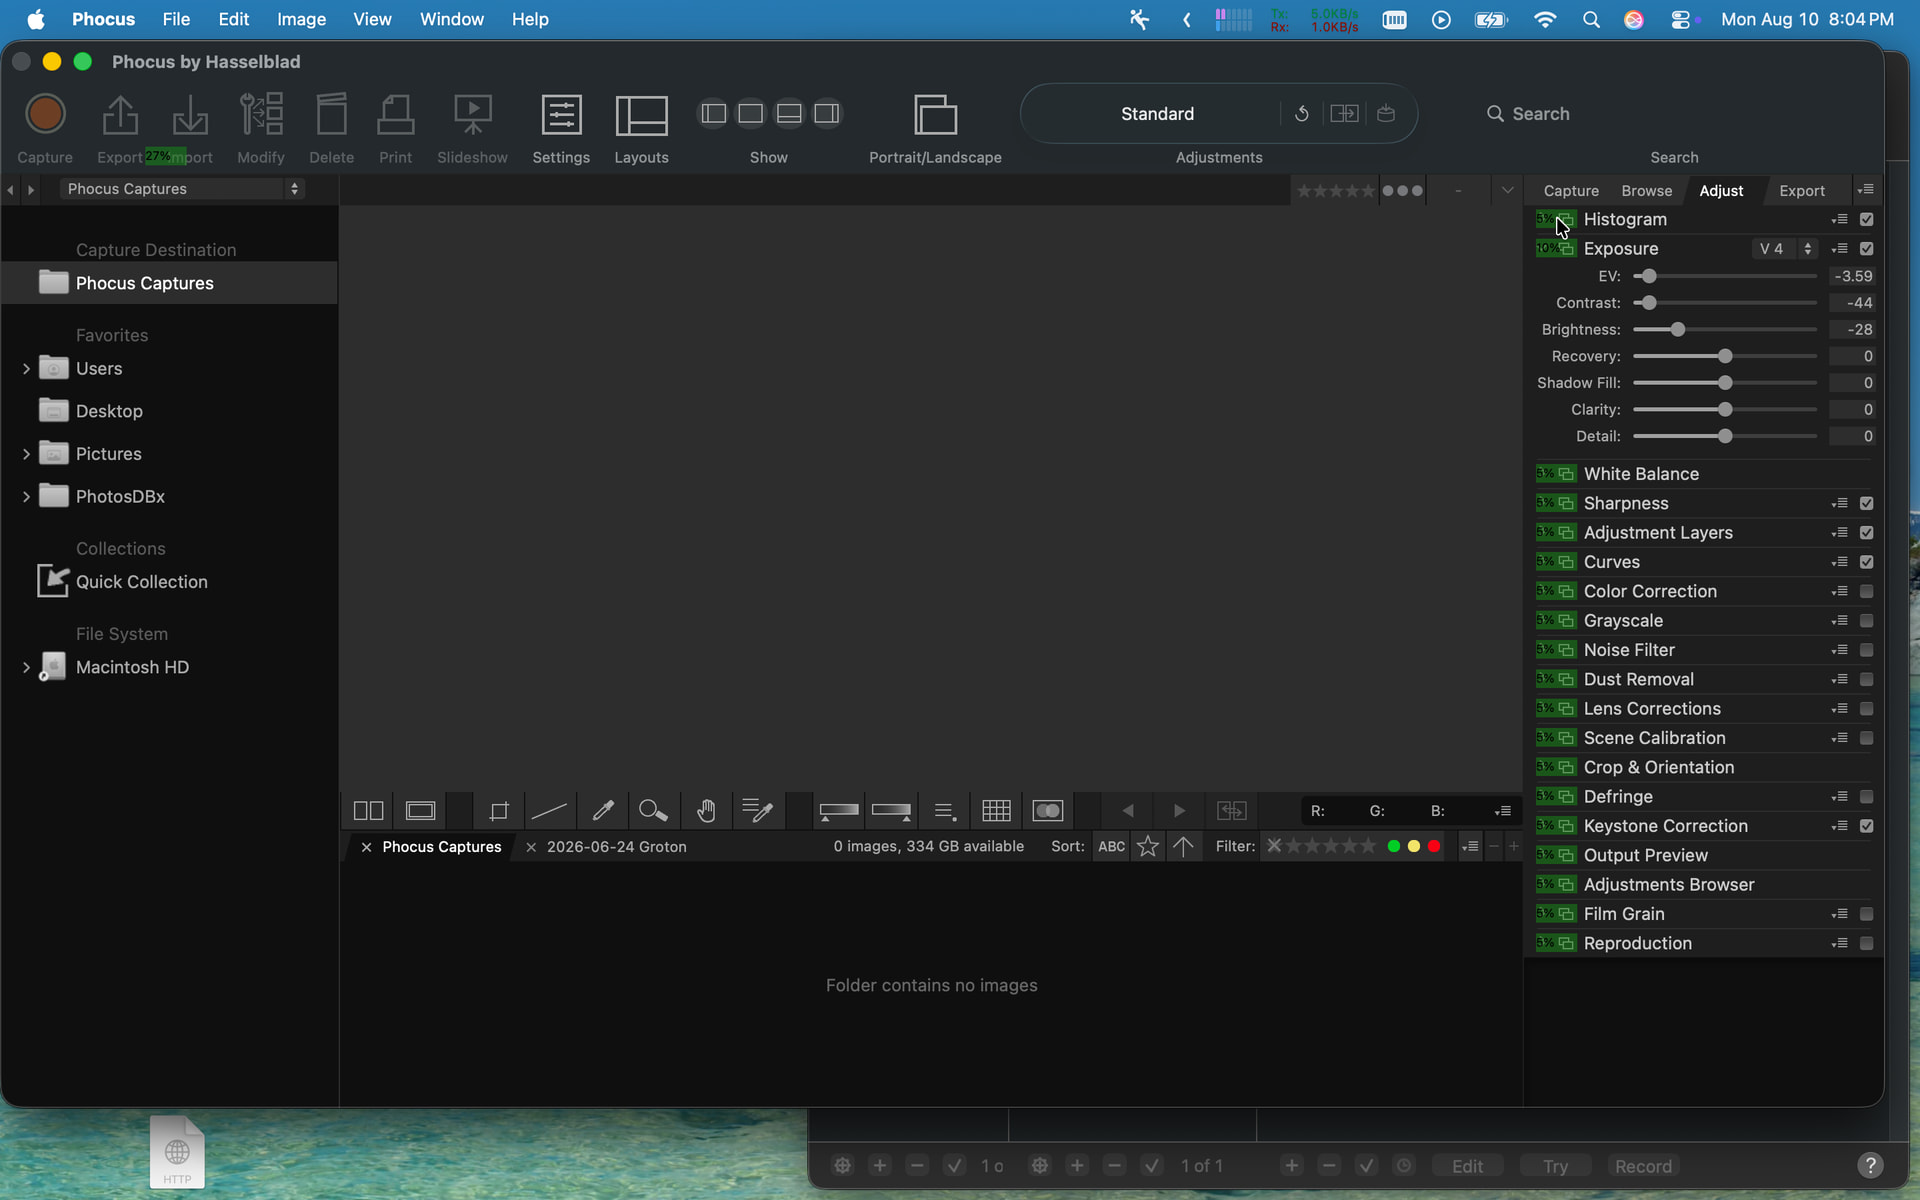
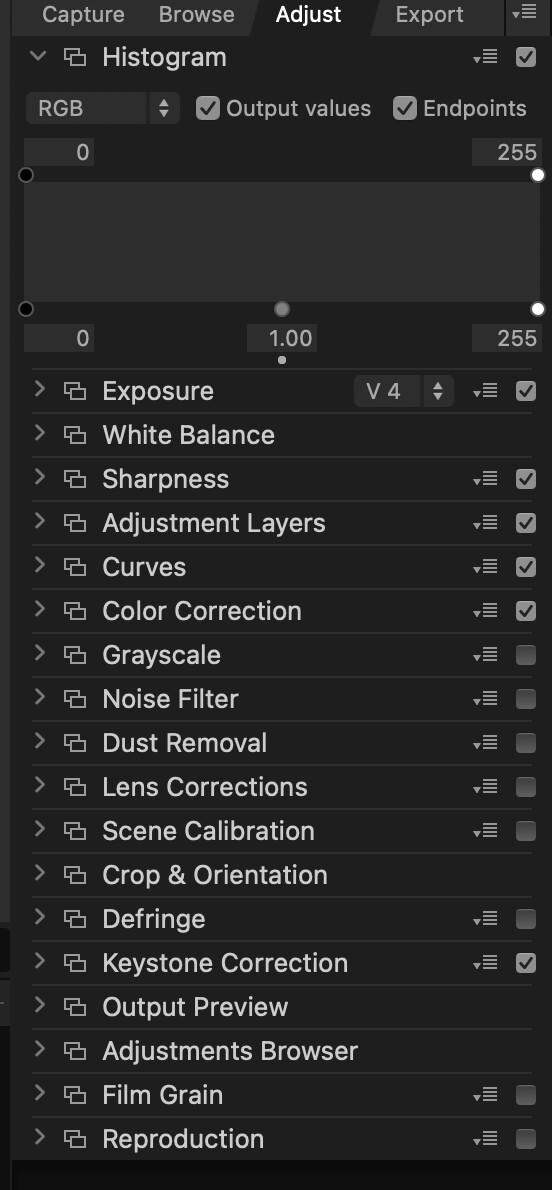
In the application, Phocus, there is a panel on the right hand side with a set of tools each of which can be expanded by clicking on an arrow. see pic below

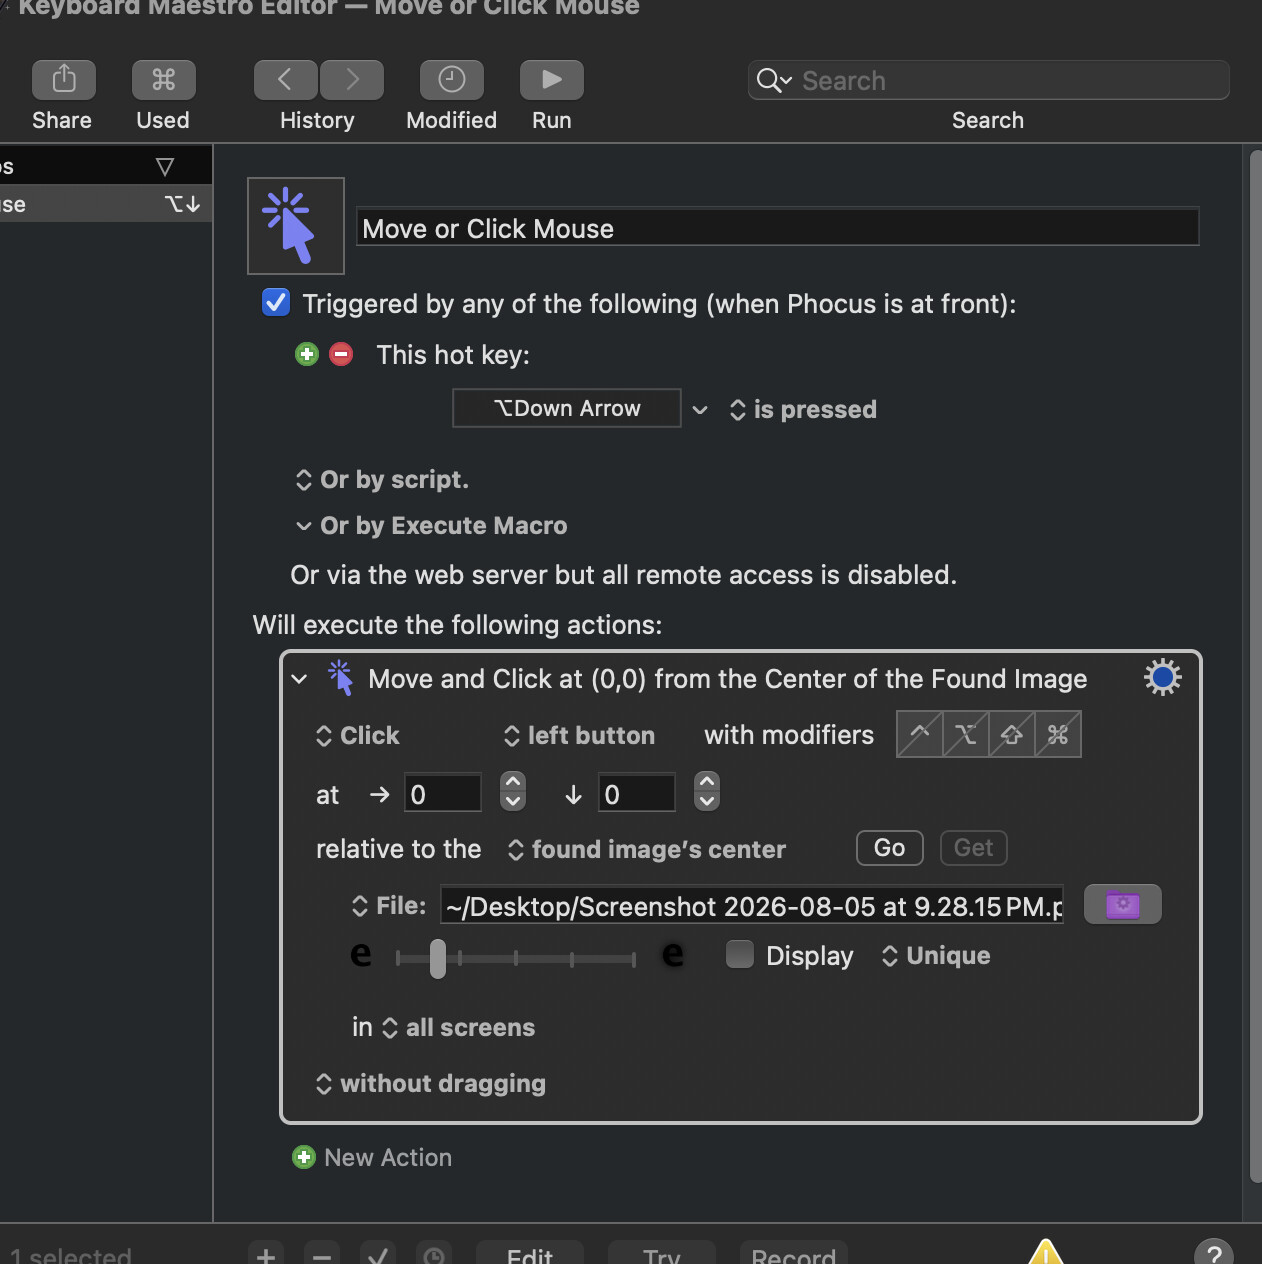
I tried making a hotkey to search for the triangle
Screenshot 2026-08-05 at 9.28.15 PM

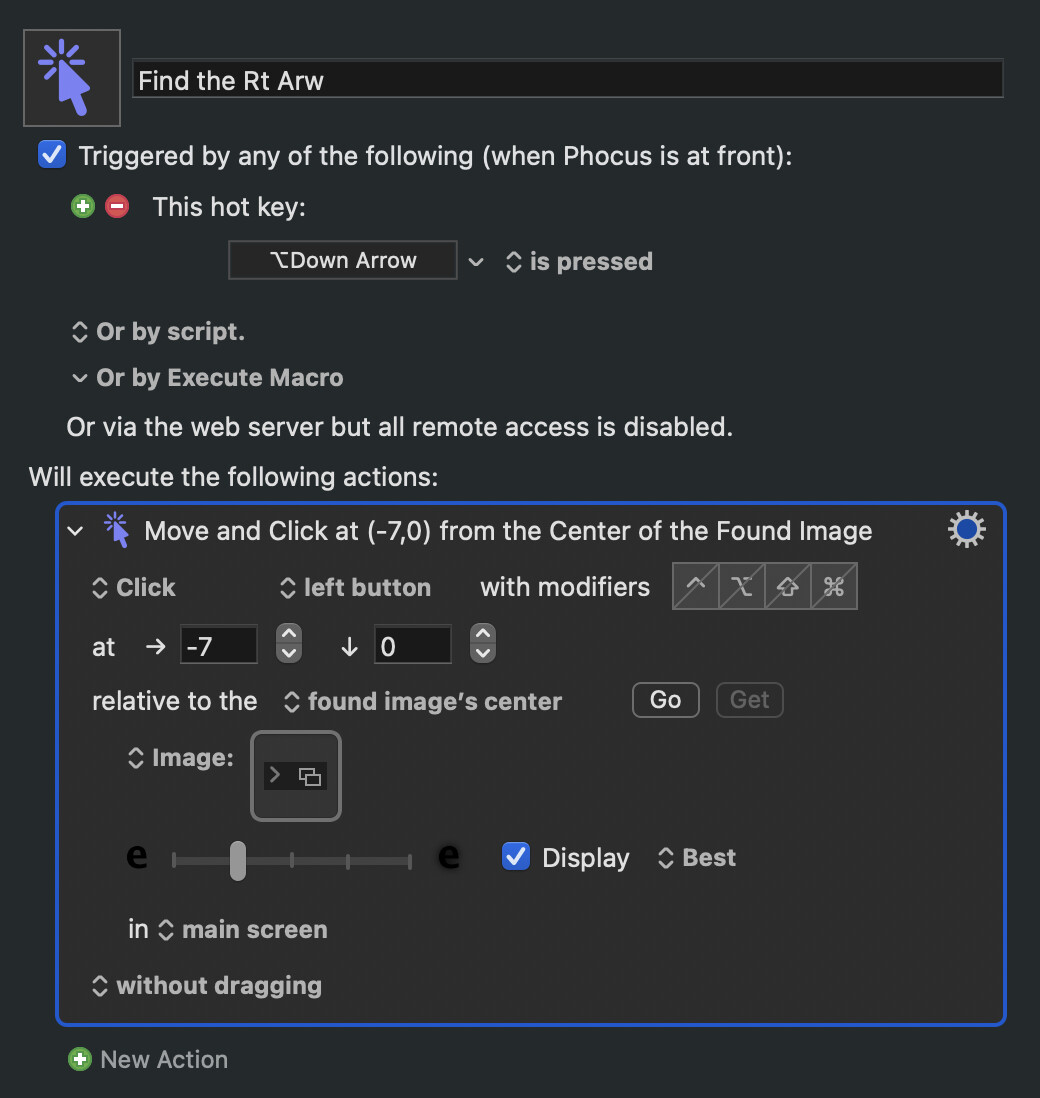
the macro looks like this:

When I make the adjust tab active and run the macro ,
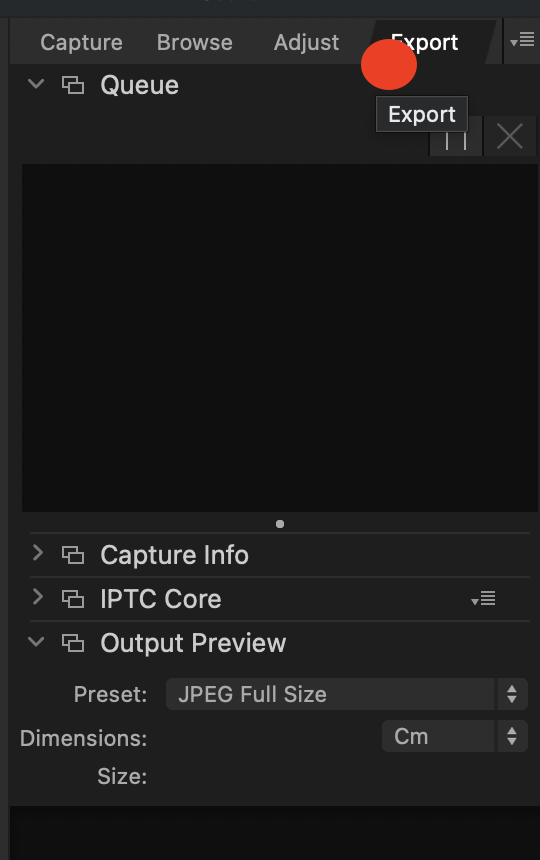
i get an error that says no unique image is found. When I change unique to topmost, the pointer moves to the nnext tab ('export') as seen in the red dot in the image below.

How can i sequentially search for the arrow? This wat I can use a key to advance through the controls.

I gave you specific advice in another thread to prevent this type of problem. Did you try my advice? Did you see my post? Here’s what I wrote. Do you have any questions about it?

I did a google and this app does not support AppleScript. However there’s a chance it might work with Keyboard Maestro’s Button action, so you should test that. You may need to resort to making a macro that uses Find Image to (a) find which triangle is open and (b) getting KM to move the mouse to click on the next rightward-pointing arrow below it, then returning the mouse to wherever it was.

I think it’s very possible to accomplish this, but since you’re the only one who can see the whole window, you are going to have to take the lead.

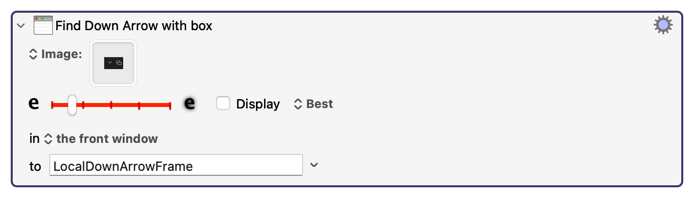
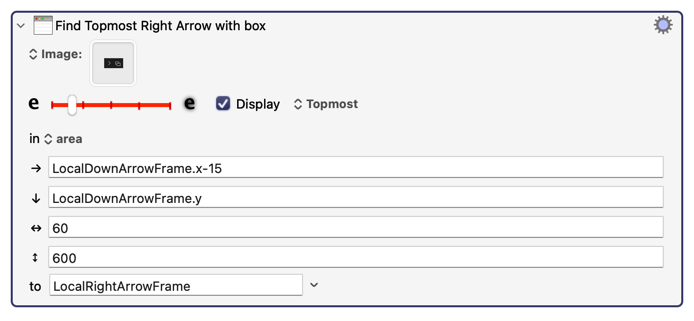
In short, you will create a hotkey triggered by the down arrow which looks for the location of the Phocus window on the screen, then looks for the first down arrow in the left column, then looks for the topmost right arrow directly below it. Then it will click on that arrow. (If there is one.) You could also reverse this logic so that the up arrow moves upwards.

This should work fairly well (ie, reliably.) Since there is a box beside the arrow, I think you should search for a combination image of an arrow with a box, which should reduce false positives.

I think it should be possible to use the left and right arrows to navigate between tabs, but I would start with the up/down arrows first.

I notice in your Move action that you are not placing the image directly into the action, instead you are putting it into a file. While it’s possible to get that to work, I strongly recommend that you start by using a screen snapshot directly encoded into the action, and do not use a file. Also, don’t use Unique. Use the method I described in my post. Read the parts that I bolded above, especially the second bolded section, which contains important advice.

Don't save your screen shot to a file -- that often causes problems with mismatched resolutions come matching time and, in this case, the image is so small it will be more efficient to store it in your macro.

Take the screen shot again by pressing ⌃⇧⌘4 to activate "drag an area to screen shot it, saving the image to the System Clipboard". Drag around your arrow. Set the Action's option to "Image:", click the image well, Paste in your screen shot.

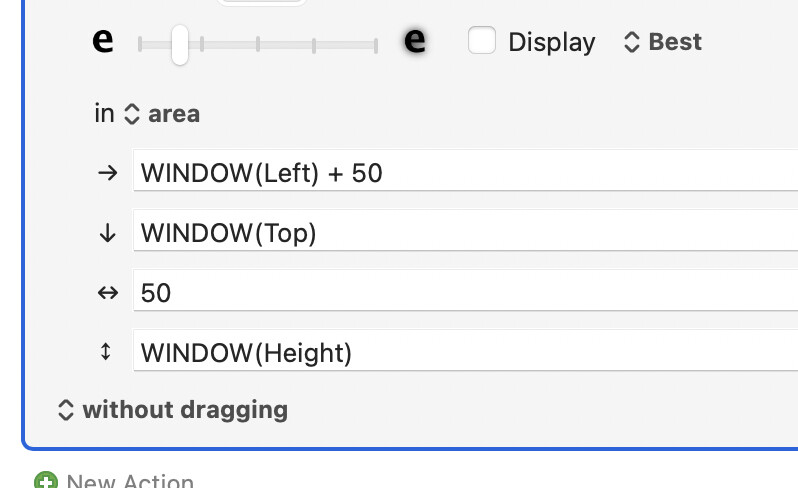
If you can, reduce the area you are searching -- "all screens" could result in some false positives and will certainly slow things down, so see if you can search "a column 50 pixels wide and 50 pixels in from the window's left edge" or similar. So, assuming the window is frontmost, you could set the area as:

For iterating through the arrows, @DocOck's method is sound -- don't forget to include the cases for:

  1. No down arrow is found -- you'll probably want to find then click the topmost >
  2. A down arrow is found, but no > below it -- probably an alert or silent cancel of the macro

If you are also going to implement their excellent idea of working up the arrows too, you'll need to handle similar-but-opposite cases for that as well.

@DocOck yes i read your suggestion. that thread was becoming confusing because of two different approaches. Finding the named button wasnt working for me which is why i tried your approach with 'finding the image'. Here are some thoughts I had regarding your suggestions:
1)" which looks for the location of the Phocus window on the screen
I didnt think I had to do this since this macro is in a group for phocus and I assumed it will only activate when phocus is the active window. I restricted to look in the right half of the screen (this is where the panel is). I want to get navigation working in the panels before I look to the left side of the screen where navigating the folder hierarchy is located.Ultimately, I would like to navigate between the left side of the screen and the right side. If I hard code 'the right side' or ' a column 50 px wide', then running a hotkey for panel navigation (Capture,Browse,Adjustt,etc) would ignore the fact that i want to be navigating the folder hierarchy when i am focussed on it. I suspect that I will need to envelop the whole macro in an if then statement that changes the pixel values of the column i am looking in.Also the UI will be a challenge because the user will not know where the active focus is.
2)' looks for the first down arrow in the left column, then looks for the topmost right arrow directly below it
I dont know how to make it look for the arrow below the one it has found. It would be nice if the the found location could be used in a variable which i can increment a little bit and then use to tell the macro where to look next
3) I will use Nige's suggestion of using the clipboard and limiting the selection to include the bounding box.

I will report back after doing these things and thank you for your involvement. I cannot get to this until later but i will respond, i am not ignoring your thoughtful advice.

Something like the %FoundImage% Token, perhaps? :wink:

But you don't need that with the "Find Image on Screen" Action since you can save the found image rectangle to a variable.

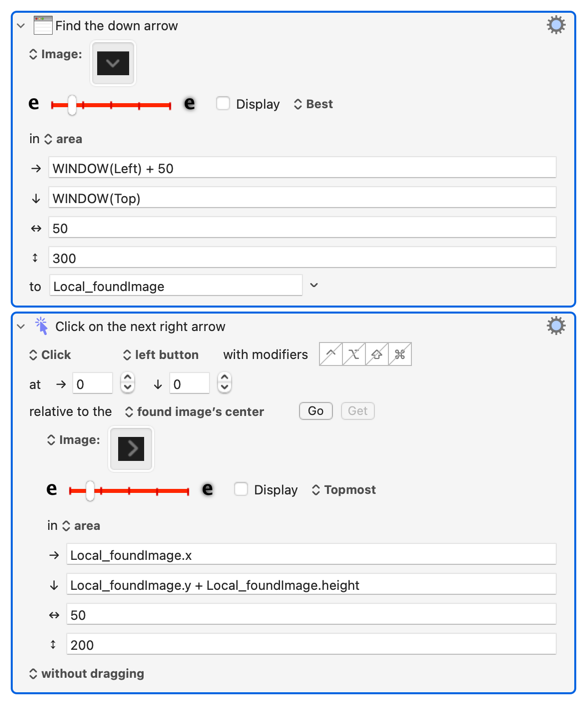
So you can find your down arrow (if you don't close the previous one on the next run, find the bottommost match) then limit your search for the next > to an area immediately below that. I think you'll have to make the height of your search area at least the height of your largest disclosed area -- I've guessed at 200px here:

Even if that’s true, you still have to find the location of the window. The window could be anywhere on the screen. After all, you want to be able to move the window. When I write macros like this, I like my macro to handle different window locations. In this case, finding the location is as simple as using the token %FrontWindowFrame%. From there, we have to decide which PART of the window to search for the arrows (plus the blocks.) You haven’t shown the entire app’s window, but it sounds to me like it’s on the right side of the window, and always the same width. Right? I could give much better advice if you showed the whole window rather than just the part of the window where the tabs/arrows are.

This sounds important. Are you saying that the frame is a floating/focussable window, and not fixed in the app? This is extremely important, and it would really help if you show us, instead of using paragraphs of text to explain it. It’s hard for me to come up with the correct answer when I can’t see what I’m dealing with. I need to see the app’s entire window to help you find the location of the frame that you are working with.

That’s why I said earlier that you will have to find the location of the window. I need to be able to see the screen in order to give you good advice here.

I can see two different solutions here. One, you can get the mouse to click on the open down arrow, then move the mouse down about 20 pixels, then click on where the next right arrow is (this method assumes there is one, so it may not be the best method.) Two, do another search, using your Find Image action to search ONLY the area directly below the right arrow that you found, and make sure you search for the “topmost” right arrow below the arrow that you already found. That’s what I was trying to explain in my original post. I might have drafted some code for you, but since I can’t see the entire app’s window yet, I can’t draft any code.

For creating the UP macro, you don’t have to search downwards. You just have to move up about 20 pixels for the next right arrow. So upwards is easier, although you MIGHT have to handle the case when the first arrow is the expanded one.

That’s exactly how the Find Image action works. The documentation for the Find Image action will explain how you save it in a variable. I think the problem here may be that you think that Find Image works only as a condition, whereas it actually also is an action. (Even as a condition, it DOES return its value in a token called %FoundImage%. But I don’t recommend that you do that here. Use the action, not the condition.)

In case you didn’t grasp one of my points earlier, I will re-iterate here that you aren’t going to be searching for right arrow, you are going to be searching for the following image. That’s because this is a far more reliable image to search for than a simple right arrow. I can see that all your right arrows have a double box to their right, which is a very helpful situation for you.

image

The first thing you should probably do is write a macro to test how reliable this search is. If it cannot find the down arrow reliably, then we have to discuss new approaches. I cannot do this testing for you, partly because you haven’t shown the app’s window. If you can do a test like this and tell us if it’s reliably finding the location of the right arrow, it’s a win for us all. But finding the window to do the search is something I can’t help you with until I see the entire app’s window.

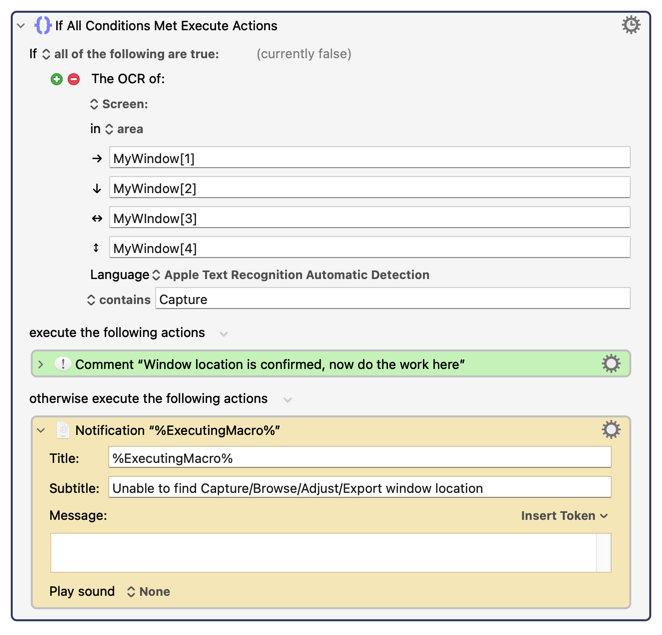
P.S. I’m neither the clearest writer nor the smartest person on these forums, but I write macros that use Find Image actions every day, so I’m experienced with this topic. And lately I’m also using a lot of OCR action work, and I can almost see a solution using OCR, or at least in this case, I might use OCR to validate that we have the location of the frame, like this:
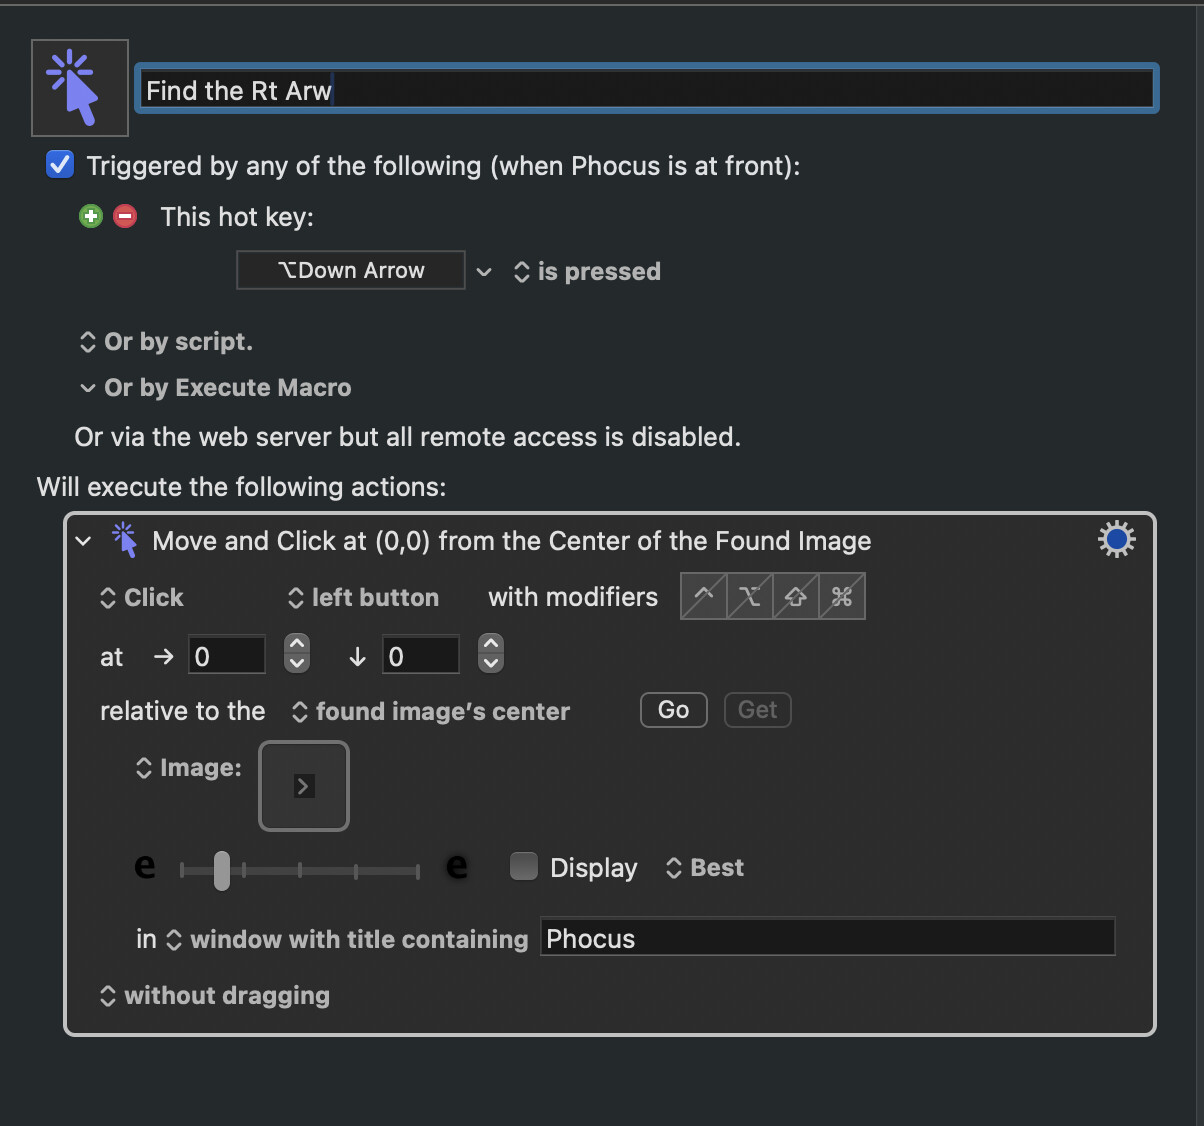
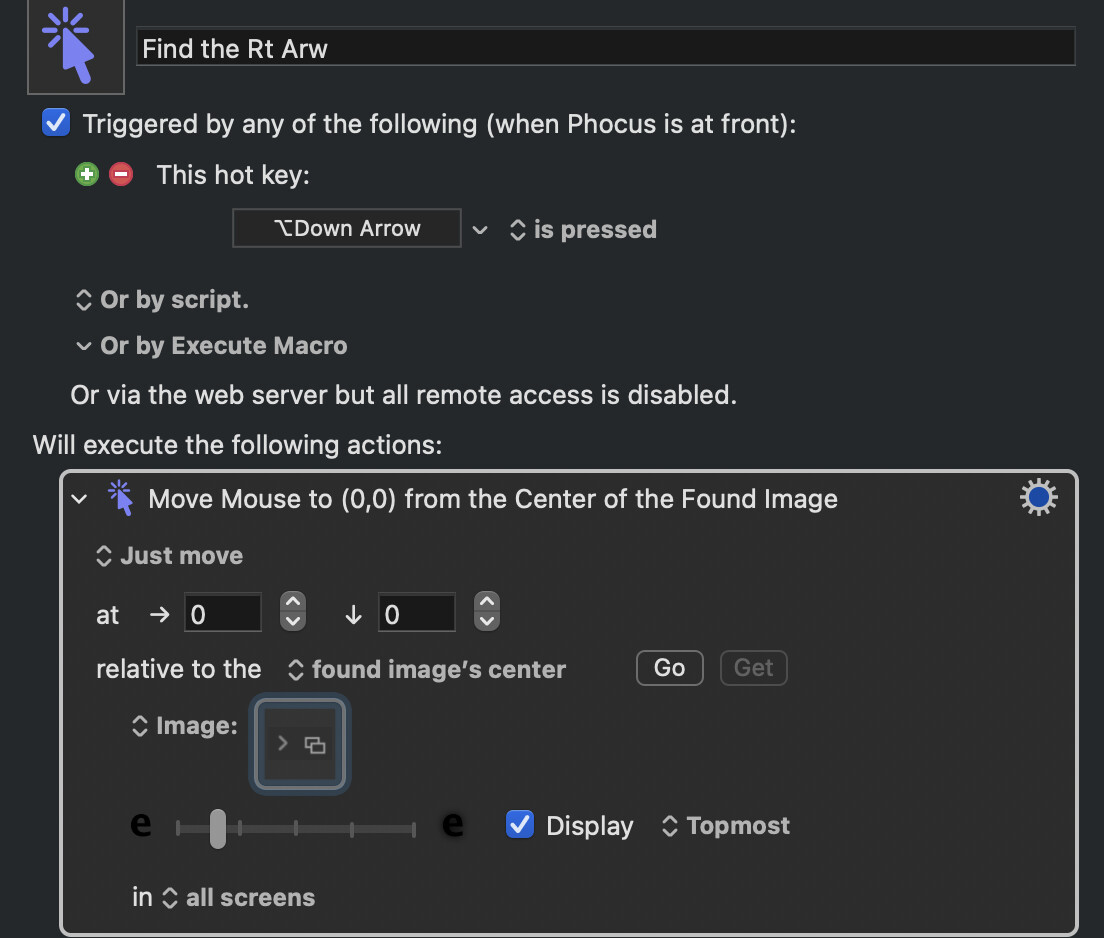
So I returned from my trip and got back to this project. Thank you for your suggestions. I tried making this image finding macro:


The application looks like this:

Triggerring the macro with option down arrow results in expansion of the bottom triangle in front of 'reproduction'. Triggerring again expands the tool above it,'film grain'. Triggering again expands the next tool above, 'Adjustments Browser', Triggerring again expands the next tool above, 'Output preview'. Triggerring again now moves to expand the triangle in front of the bottom tool, 'reproduction'. The macro just cycles through these 4 tools.

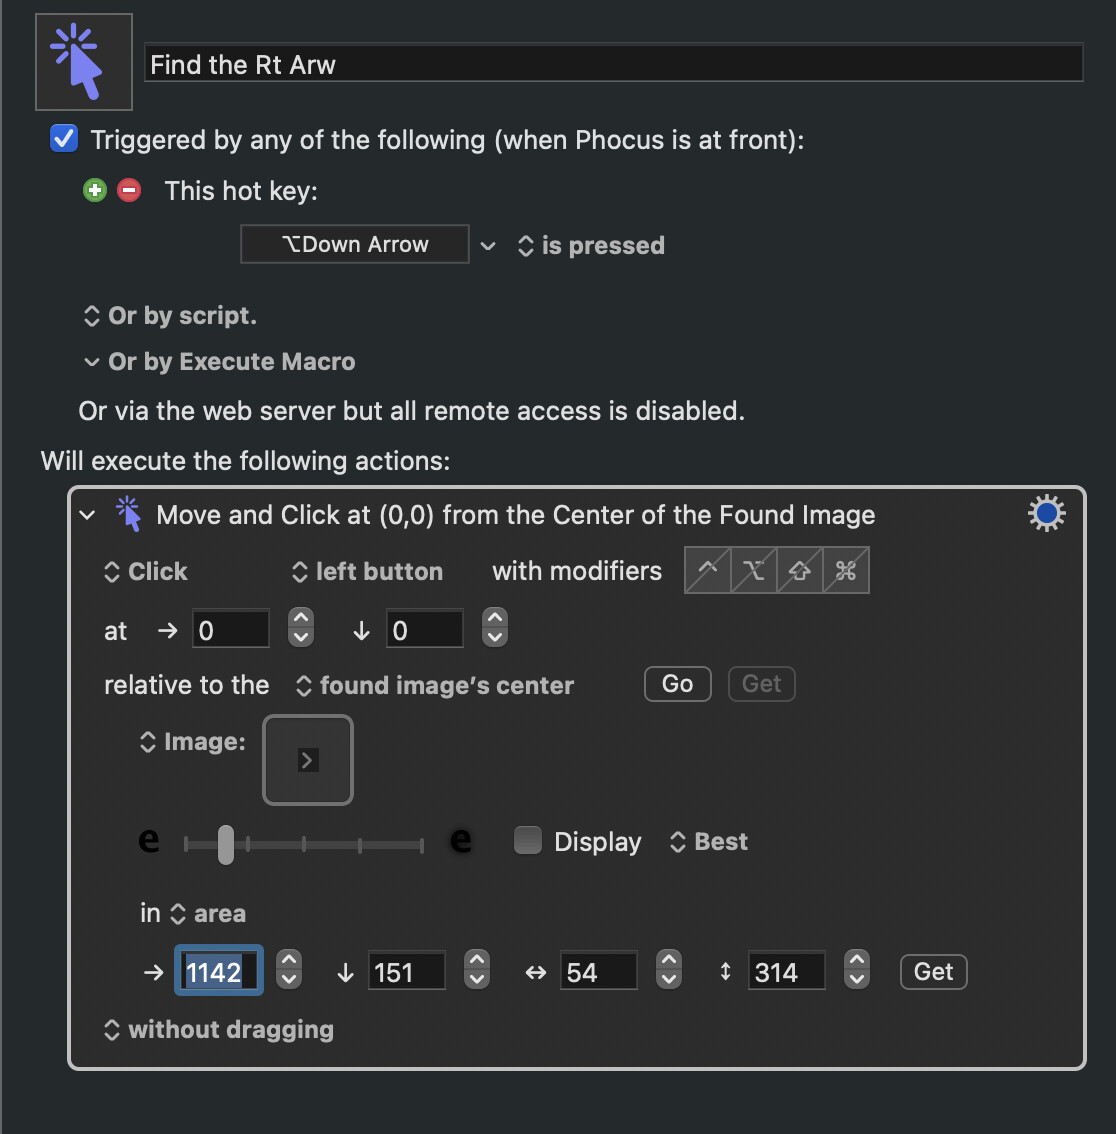
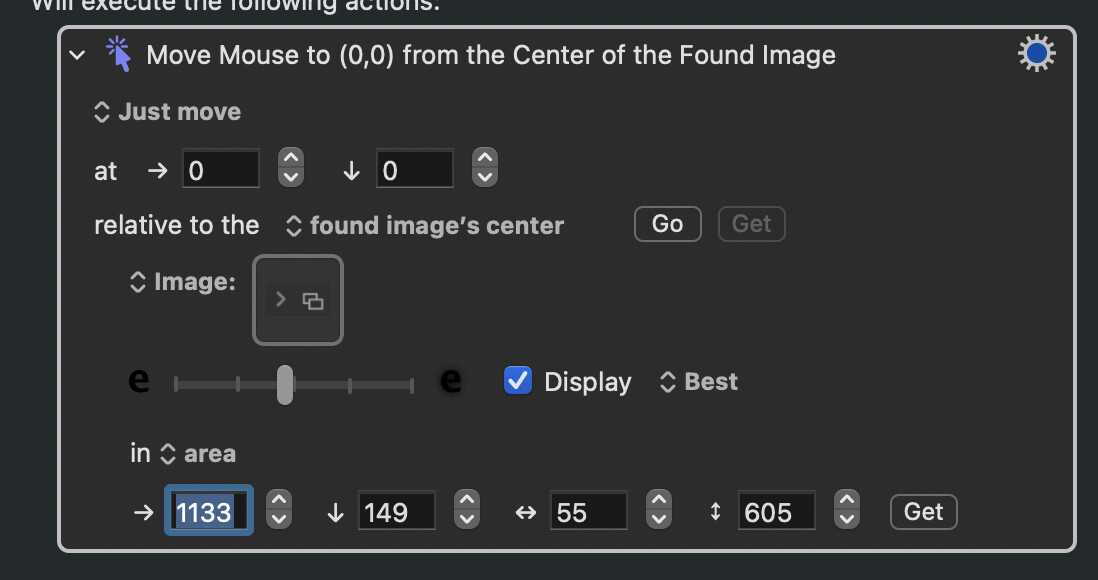
I also tried Nige_S's suggestion but when I set the maro to look in an area it looks different, like this:


I got the area coords by using the get button and selecting the column of arrows.
Notice there is no option to save the found location to a variable.
When i run this macro, it cycles among the top three tools.

I congratulate your efforts. You made a great effort. But I see some mistakes.

First, you didn’t search for what I said you should search for. I told you to use an image containing both an arrow and a box. You searched only for the arrow.

Second, you didn’t search for the arrows in a restricted area, where they will probably be found. Instead, you searched within the entire application window. In theory, that could work, but since you have such a “weak” image to search for (just a grey arrow), you may need to do additional things, like narrowing the region that you want to search. That will take a little arithmetic (which will mean you will need to fetch the screen coordinates of the application and then adjust those coordinates using a little arithmetic so that only the desired area is searched. I can give you the arithmetic later.)

Third, I said that the first thing you should do is test if the search action actually finds all the arrows. You did do some testing, but not the right kind of testing. Your testing actually tried to click on the arrows. What I want you to do is just test by having all the arrows highlighted by a test macro, so that you can see with your eyes if there are any false positive or false negatives. You even named your action “Find the arrow” but instead of just finding, your action actually clicks on the arrow.

The good news is that these things are not hard to fix. And there’s more good news… your screen shot shows that the arrows are in a predictable place within the window.

So the simplest way to proceed without doing any arithmetic is just change your action from “Move and Click” to just “Move”, and then change your action’s option from “Best” to “TopMost” and then change your action so that “Display” is checked (enabled.) Then press your hotkey. It should show you all the places that the Find action SEES arrow buttons on the screen. You can press the hotkey several times, and as you do so, verify if there are green boxes placed over all the arrows, and NOWHERE else. If that works, we are 80% of the way to a solution. If that does not work, we have to take some additional precautions. So let me know how that works.

I used a capture of the arrow and adjacent box as an image to search. This:
image

It cannot find anything.
If i move the slider (just to the left of the display checkbox)a couple notches to the right, a bunch of random green rectangle
s show up when i try it.

I also tried limiting the search area to a region of the which is a column that includes all of the arrows.

but it cannot find anything

I guess the image search requires more contrast to work so this approach is failing.

There are a couple of reasons this might occur. One reason is the method you used to capture that image and place it in that box. You didn’t say how you did that. Can you explain your exact method? I suspect this is your problem, but I can’t be sure, since you didn’t say how you captured the image.

Not necessarily. If you answer my question above, we might find a much simpler answer.

(There are some “wrong ways” to capture images that would results in exactly what happened to you.)

command shift 4 and drag the selection box over the area of interest.
save the clipping
open it in preview, select all, copy
go to keyboard maestro, select 'image' in the action and paste

That’s your problem. That’s why you aren’t getting the correct results (I believe.) Try doing it the correct way, which is CMD-SHIFT-4, copy the region to the clipboard, do not open it in Preview, paste it directly into the action, and if you do that, your results will probably skyrocket to 90 or 98%.

At least that’s been my experience. You see, Preview changes some scaling attributes of the image. The reason it couldn’t find your arrows was because the image was re-scaled in size and for that reason it couldn’t find good matches.

It’s hard to explain. But trust me. Do it the way I described and it’s most likely your macro will start to work better. Then we can move onto the next steps. I try not to explain everything all at once because it’s too much. So I take it step by step.

Because "Move or Click Mouse" and "Find Image on Screen" are different Actions, with different options. In case you missed the earlier links:

The "Move or Click Mouse" Action: action:Move or Click Mouse [Keyboard Maestro Wiki]
The "Find Image on Screen" Action: https://wiki.keyboardmaestro.com/action/Find_Image_on_Screen

You can still save the found location when using "Move or Click Mouse" -- it's held in the %FoundImage% Text Token:

You'll run into problems when using "Best" for your match -- with 19 identical images, "Best" will be... problematic. That's why it is better to look for the down-arrow first, then look for the first right-arrow below (or above) that, or the top-most (bottom-most) right-arrow if no down-arrow is found.

Don't do this! @DocOck's already explained what to do, as did I earlier:

If you go the save-and-open-in-Preview route your image will probably default to 72dpi and will not work well with a Retina display.