Overall objective
This series is designed to help those looking to use sqlite3 databases with their Keyboard Maestro macros. It assumes minimal to no knowledge of sqlite3, and I'll do my best to clearly explain things as I go.
If you have questions, please ask and I'll do my best to clarify.
Part One
Part Two: You're reading it
Part Three
Part Four
Overview of Part Two
Part One of the series ended with a working sqlite3 database in the DB Browser for SQLite app. Part Two of the series will end with that database being created in a Keyboard Maestro macro on your Mac. It begins with a bit more detail on SQL commands and databases, then moves into how to set up the database in a macro,
Depending on the intended use of your database-laden macro, you may be able to skip a large section of this part of the series. Keep reading to see whether or not that applies to you.
By the end of this part, you should have a macro that creates a database, populates it with preexisting data, and allows adding new data to the system.
Note: The completed macro is linked at the end, but you'll gain a lot more knowledge by following along and building the macro yourself as you go. To make building it simpler, I'll provide copy-and-paste text where required, to reduce needless typing. But you really should build the macro yourself to get a feel for the process.
A bit more about SQL and databases
SQL statements are how you make the database do what you want it to do. In the first part, I linked to the SQLite Tutorial, which provides a good introduction to using SQL in the sqlite3 database. I also noted you don't need to be an expert at using SQL to work with it in your macros, and that's still true. Here's a short list of some key topics that you should focus on as you learn the language and the database system…
Indexing
You may want to index certain non-key fields in your database. An indexed field will return query answers more quickly, sort much more quickly, and enforce unique constraints, if you have them. If you look at my MacroBackerUpper macro (in the dbase | 12 Database creator macro), you can see I add some indexes:
CREATE INDEX IF NOT EXISTS idx_groups_new
ON groups_new (Group_Name);
CREATE INDEX IF NOT EXISTS idx_macros_new
ON macros_new (Macro_Name, Group_ID);
Read the linked article, and then experiment to see if indexes improve your database's performance.
If this were a real sales tracking database for a company with hundreds of employees and thousands of products, you would want indexes on things like employee names and product names. For purposes of this demo and it's limited-size database, we'll be skipping the indexing.
Reading data
You read data from a database with the SELECT command, specifying what you want (the columns) from where (which table), in what order, and meeting certain conditions as specified in a WHERE clause. SELECT statements can be quite simple or quite complex, depending on what you're trying to do.
Writing data
You write data to a database with the UPDATE and INSERT commands. I always practice such things in DB Browser first, in case I mess something up badly!
Merging data across tables
JOIN commands are used to merge data from two or more related tables. In part one of this series, the sample sales report SQL contained two JOIN commands to merge data from the Employee and Products tables with the Sales table.
Controlling what's returned
You can use a bunch of terms—WHERE, LIMIT, IN, LIKE, BETWEEN, etc.—to control what data is returned from your query.
Dot commands
Dot commands are used to send commands to the sqlite3 application, as opposed to the database. There are a bunch of them, but the only one I use is .separator, which specifies the delimiter to use between fields in data I pull from the database. For example, .separator ### would cause the database's returned data to look like this:
Field_1###Field2###Field3
Being able to set a delimiter makes it easy to split the data you get back from your database inquiries. Note: You do not want to use ###, or any other relatively easily typed string. If you do, and your data includes that string, you will break database operations when the parser can't figure out where the field split goes. So use something obscure that's virtually guaranteed to not show up in your data. You'll see examples of how I use the separator later on.
Ask the bot!
When in doubt, ask ChatGPT—just make sure you let it know you're using sqlite3 so you get the proper SQL commands back.
There's obviously a lot more to SQL (heck, there are multiple books on the topic!), but working through the tutorial and with some hands-on time in Keyboard Maestro, you'll be able to pick up what you need to know without too much trouble. Now, let's get a database into a macro!
Who is the audience for your macro?
Depending on the intended user(s) of your macro, the database-related portion of the macro can either be incredibly simple or not quite so simple…
For your own use only
If you are creating a macro for your own use, that you have no intent to distribute to anyone else, then congratulations: That database you created in part one? It's actually ready to go into any macro you want to use it with in Keyboard Maestro. All you need to do is create a variable with the path to the database, and that's that. You'll then be able to interact with the database using the actions and routines you'll soon learn.
I do exactly that for my private database macros: Set it up in DB Browser for SQLite first, import any data it needs, and then in Keyboard Maestro, I just create a local variable that points to the database and start using it. There's no need to code support for things you'll never have to worry about with an unshared macro.
If this is your use case, you can skip to The SQL Runner section (feel free to skim the other parts), as everything between is about publicly-distributed macros. Make sure you download the complete macro at the end, as you'll need it for Part Three. While the macro is designed as one that could be shared, all the methods it uses for database interaction are the same as you'll use in a private macro.
For public distribution
If you plan on distributing your macro, the above method isn't a good way to go. Your macro needs to be able to create the database and load it with data from within the macro. It also needs to be able to rebuild the database if the user somehow loses it. This is much more complicated than an internal use macro, obviously. The macro that this tutorial builds will at least touch on handling those issues, and link to examples in other macros for more details. It's a much more complex thing than building a database-enabled macro for your own use.
My rules for databases in distributed macros
When I decide to use a database in a distributed macro, I have certain rules that I enforce while implementing the database:
-
The macro must be able to recover from a lost database. This doesn't necessarily mean recover without losing any data, but rather that the macro needs to be smart enough to recreate the database it needs in order to do keep doing its work. The user must also be given a chance to locate a lost database before giving up on it.
-
I always use a SQL command runner subroutine to execute the SQL statements. This saves a bit of typing, but more importantly, makes it much easier to read my code to see what's happening.
-
After releasing MBU, I discovered that it was also critically important to be able to log what the SQL command runner subroutine is doing. In MBU, that routine is called probably at least 70 times. If I make a typo in a SQL statement, the macro breaks while trying to execute it—so the logged failed action is always pointing at the SQL command runner. And while that's true—it did cause the failure—it's also useless information: I need to know what the SQL command runner was trying to do when it broke. So from here on out, all my database macros include a way to log what routine called the SQL command runner. (And you'll see this demonstrated in the sales tracking database.)
-
The user controls where the database will reside. I don't feel it's my place to make that decision for the user, so I always prompt for a location before creating the database. This location is stored in a global variable.
-
If the macro changes data it retrieved from the database, I write it back to the database as soon as practical—I don't ever want to lose any data by trying to make a single batch of changes that pile up over time. If it changed and you want it, write it back.
Enough with the rules; how do you actually create a database within a macro?
Build the macros!
Create a new macro group ("sqlite part two" or whatever you want). Now create three new entries within that macro group:
- 1 - Sales Tracking: (Macro) This is the main macro where most of the work will happen. The
1-bit is just so it sorts to the top of the list. - Database Creator: (Macro) This macro will be used to build the database for first time users, or when it can't be found.
- SQL Runner (Subroutine) This subroutine will take a few arguments as input, including the SQL commands that need to be run, and then run them on the specified database. Don't worry about setting up its parameters at this time; we'll do that later.
We'll start by building the first part of the Sales Tracking macro. The macro needs to know if its database already exists, and the easiest way to do that is to check if the global variable that shows its location exists. If the global doesn't exist, the macro assumes this is a new user and goes through the first time setup. If the global does exist, the macro should make sure the database is actually there before proceeding. (The demo macro doesn't include that process, but points out where it would be.)
Because the macro may have to create the database multiple times, database creation will happen in the Database Creator macro. Typically I would also put all setup in a separate macro, as it can get quite involved—you can look at the setup macro in MBU as an example. But given the simplicity of this demo macro, the setup will reside in the main macro.
Note: For the purposes of this tutorial, I'm not building in much (if any) error checking. The point of the tutorial is to teach about the database integration, so the data integrity side of things is up to you. I don't want to make the macro any more complicated than it needs to be given the objective. Also note that this is not the only way to build a database-enabled macro; it's just the way that I've chosen to build this particular one. But the ideas will be applicable to any structure you choose to use.
You can copy/paste variables and other text from the following steps to reduce the typing required. If you're feeling really lazy, the full macro is linked at the end, but you'll learn a lot more by building it yourself. Each step contains a screenshot of the completed step, and the instructions for creating it yourself.
1 - Sales Tracking macro
The Sales Tracking macro actions
The first thing the Sales Tracking macro needs to do is check to see if this is a new or returning user; i.e. is the database there or not?
Action 1: Switch/Case
If > Variable > rg_SQLdemo_path > is empty
  Prompt for User Input
    Title:  Welcome to the Sales Tracking Database
    Prompt: Enter a name for the database file, and when the macOS save dialog appears, select the folder that will hold the database.
    Variables and default values: local__Filename
    Buttons: OK (remove Cancel)
  Prompt for File
    Choose folder
    Title: Select the parent folder for %Variable%local__Filename%
    Set variable: local__ParentFolder
  Set Variable to Text
    Set variable: rg_SQLdemo_loc
    to: %Variable%local__ParentFolder%/%Variable%local__Filename%.db
  Execute Macro
    Database Creator
⋅
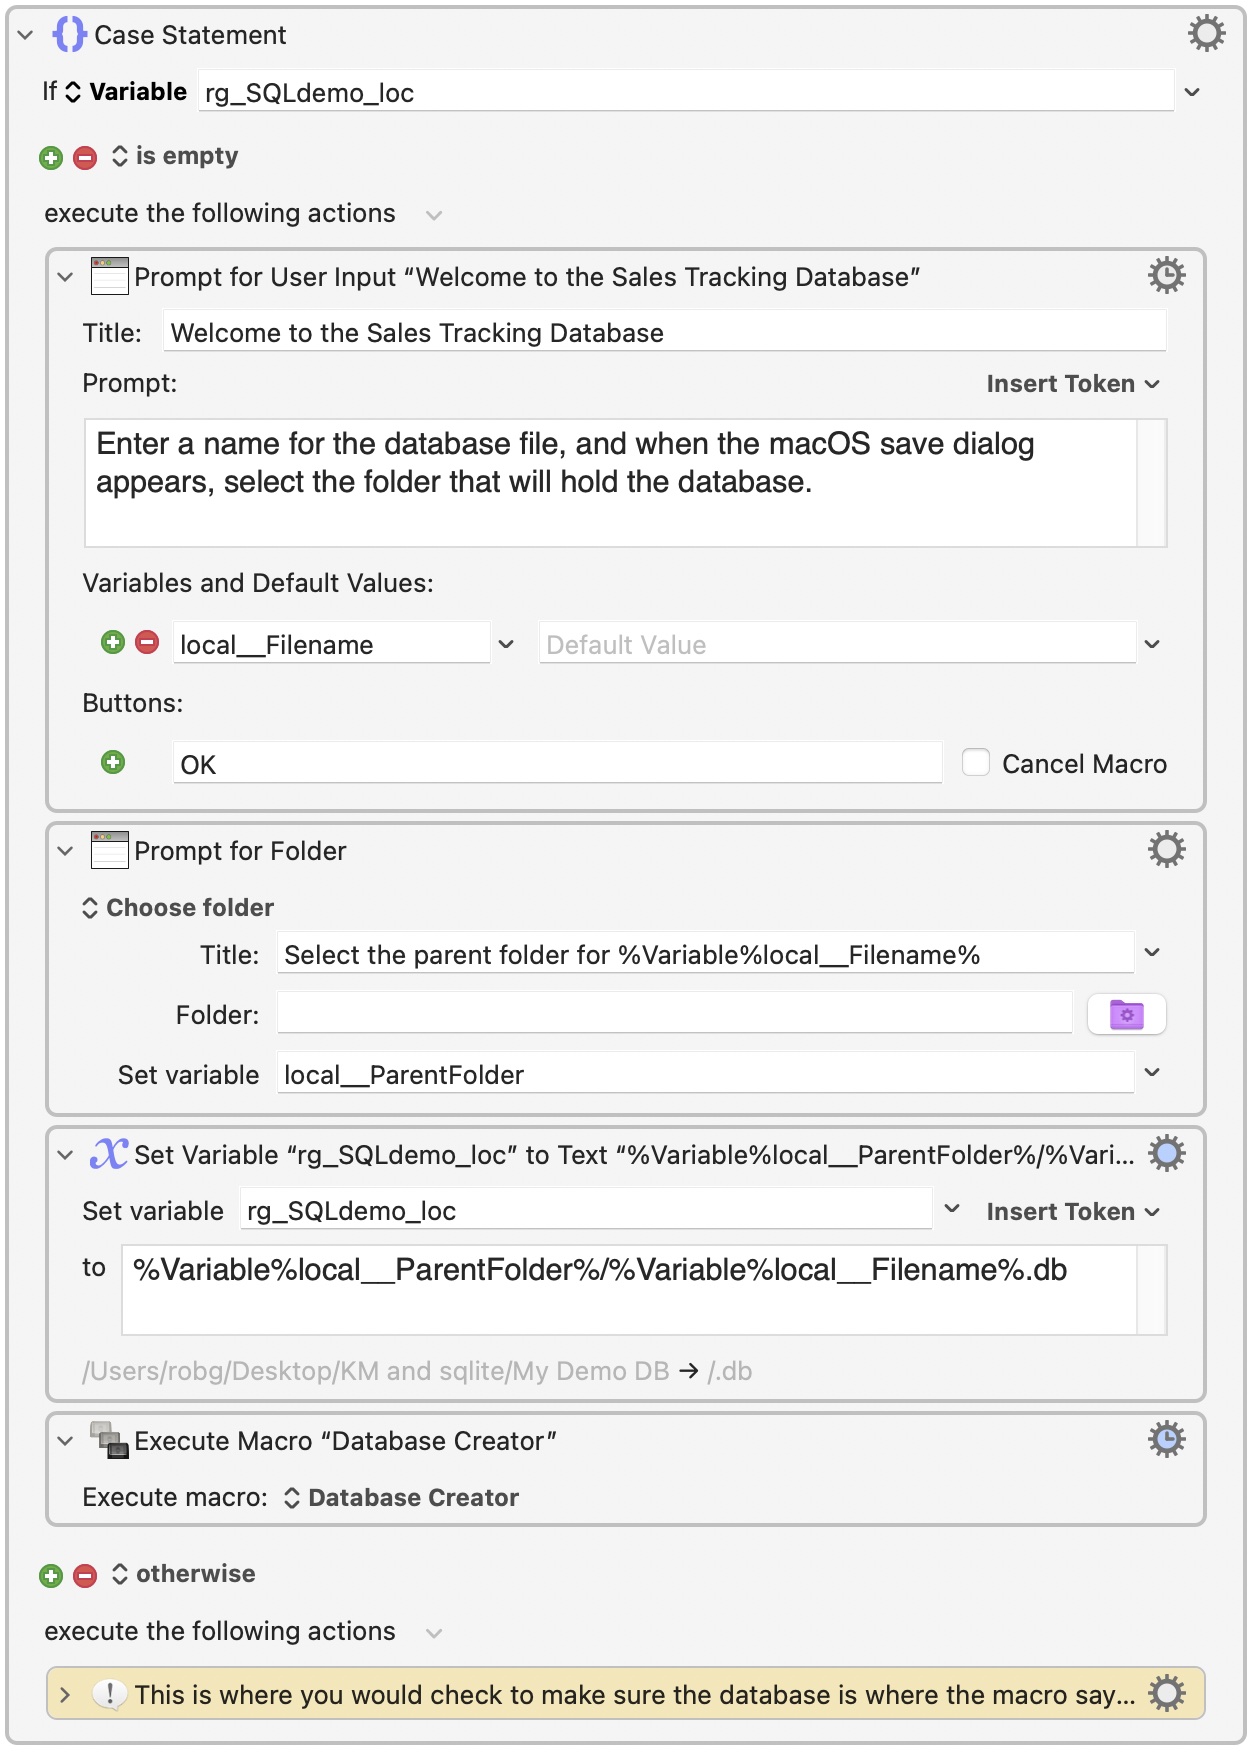
This is our setup step: The macro checks to see if its global variable exists; if it doesn't, it prompts for a filename and save location, then creates the global variable, which is the full path to the actual database file.
On that global variable, notice the .db at the end. This makes the resulting file one that DB Browser recognizes, so you can double-click it to open the database in DB Browser.
The macro then launches the Database Creator macro to actually create the database. Notice there is absolutely no error checking done here—sure, name your database Robert'); DROP TABLE Students; --, if you wish. Obviously, in a real macro, you'd want to sanitize things.
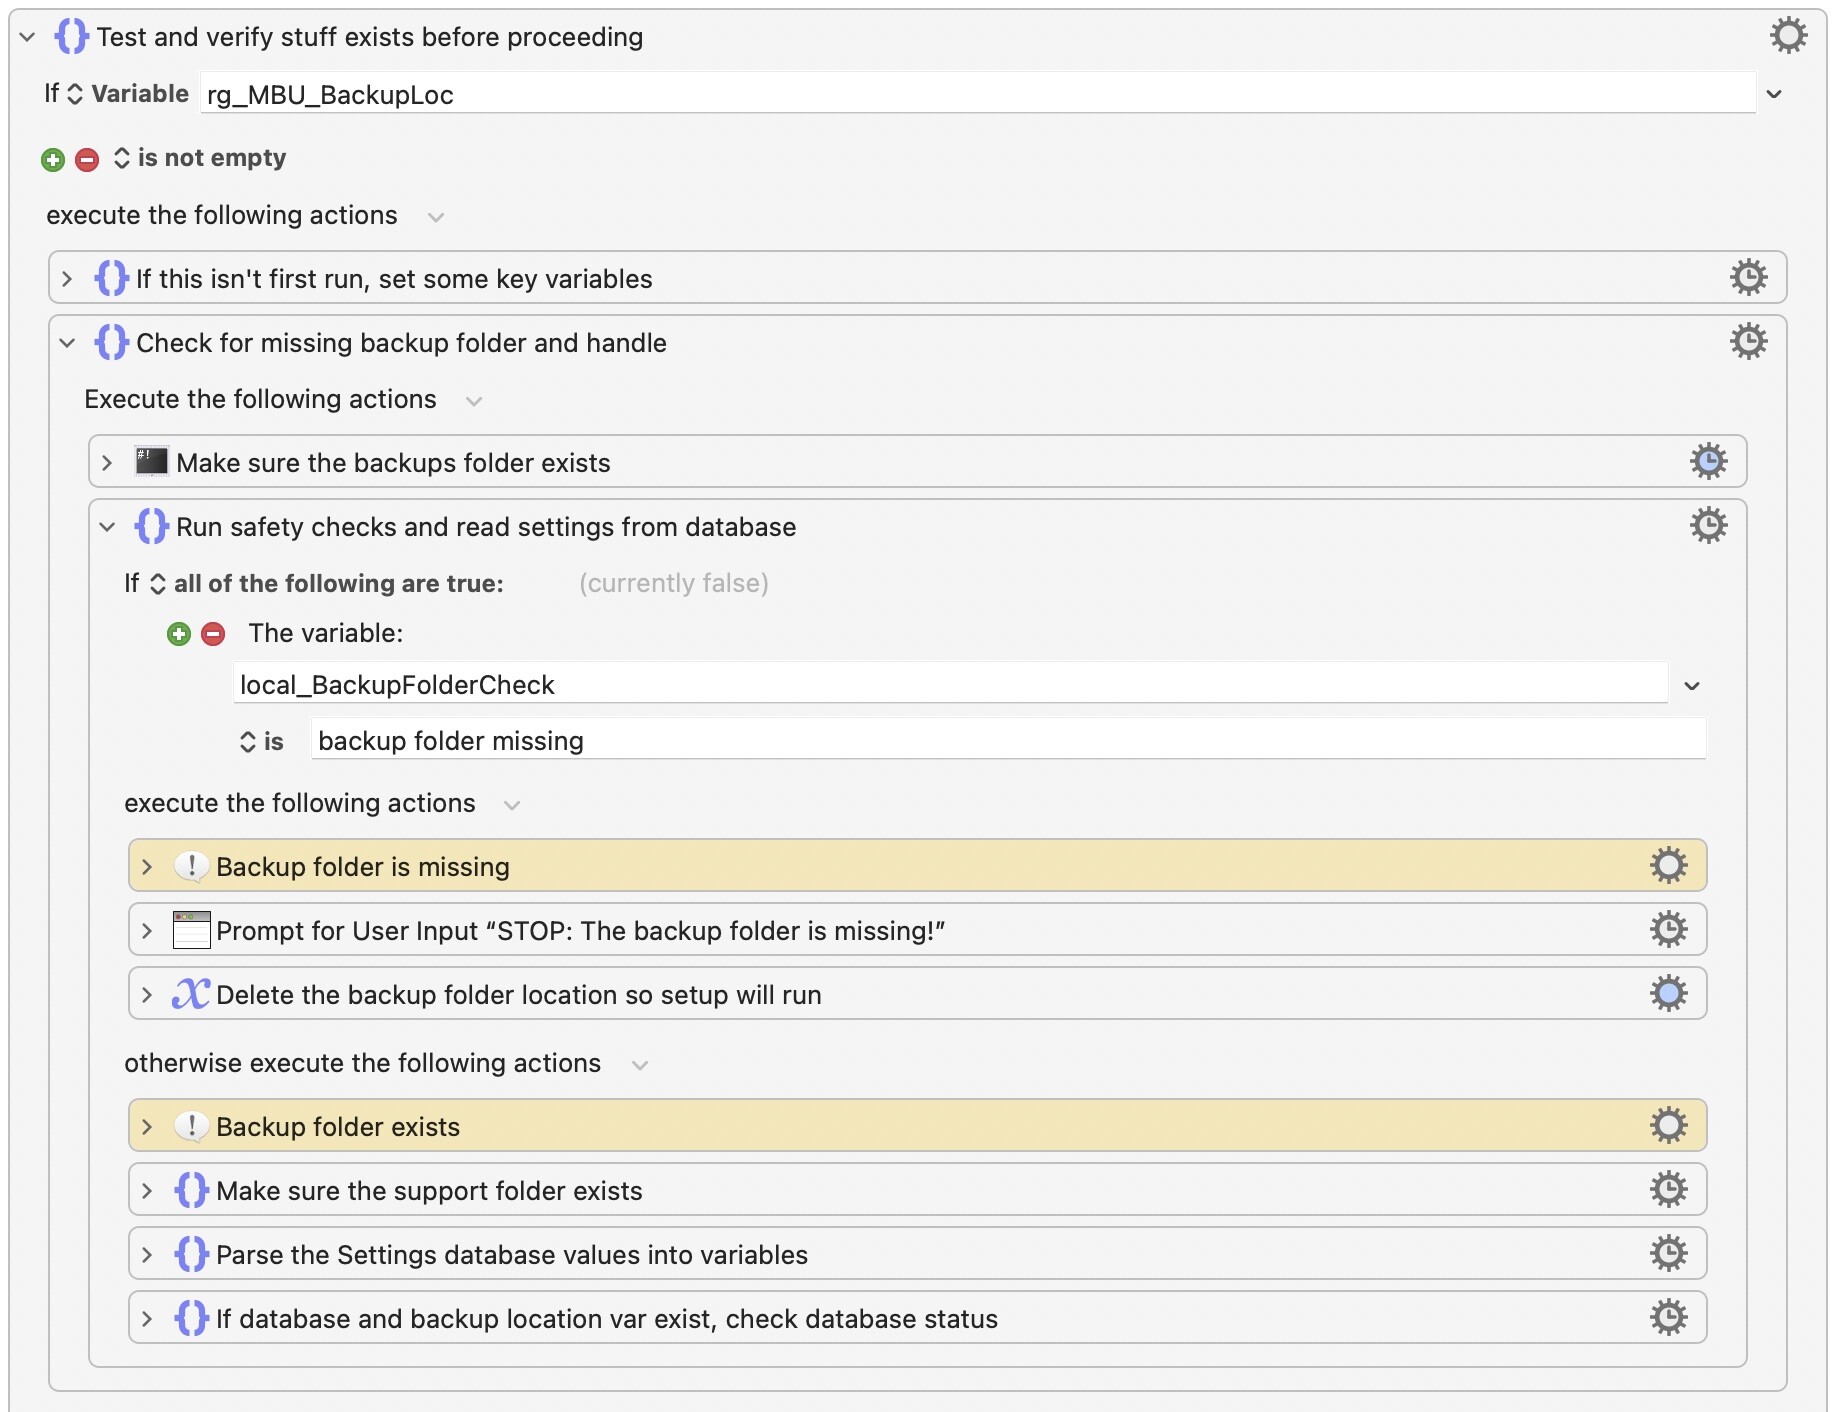
In the screenshot, notice that I've included an 'otherwise' step. This would execute when the global variable exists, and this is where I'd then check to make sure the database itself was there, and then offer options to rebuild it or try to locate it outside of the macro. If you'd like an example of how I do this in my macros, look at my MBU macro, and select the subs | 00 Startup checks and setup macro. Drill into the Test and verify stuff exists before proceeding group to see the details:
Action 2: Set Variable to Text
Set Variable to Text
  Set variable: instance_DebugMode
  to: FALSE
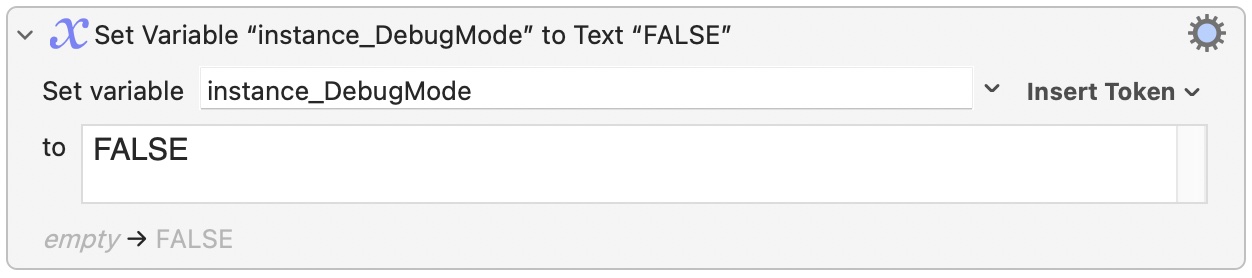
This variable will be used to enable debug mode, which will provide more detailed messages in the Keyboard Maestro log file when enabled.
Action 3: Execute a Macro
Add the action, and set it to activate the Database Creator macro. Now switch the editor to the empty Database Creator macro.

Database Creator macro
The Database Creator macro actions
Switch over to the (empty) Database Creator macro. If this weren't a tutorial, the first thing I'd do in this macro would be to check if it's a real first-time setup, or if the user is having to recover a lost database. If that were the case, I'd set different messages for them to see before building the database.
To set up the database in your macro, you need the SQL statements that define the database. In Part One, I explained that the work being done would do that for us, and it has. We just need to get those SQL statements into the macro.
You'd think you could do this directly in DB Browser, but if you can, I'm don't know how. But that's OK, as you'll now get introduced to the sqlite3 Terminal command, which is what you'll use to interact with your database from your macro. Open Terminal, and cd into the directory containing the test database you created in Part One. Then execute this command:
sqlite3 name_of_test_database.db '.schema' | pbcopy
Replace name_of_test_database.db with the actual name you used in Part One, of course. This command (two commands, technically) copies the database's schema—that is, its design—as a series of SQL statements to your clipboard. Now switch back to Keyboard Maestro, and add a new action in the Database Creator macro.
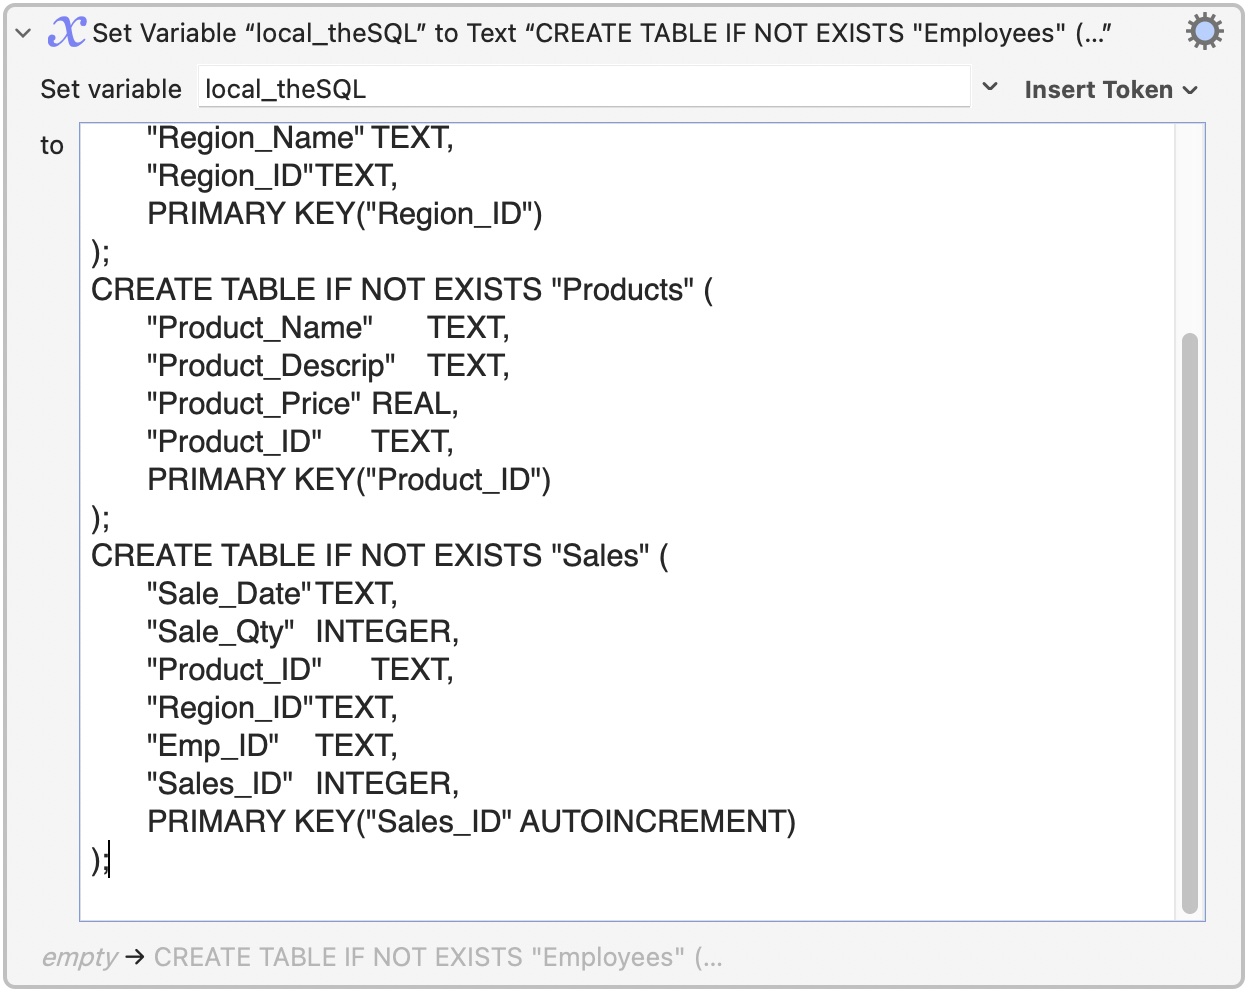
Action 1: Set Variable to Text
Set Variable to Text
  Set variable: local_theSQL
  to: [Press Command-V to paste in the copied data]
After pasting the SQL, you need to make a quick edit: Delete the last line, which is this one:
CREATE TABLE sqlite_sequence(name,seq);
That table will be created and updated by sqlite for the auto-incrementing Sales table. If you try to create it yourself, you will get an error. With that edit in place, the local_theSQL variable now holds the SQL needed to create the database. The next step uses that variable to create the actual database.
Action 2: Execute Shell Script
Execute Shell Script
  With input from: Nothing
  Execute text script • Ignore results
  Code:
    sqlite3 "$KMVAR_rg_SQLdemo_loc" << EOF
    $KMVAR_local_theSQL
    EOF
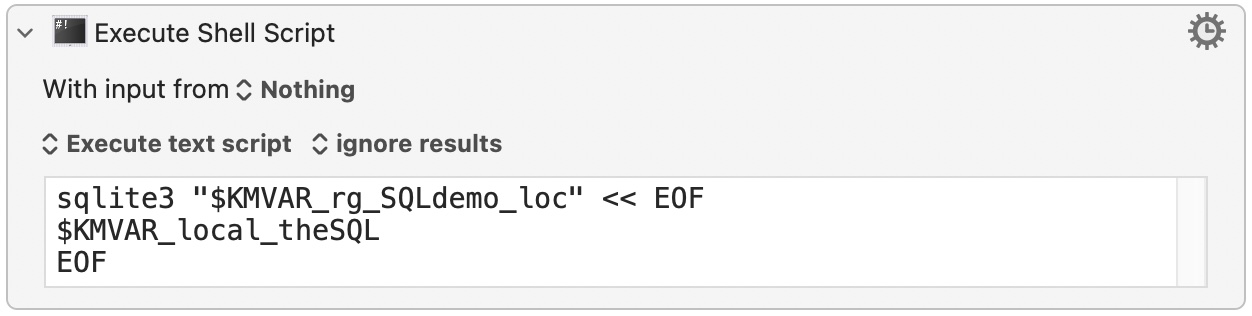
This shell script is the same one that the SQL command runner will use. So why is it separate here? Because of the data issue, as you'll see in the next (long) aside about data population in your database. We call sqlite3 with the path to the database in the global variable, and then switch to Here Document mode, and pass in the text in the local_theSQL variable.
Because of the way the Here Document works, you don't need the quotes around the $KMVAR variable—the shell isn't going to process anything within the Here Document, it all gets sent to sqlite3, so there's no worry about what does and doesn't get expanded in the variable. Once this command runs, you should be able to go to the path set in rg_SQLdemo_loc and find a database file with the name you assigned during setup.
Test it out
Click on the Sales Tracking macro and run it. Go through the brief setup, and see if you wind up with a database file. If it didn't work, check the Keyboard Maestro engine log file for any errors (and post here if you need help). To try again, delete the rg_SQLdemo_loc variable and run the main macro again.
You may wish to add a notification or Display Text action after the shell script in Macro Creator, stating that the database has been created, etc. In a "real" macro, you would definitely do some error trapping, too—check to make sure the database file actually exists before proceeding, for instance.
Now that you have a functional database, you may think you're ready to go, but you're not. You've now reached the hard part: Data for your database. Note that this entire section is set off as an aside, as it's not critical to get up and running. It's really only of importance if you're going to be sharing your macros and need the database populated with data when the users first use the macro.
There is one important tidbit in there about importing data: Apostrophes must be escaped. This will be covered again in Part Three, though.
___________________________________
Aside: The data problem
A database in a macro you distribute can either be empty on first use, or it can have data populated on first use. If it has data populated, that data could come from either a variable within the macro, or an external file. And if you have to populate data in a distributed macro, there are some challenges…
A deep aside on the data problem
No data required
If the user is going to create all the data for the database, then you don't have a data problem: You just ship your macro with the empty database, and as the user uses the macro, it will add data to the database. The update I'm working on for The Decrufter falls into this category: I'm adding a database to track the URLs that a user decrufts. Existing users will have that data in a global variable, which I'll just read into the database on first run then delete the variable. But new users will have an empty database that fills over time.
No data required is the simplest problem, because it isn't a problem. The problems begin when you have to provide data in your database with the macro. This data can come in two forms, both of which I've run into with my macros.
Some bundled data required
The first form of required data is that you want to ship your macro with some data in the database. For me, that was my Quick Web Search macro. QWS lets you search any number of web sites from a pop-up menu with a simple shortcut.
But to make it useful to people, it had to ship with a number of predefined shortcuts—both an active set, so there was something functional to use, and a fuller set of other sites users could activate. To see how I addressed this, download the macro, then open the scm | 02 New Database Setup macro. You'll see two large variables (in green) that contain the two lists. Further down are some Search/Replace: Regex functions that look like this:
Find:    (?m)^(.*?)•(.*?)•(.*)$
Replace: insert into %Variable%rg_QWS_tablename% ("category", "source", "status", "state", "shortcut", "descrip", "url", "restoreval") values ("$1","OPTIONAL","INACTIVE","ORIGINAL","","$2","$3","$2┇$3");
I store the data in a format that's easy for me to read (and edit), but it needs to be in another format for importing to the database—that's what the regular expression does. You could save yourself this trouble by simply storing the data you want to use in SQL form, but it's a bit harder to work with if you do that. Later on, you can see that the two variables are included in the SQL command that is then piped into the database (this is an alternative to a Here Document, but has the same end result).
The QWS macro only runs this routine if it can't find the database: If the database is there, then this data must have been imported already. But that causes another issue: What if I want to add to that list over time, in future releases of the macro? Because the first-run routine isn't run, I can't just add them to those lists. Instead, I have a "on first run of this macro" macro that contains a list of new additions:
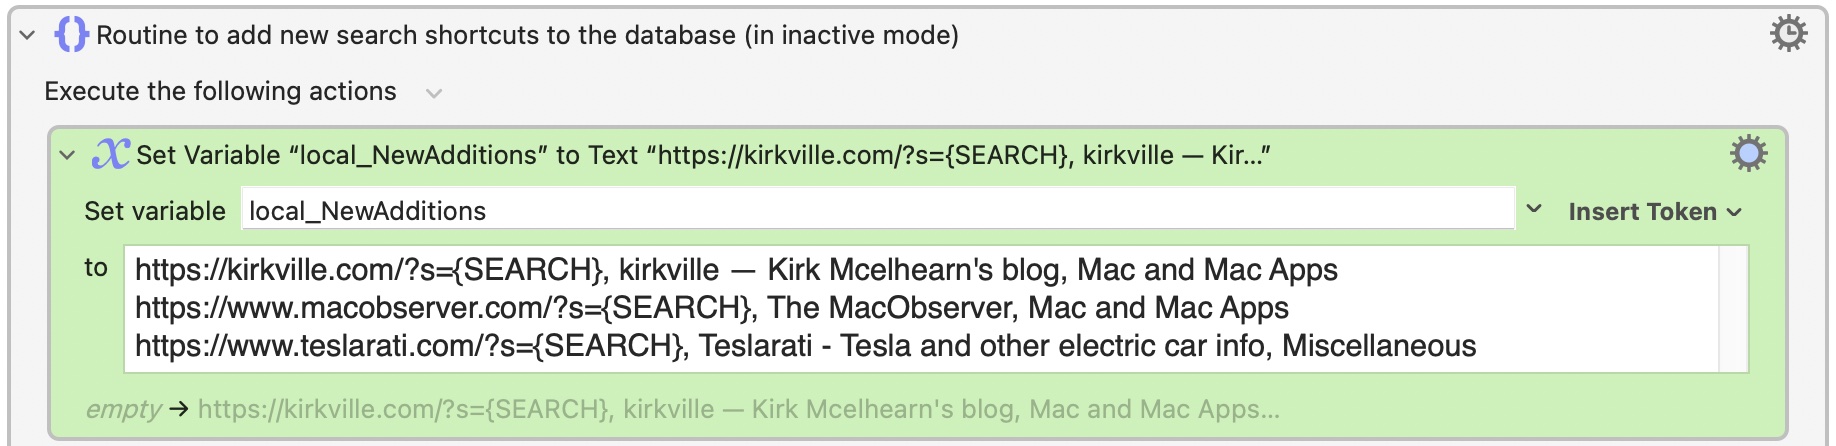
You can see this for yourself in the sub - main 03 - First run of this version macro in the QWS macro.
Whenever I want to add a new site, I just add it to this list. But I can't remove the ones that are already there, because new users won't have them in their list (upgrading users will).
So you can see how this is a data problem: It's tricky making sure that all of your users always have the same set of bundled data. While this solution works reasonably well, if I had to do it over again, I would have made the "new additions" list a text file that gets downloaded from my server, then imported into the macro. I could set that to run a couple times a week, or on demand, and it could update the list of bundled shortcuts for everyone.
Data required from the user's Mac
This version of data required isn't necessarily the most complex, but it does require some creative thinking. In my case, this was a key element of MacroBackerUpper, which backs up a user's macro groups and macros. To do this, I need a database of macros and groups in the database. So not only do I need a lot of data, it's data that has to come from the user's machine each time they run the macro.
Getting the data out of Keyboard Maestro wasn't overly complicated, as there's very good AppleScript support in Keyboard Maestro. If you download the macro, open it and look at subs | 04 Create UUID tables; those are the AppleScripts that extract the group and macro data from Keyboard Maestro. Notice that I save them to files on disk, not into variables. That's because there can be a lot of data here, particularly in the macros database: Some users have thousands of macros.
The AppleScripts delimit the data with a unique three-character string, which is what I use next when I create the database tables from those files. Open the dbase | 12 Database creator macro, and then expand the Case statement entry for NewMacros. I read the Groups data file into a variable, and then do something very important:
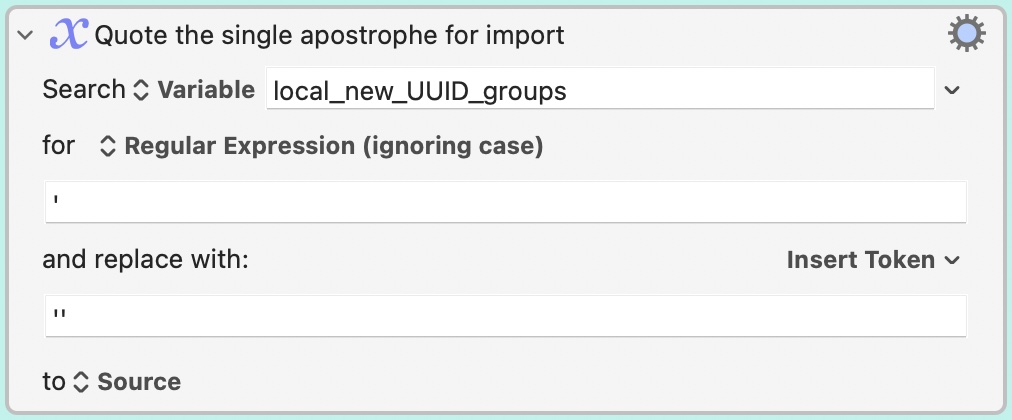
SQL can import nearly any character without trouble. Except an apostrophe, which must be quoted with another apostrophe. This simple search/replace does that on the list of macros (and groups), just in case users have used apostrophes in their naming conventions. This is critically important whenever you're importing data, as it will fail on unescaped apostrophes.
Note that there are probably a lot of other things you should do to validate data on import, but as my macros don't (generally) allow users to import anything they wish, and they're running them on their own machines, I don't worry about this much. But you do have to protect the apostrophes!
After the apostrophe protection, there's another version of the Search/Replace: Regex to convert the data into SQL form. I then repeat this process for the Macros file. Once both variables are set, I add them to another variable that contains the SQL to create the tables…and then I save that SQL to a file, instead of using a Here Document to create the database. Why?
Because these data files can be quite large, I didn't want to risk hitting some sort of limit in either the shell or Keyboard Maestro's ability to pass the content in a variable. With them in a file, I can just display the file and pipe that output to the database:
cat /tmp/MBU_rgdata.sql | sqlite3 "$KMVAR_instance_theDatabasePath"
These things happen every time the user runs the macro, and are actually processed very quickly—it takes much longer to describe what happens than it does for it to actually happen.
The data problem: Conclusion
Populating data into the database is one of the trickier things to master when distributing a macro that uses a database. The above examples show how I handled it in a few of my macros, and the example sales tracking macro we're building will present one other option that makes sense if you want to fill in data that might come from another system.
———————————————————————————————————
The SQL Runner
The SQL Runner subroutine actions
This very short subroutine will probably be the most-used subroutine in any database-enabled macro, as it will get called any time you want to do anything with the database. This version will do some basic error trapping (as an example, more than anything practical), add some details to the log file if the debug variable is set, and finally, send the SQL commands to the database.
For a more full-featured version of a SQL command runner, look at dbase | 10 Run database action in my MacroBackerUpper macro—it checks for all sorts of data before proceeding, and is set up to work with two separate databases. (MBU keeps its settings in a separate database file, mainly because I often have to delete the macros database during development, and I got tired of having to drop the table instead of just deleting a file on disk!)
Start by adding three parameters to the subroutine: local_DotCommands, local_TheCommands, and local_TheLogText:
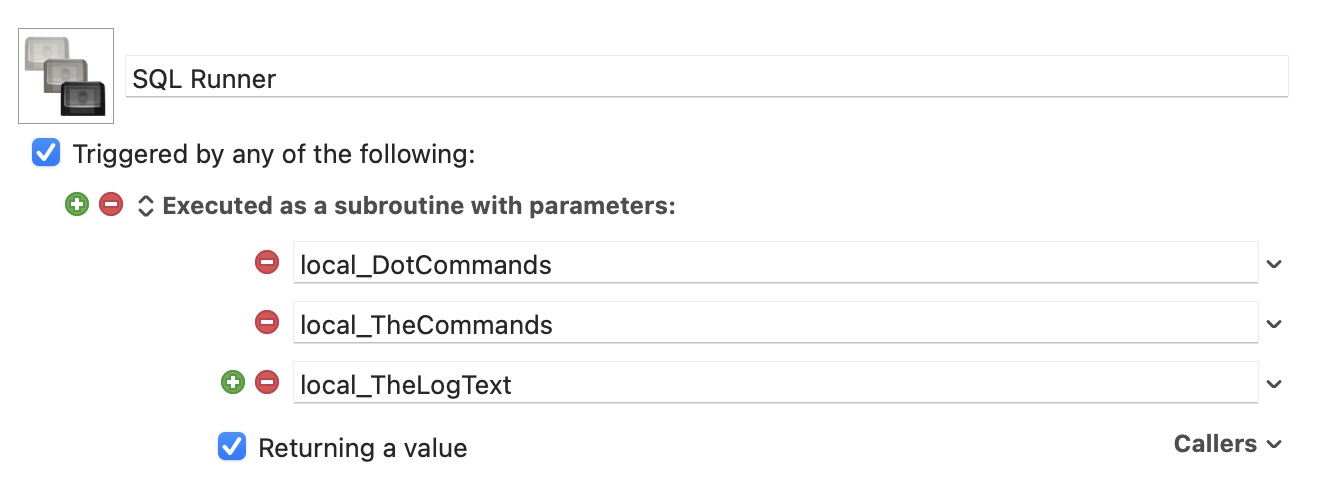
The local_DotCommands parameter will be used to set a delimiter when required, local_TheCommands will be the actual SQL commands, and local_TheLogText will be a meaningful message about the routine calling SQL Runner.
Action 1: Switch/Case
Switch/Case
  If > Variable > rg_SQLdemo_loc > is empty
    Prompt for User Input
      Title: Fatal error: Database variable missing!
      Prompt: The variable that tells the macro where the database lives is empty. This shouldn't actually be possible at this point, yet here we are.
              Please try to figure out what went wrong before re-running the macro.
      Variables and Default Values: none
      Buttons: OK > √ Cancel Macro
⋅
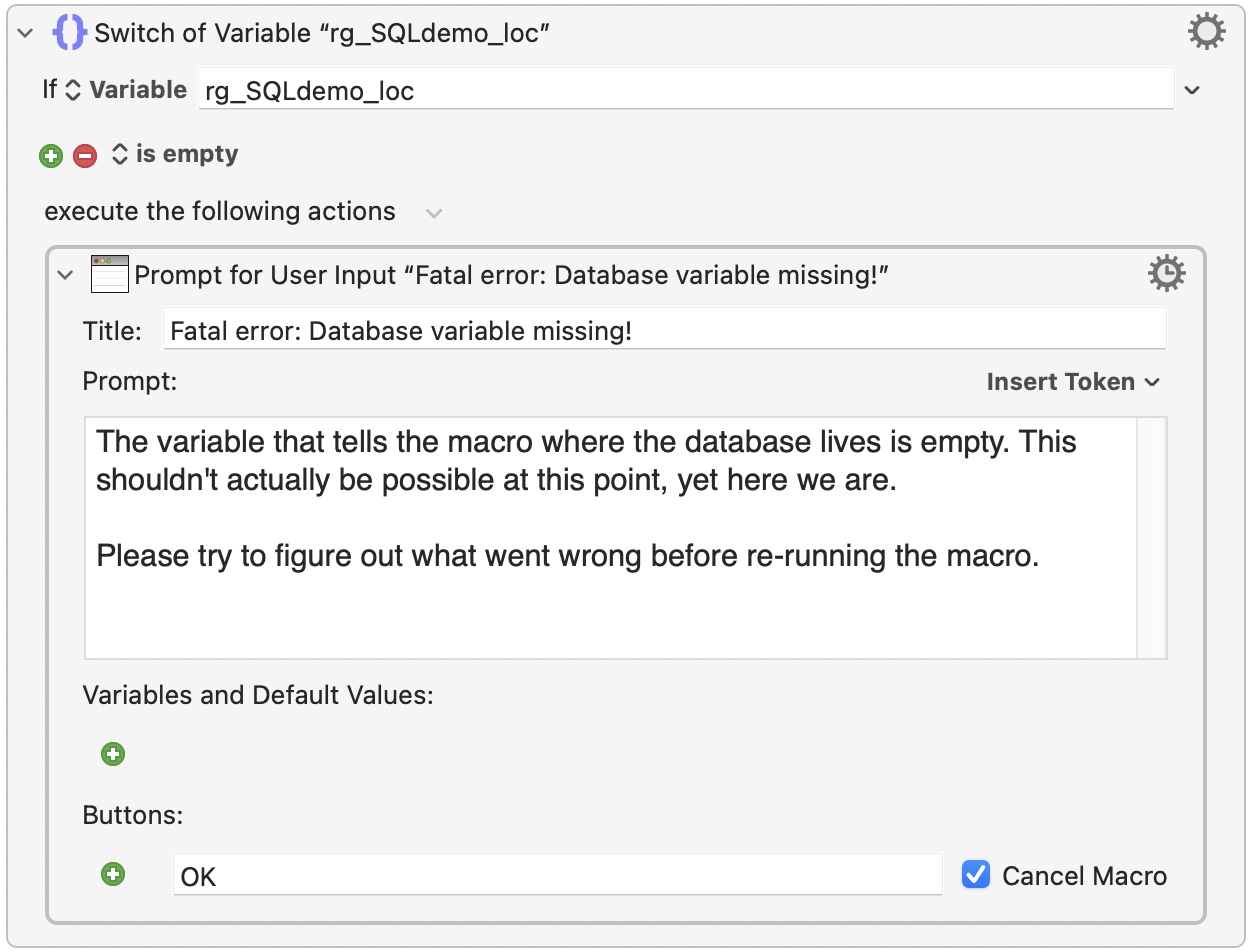
This is just an example of some error trapping you could do. In the version in MBU, I also check to make sure all the parameters have values—this stops stupidity on my part if I forget to fill in a field, for instance.
Action 2: Switch/Case
Switch/Case
  if > Variable > instance_DebugMode > is TRUE
    Log Message
      Text: Sales Tracking SQL task: %Variable%local_TheLogText%
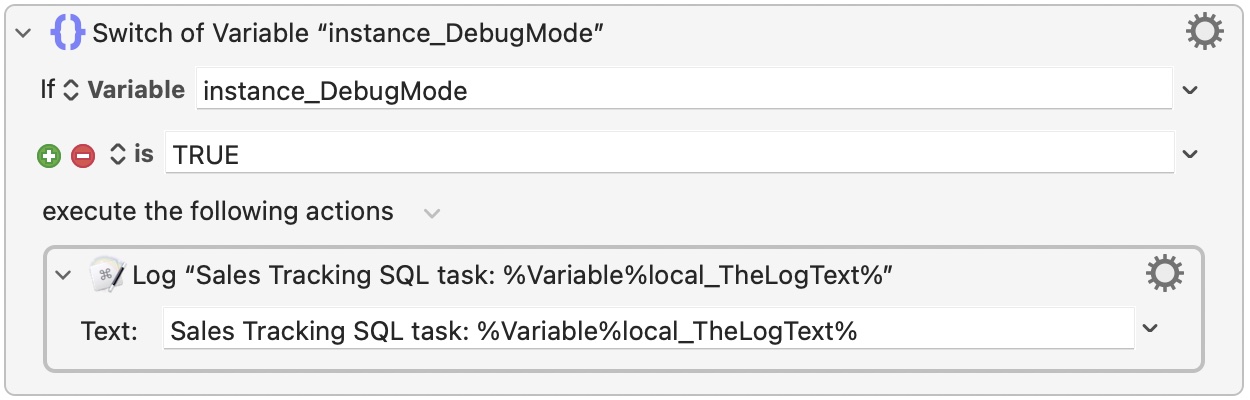
If the debug variable is enabled, log the message to the Engine.log file.
Action 3: Group
Group "SQL: Execute arbitrary command"
  Execute Shell Script
    With input from: Nothing
    Execute text script • Save results to variable
    Code:
      sqlite3 "$KMVAR_rg_SQLdemo_loc" << EOF
      $KMVAR_local_DotCommands
      $KMVAR_local_TheCommands;
      EOF
    Save to variable: local_TheResults
  Return from Subroutine
    Text: %Variable%local_TheResults%
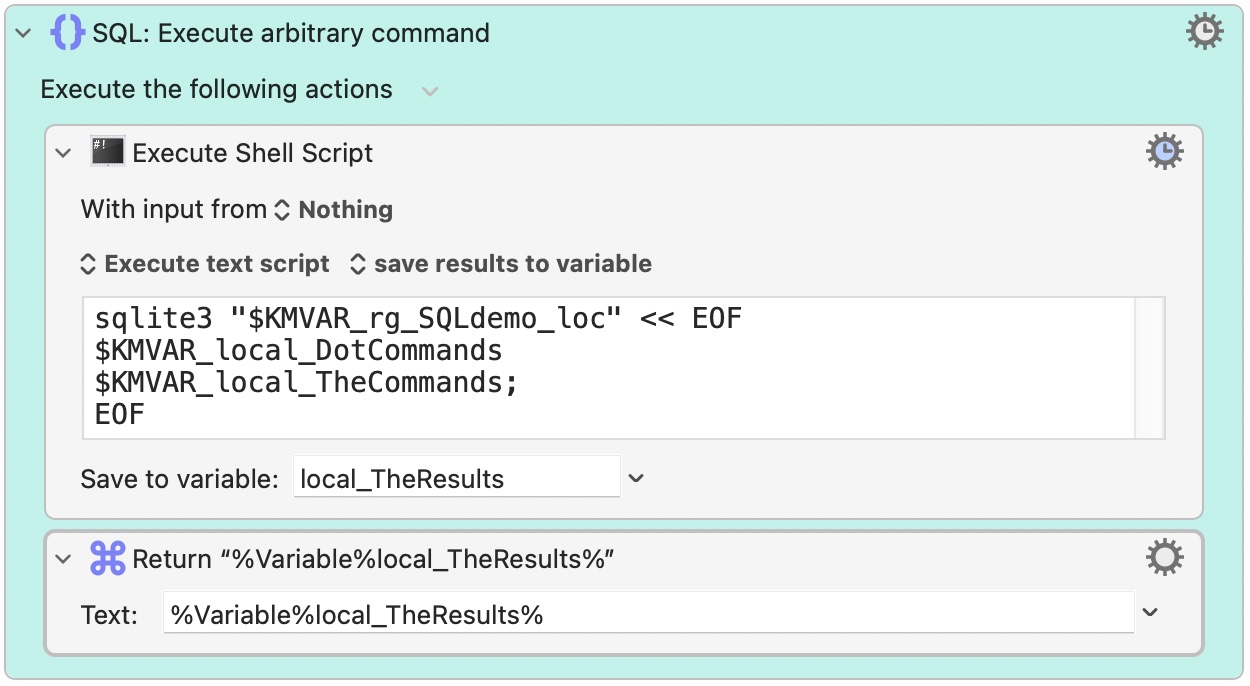
I always put SQL-related tasks on an aqua background, so they stand out from the rest of the macro—most of my issues are usually database related, and the visual helps me zero in on them. I also tend to put related SQL commands into a group, so I can see that it's all related. Hence, that's why there's an two-action aqua group in this subroutine.
The shell script here is what does all the work: It again uses Here Document mode to pass both the dot commands and the SQL commands to the database, and saves the results to a variable, which is then returned to the calling macro when the subroutine ends.
You now have a SQL Runner that's set up and ready to process requests…and that's exactly what it'll be doing in Part Three.
Conclusion
I was really hoping to discuss actually adding data to the database in this part, but it's already too long, so that's a wrap for Part Two. Part Three will cover importing some historical data to the new database, adding new sales to the database, and querying the database. The concluding Part Four will cover the settings table and how to work with database-stored preferences.
If you didn't build the macro as you went along, please download a full copy now so that you're ready for Part Three.