Overall objective
This series is designed to help those looking to use sqlite3 databases with their Keyboard Maestro macros. It assumes minimal to no knowledge of sqlite3, and I'll do my best to clearly explain things as I go.
If you have questions, please ask and I'll do my best to clarify.
Part One
Part Two
Part Three: You're reading it!
Part Four
Overview of Part Three
Finally, after slogging through a bunch of database stuff in Part One, and some setup work and boring discussion on data in Part Two, it's time for the fun stuff!
Part Three will go through all the normal tasks you might do with a database. You'll see data import from CSV, adding a record to the Sales database, and a bunch of stuff about modifying, deleting, and working with the data in the database.
But first, to misquote a popular old Schwarzenegger movie…"Remember when I told you you could use the macros you built in Part Two? I lied…"
So yea, go ahead and delete those, and instead, download and use this set:
____ KMsqlite3 tutorial - Part Three Macros.kmmacros (148 KB)
Why the change? Well, in building this final version, I wound up changing some stuff in the macros built for Part Two, so it seemed simpler to just distribute the new version. And there's no way we'd be able to build these macros on the fly, given the number and length. So just start with the finished version, and refer to the macros as you read each section in this writeup.
If you read only one part of this series, read this part! The above-linked macro is a fully functional database-enabled system you can use to play with sqlite3 in Keyboard Maestro.
By the end of this part, you should have a good understanding of almost all the details involved in working with a sqlite database in Keyboard Maestro. And you'll have a macro you can look at for reminders going forward.
The new Sales Tracking macro suite
Install the new macro suite, and you'll find it now consists of 11 macros and one subroutine:

It didn't really need to be split up this much, but it makes it much easier to talk about and follow along, as I can refer to a specific macro without having to say "find this section in that macro." Most of the macro titles should be self-explanatory, so I'm not going to say much about each of them at the top level. In the macros, orange boxes contain methods that are important for working with database data, and yellow comment boxes (usually) note verification steps I skipped.
As you might have guessed, 1 - Sales Tracking is the macro you need to run to access all the other features of the system. Go ahead and do that now; if you didn't finish Part Two, you'll have to go through the steps to create a database. But once that's done, or if you did finish Part Two, you'll see the Action Manager:
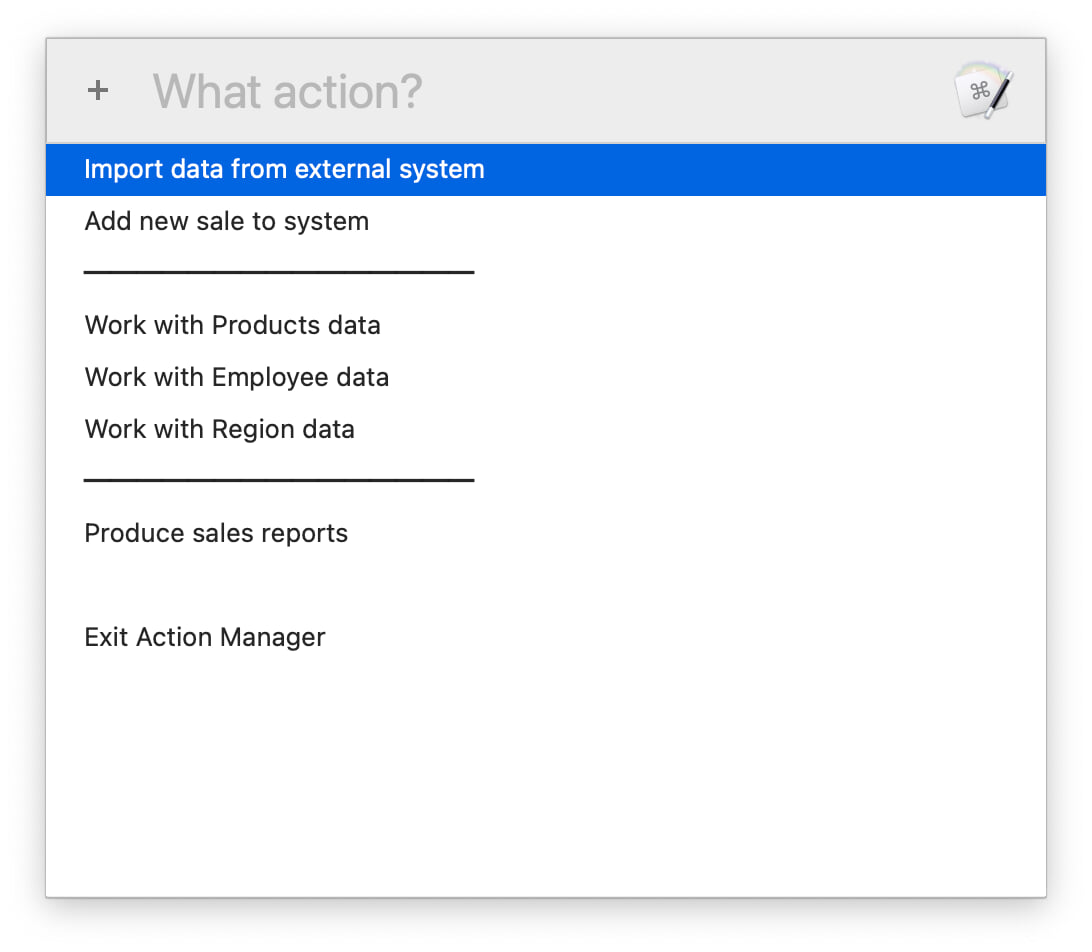
While you could try some of these menu items, right now your database doesn't hold any data, so the experience wouldn't be good. Our first task will be to load some data, so we'll start by talking about the "Import data from external system" macro first.
Macro: Action: Import external data
In Part Two, I talked about a number of ways to get data into the system. The macro includes another: Importing chunks of CSV-formatted text. The macro covers a visual way to do it, but I will also tell you that if you're importing a bunch of known-good CSV data, you can do it much faster via the Terminal:
$ sqlite3 /full/path/to/database.db <<EOF
.mode csv
.import /full/path/to/csv.csv Table_Name
EOF
Replace the various bits with real paths and table names, and you CSV will be imported. If you were loading a database yourself with CSV data, this is how you would do it. The method I used in the macro is more appropriate for a shared macro, where a user might be adding data in chunks over time. Today, we're going to use this importer to put the data in our Sales Tracking database.
From the Action Manager, select 'Import data from external system,' and you'll see the pop-up table selector:
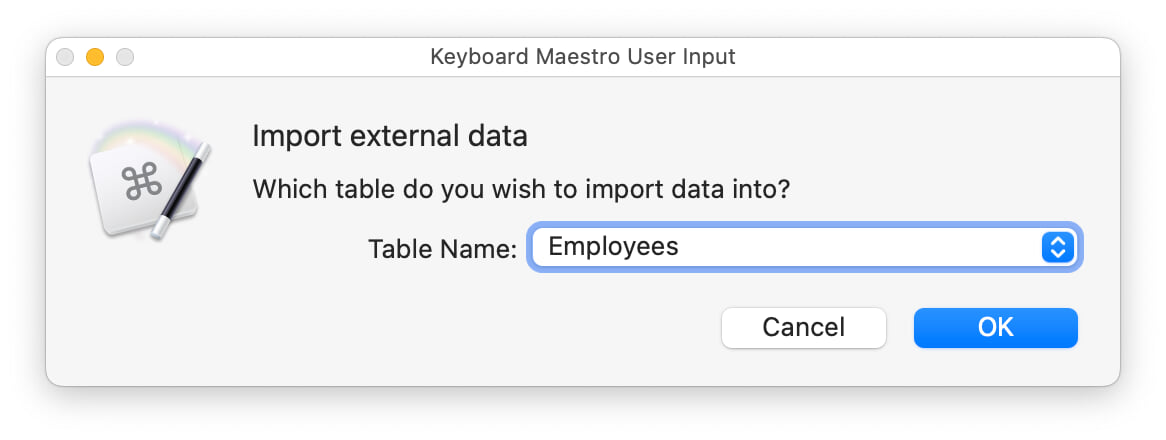
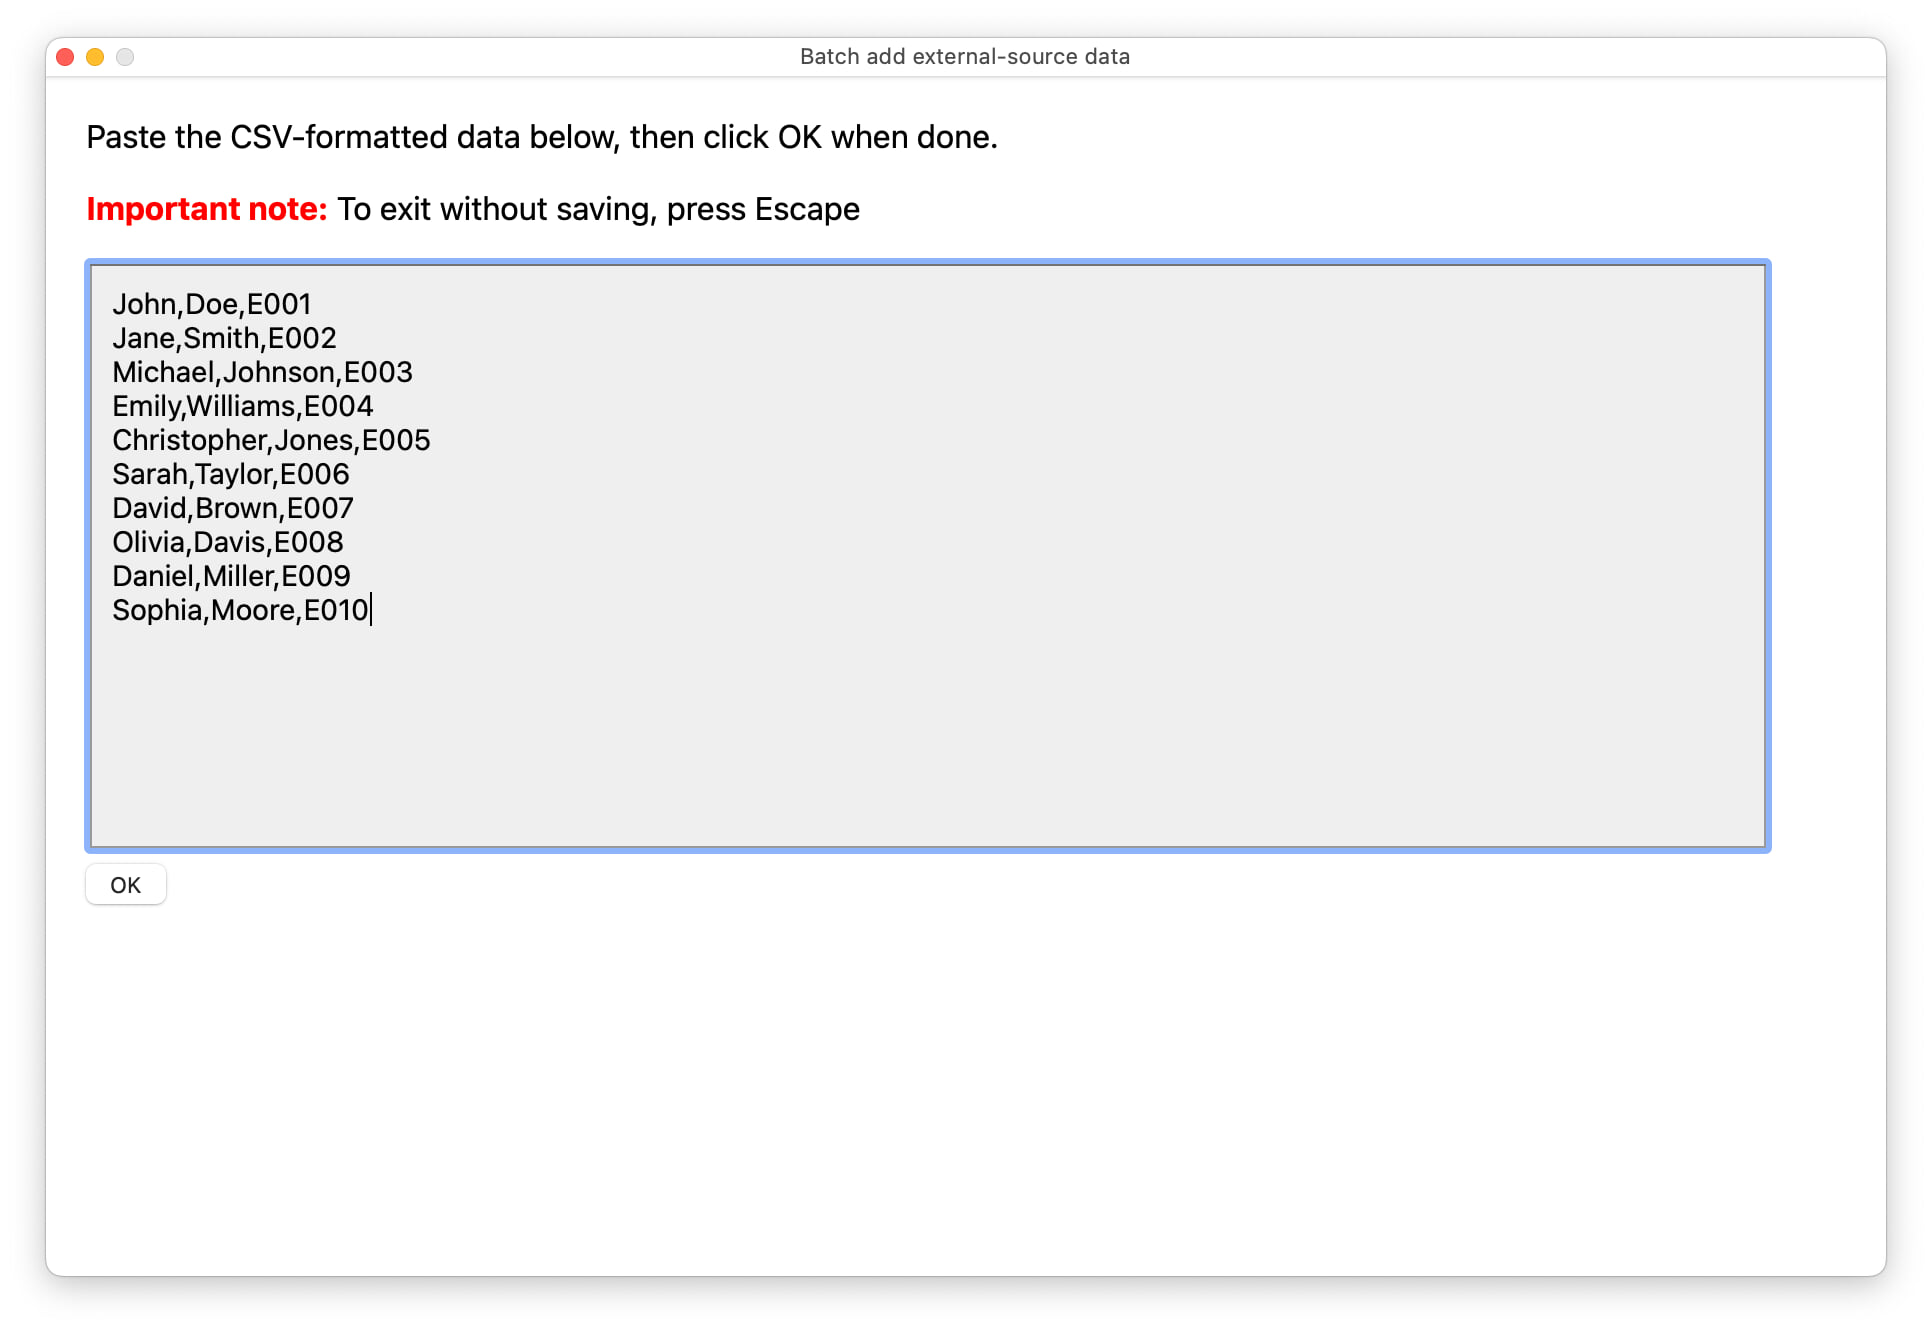
Leave the selection on Employees and click OK, and an HTML input box will be displayed. I lifted this nearly unaltered from my QuickWebSearch macro, where it's used to batch add URLs and shortcuts. Paste the following text into the form:
Employees as CSV
John,Doe,E001
Jane,Smith,E002
Michael,Johnson,E003
Emily,Williams,E004
Christopher,Jones,E005
Sarah,Taylor,E006
David,Brown,E007
Olivia,Davis,E008
Daniel,Miller,E009
Sophia,Moore,E010
It should look like this when done:
Click OK, and you'll return to the Action Manager and see a message stating that the data has been imported. Select 'Import data from external system' again, and this time pick Products from the pop-up menu. Paste the Products data below and click OK. Repeat the process again for both Regions and Sales, clicking OK to dismiss the input box and add the data to the database each time. Here's all the data:
Products as CSV
Sprocket,High-quality bicycle sprocket for smooth and efficient chain movement. Durable construction for long-lasting performance.,19.99,P001
Pedals,Lightweight and sturdy bicycle pedals with grip-enhancing surface. Perfect for both casual and professional cyclists.,29.99,P002
Seat,Ergonomic bicycle seat designed for maximum comfort during long rides. Adjustable and suitable for various bike types.,39.99,P003
Handlebar Grips,Comfortable handlebar grips with non-slip design. Enhance your grip and control during rides. Easy to install and durable.,12.99,P004
Chain,Durable bicycle chain for smooth and reliable gear shifting. Suitable for various bike models. Easy to maintain and install.,24.99,P005
Brake Pads,High-performance brake pads for efficient and responsive braking. Suitable for different weather conditions. Easy to replace and install.,17.99,P006
Tire Tube,Quality bicycle tire tube for a smooth and puncture-resistant ride. Compatible with various tire sizes. Easy to install and inflate.,14.99,P007
Headlight,Powerful LED headlight for enhanced visibility during night rides. Easy to mount and suitable for various bike models. Long battery life.,32.99,P008
Taillight,Compact and bright taillight for increased safety during night rides. Multiple lighting modes and easy to attach to the bike frame.,14.99,P009
Fenders,Stylish and durable bicycle fenders to protect against mud and water splashes. Easy to install and suitable for various bike types.,21.99,P010
Bike Lock,Secure your bike with a robust and reliable bike lock. Durable construction and easy to carry. Enhance your bike's security.,27.99,P011
Water Bottle Holder,Convenient water bottle holder for easy access during rides. Lightweight and adjustable to fit different bottle sizes.,9.99,P012
Bike Pump,Compact and efficient bike pump for quick and easy tire inflation. Suitable for Presta and Schrader valves. Essential for every cyclist.,19.99,P013
Multi-Tool Kit,Versatile and compact multi-tool kit for on-the-go bike repairs. Includes various tools for common maintenance tasks. Durable and portable.,16.99,P014
Bike Rack,Sturdy and adjustable bike rack for secure storage. Suitable for garage or outdoor use. Protect your bike and save space with this rack.,34.99,P015
Regions as CSV
West,R001
Midwest,R002
Southwest,R003
South,R004
East,R005
Northeast,R006
Sales as CSV
2023-01-01,5,P001,R001,E001,1
2023-01-02,8,P002,R002,E002,2
2023-01-03,10,P003,R003,E003,3
2023-01-04,15,P004,R004,E004,4
2023-01-05,7,P005,R005,E005,5
2023-01-06,12,P006,R006,E006,6
2023-01-07,3,P007,R001,E007,7
2023-01-08,6,P008,R002,E008,8
2023-01-09,9,P009,R003,E009,9
2023-01-10,4,P010,R004,E010,10
2023-01-11,5,P001,R002,E002,11
2023-01-12,8,P002,R003,E003,12
2023-01-13,10,P003,R004,E004,13
2023-01-14,15,P004,R005,E005,14
2023-01-15,7,P005,R006,E006,15
2023-01-16,12,P006,R001,E007,16
2023-01-17,3,P007,R002,E008,17
2023-01-18,6,P008,R003,E009,18
2023-01-19,9,P009,R004,E010,19
2023-01-20,4,P010,R005,E001,20
2023-04-11,3,P011,R001,E001,21
2023-04-12,6,P012,R002,E002,22
2023-04-13,8,P013,R003,E003,23
2023-04-14,12,P014,R004,E004,24
2023-04-15,5,P015,R005,E005,25
2023-04-16,10,P001,R006,E006,26
2023-04-17,7,P002,R001,E007,27
2023-04-18,4,P003,R002,E008,28
2023-04-19,9,P004,R003,E009,29
2023-04-20,2,P005,R004,E010,30
2023-04-21,8,P006,R005,E001,31
2023-04-22,5,P007,R006,E002,32
2023-04-23,3,P008,R001,E003,33
2023-04-24,11,P009,R002,E004,34
2023-04-25,6,P010,R003,E005,35
2023-04-26,14,P011,R004,E006,36
2023-04-27,7,P012,R005,E007,37
2023-04-28,9,P013,R006,E008,38
2023-04-29,4,P014,R001,E009,39
2023-04-30,10,P015,R002,E010,40
How it works
The HTML input box is what converts your data into a variable. While there's a fair bit of HTML and CSS there, there's really only one line that does the work:
<textarea autofocus wrap="off" placeholder="comma-delimited CSV only, please!" rows="15" cols="90" name="instancetheBatch"></textarea>
⋅
The name="instancetheBatch" bit is the key. When you click OK, all the data in that text area is saved in a KM variable named instancetheBatch. From there, the next orange box in the macro demonstrates one aspect of data safety:
You must quote all single quotes with another single quote, or the import will fail.
The orange box after that is a construct you'll use a lot (with slight variations) when working with databases:
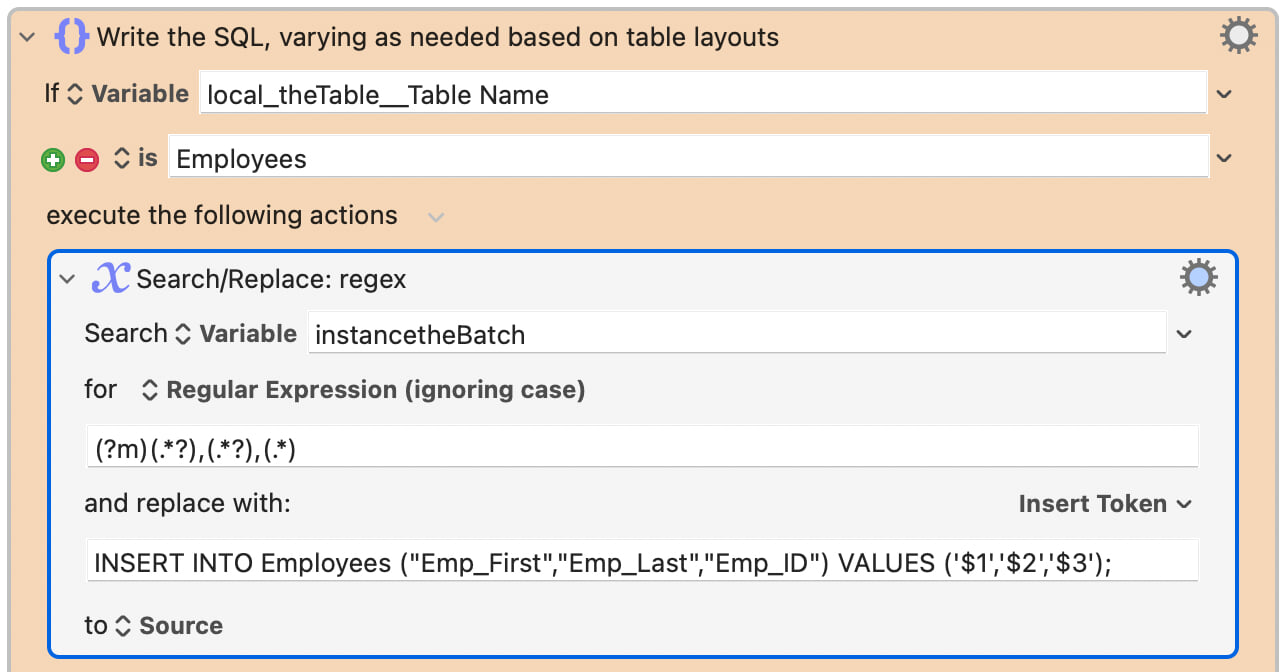
This regular expression searches for the commas in the CSV, and splits the data between each into capture groups:
(?m)(.*?),(.*?),(.*)
Those capture groups are then inserted, in the proper spots, into a SQL statement that does the actual work to insert the data into the database:
INSERT INTO Employees ("Emp_First","Emp_Last","Emp_ID") VALUES ('$1','$2','$3');`
You don't need to know a ton about regular expressions to use a database with Keyboard Maestro, but you do need to understand how to split a string based on delimiters, as you'll be doing it a fair bit. Notice, too, that these splits are in a big Switch/Case action, because each data form has a different number of fields. And if we look at the entry for the Sales database, you'll notice something different about its INSERT command:
INSERT INTO Sales ("Sale_Date","Sale_Qty","Product_ID","Region_ID","Emp_ID","Sales_ID") VALUES ('$1',$2,'$3','$4','$5',$6);
⋅
Notice that two of the capture groups, $2 and $6, are not in single quotes in the insert line. That's because these fields (Price and Sales ID) are numeric fields, not text fields.
If you are inserting numeric data, you do not surround it with quotes.
If you're inserting textual data, you always surround it with quotes.
Once formatted properly, it's time to use the "SQL Runner" subroutine for the first time. You can see in the call to the subroutine that it gets passed the SQL statements (in the instancetheBatch variable), and there's some log text to help with debugging. And that's it. The SQL Runner subroutine then talks to the database, as explained in the last part, and executes the SQL commands. (I'll explain the dot commands bit further along in this part.)
In the demo macro, you'll then see a notification that the data was successfully added. But in the source, you'll see an important comment above the notification:
Error checking should go here—confirm the import worked
The comment explains one way to do that, though there are others. The important thing to know is that you should always verify that what you think happened actually did happen before proceeding.
Check your database
Switch out to Finder, find the database you created with the macro, and double-click on it to open it in DB Browser. Click on the Browse Data tab, and make sure you have data in all of the tables. If you don't, try again. If it still doesn't work, please let me know. But assuming you have all the data in your database, congratulations! Now we can start working with the database.
Macro: Action: New sale entry
This is one of two demonstrations in the macro on how to add a singular new record to the database (the other is in Products, later on). Select the "Add new sale to system" entry in the Action Manager, and you'll see a somewhat complicated input box:
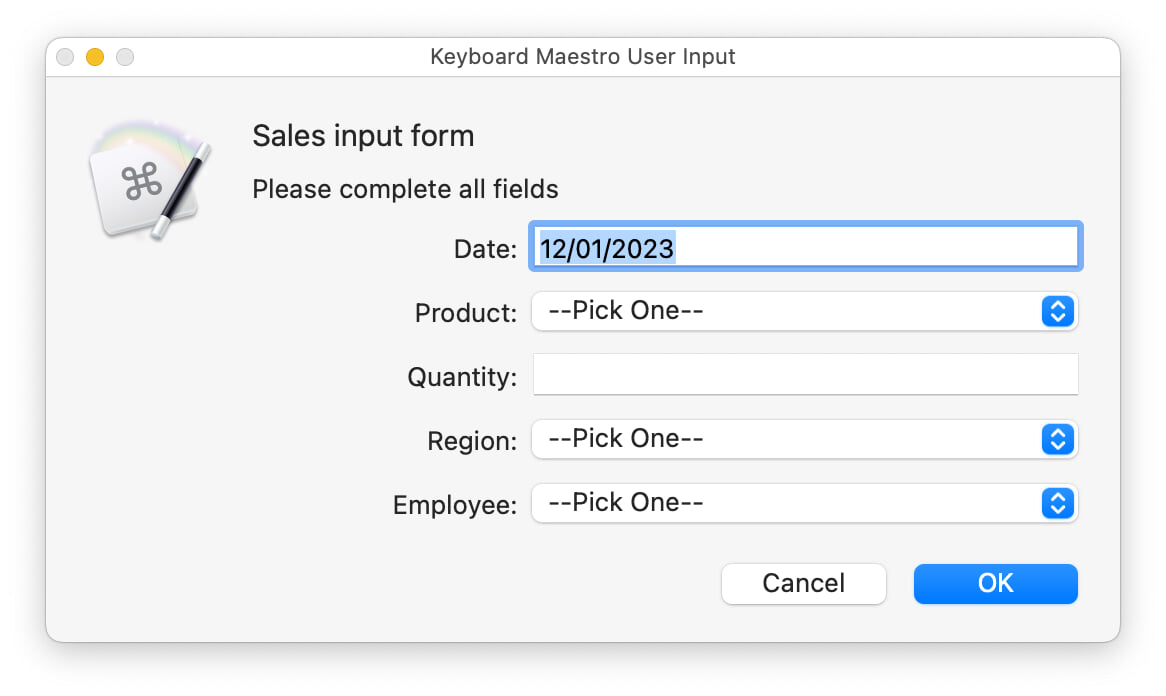
Click on each of the "pick one" boxes, and you'll see that they're pop-up menus with data from the database. This method of entering sales data would obviously not work for a large database with hundreds or thousands of rows in each table, but it's perfect for our demo database. Go ahead and add a sale to the system, selecting whatever you like for product, quantity, etc. Click OK when you're ready to add it to the company's sales. You'll see an onscreen confirmation message that it was successful, and then you'll be returned to the Action Manager.
Behind the scenes, there's a fair bit that goes into making this work the way it does, so open up the "Macro: Action: New sale entry" macro in KM and follow along. The very first thing in the macro is an orange group of SQL commands. These commands pull a name and ID from Employees, Regions, and Products. The thing to note in the SQL is this bit:
SELECT
GROUP_CONCAT
(Product_Name || ' [' || Product_ID || ']', '|') AS Products_Full
This SQL instructs the database to select the data, but to format it in a particular way. You can combine text and data in sqlite3 with the || construct. Breaking that line down, it builds a data row that looks like this:
Product Name [Product ID] |
The GROUP_CONCAT command tells SQL to output the results as one row, instead of one record per row as is usual. Why would I want that? We'll get back to that odd form in a minute, but first, the rest of the SQL:
FROM
    (SELECT
        Product_Name, Product_ID
        FROM Products
        ORDER BY Product_Name ASC
    );
I'm not sure of the technical name for this construct, but it lets you use a SELECT to build the FROM clause. In this case, I did it this way so that I could get things sorted by the product name. And remember how I said ChatGPT is good at this stuff? It helped here, as I was struggling to remember the exact correct syntax, and it fixed a couple silly errors for me.
Now, about that odd format. What I wind up with using that construct is one row, with each product name/ID pair separated by a vertical bar. And why is that useful? Because that's the construct needed to build a pop-up list in Keyboard Maestro's Prompt for Input box:
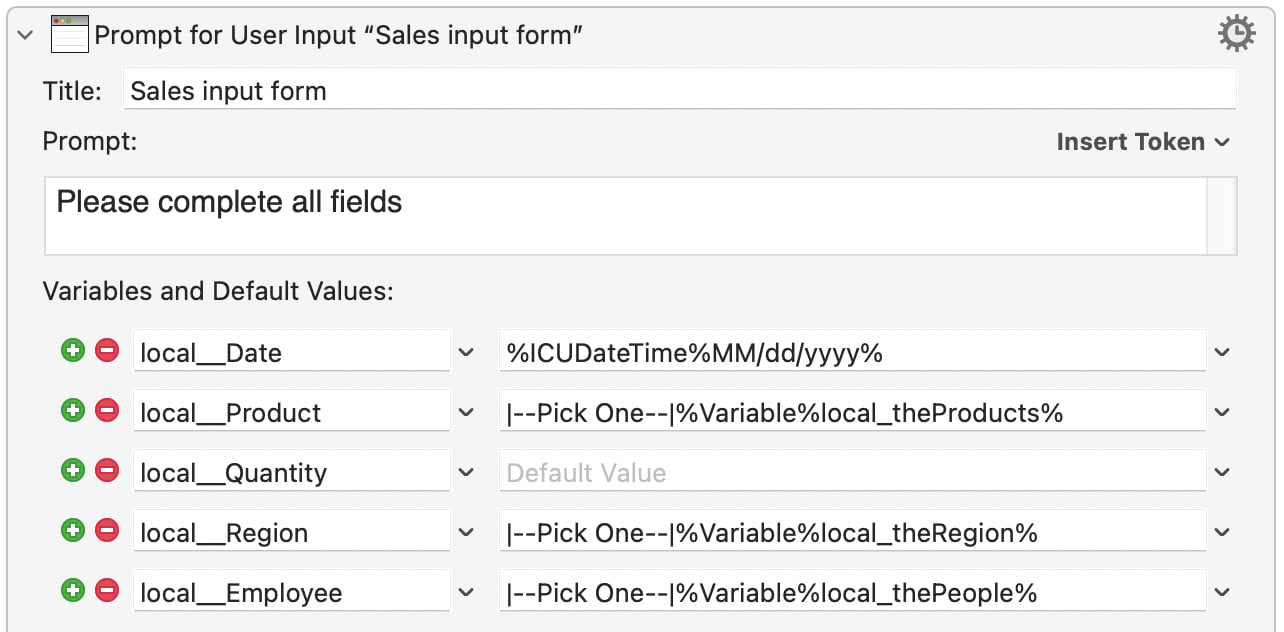
The only tricky thing to remember is that to make it work, you also have to precede the variable with a | symbol. I also included the "pick one" bit to demonstrate you can include other text if you wish.
As you can see, this SQL construct let me get data out of the database in exactly the form I needed to use it in Keyboard Maestro, so this is a good method to keep in mind as you build your macros.
There's another orange box after the input prompt which processes the date. This involves a bit more regex to split the date into its parts, and then combine them again so they're ready to import into the database. I'll admit, I hate dealing with dates :).
The next orange box is another bit of regex, on the local__Employee variable:
^.*?\[(.*?)\]$
The Employee data is in "Name [ID]" format, but we need to interact with the database using just the ID. This regex strips out everything except the ID number. You can see two more below it, too, to do the same for the other fields.
The SQL is then set in the form needed to insert data into the database, which is this construct:
INSERT INTO tablename (field1, field2, field3, etc.) VALUES ('value1', 'value2', value3, etc.)
As before, remember if you have numeric data, it does not need quotes around it, as in the dummy value3 example above. The SQL is then sent to the SQL Runner, a yellow box tells you that I did no confirmation but you should, and then an onscreen dialog summarizes the change that was just made.
The Product Manager
Now that we've added some data to the sales side, what else can we do? What about modifying, deleting, or extracting data? Or adding some in yet another way? Select "Work with Products data" from the Action Manager, and you'll see the Product Manager menu. (Feel free to try the two other "Work with…" menu entries on the Action Manager, if you wish…but you'll find they've been left as an exercise for the reader.)
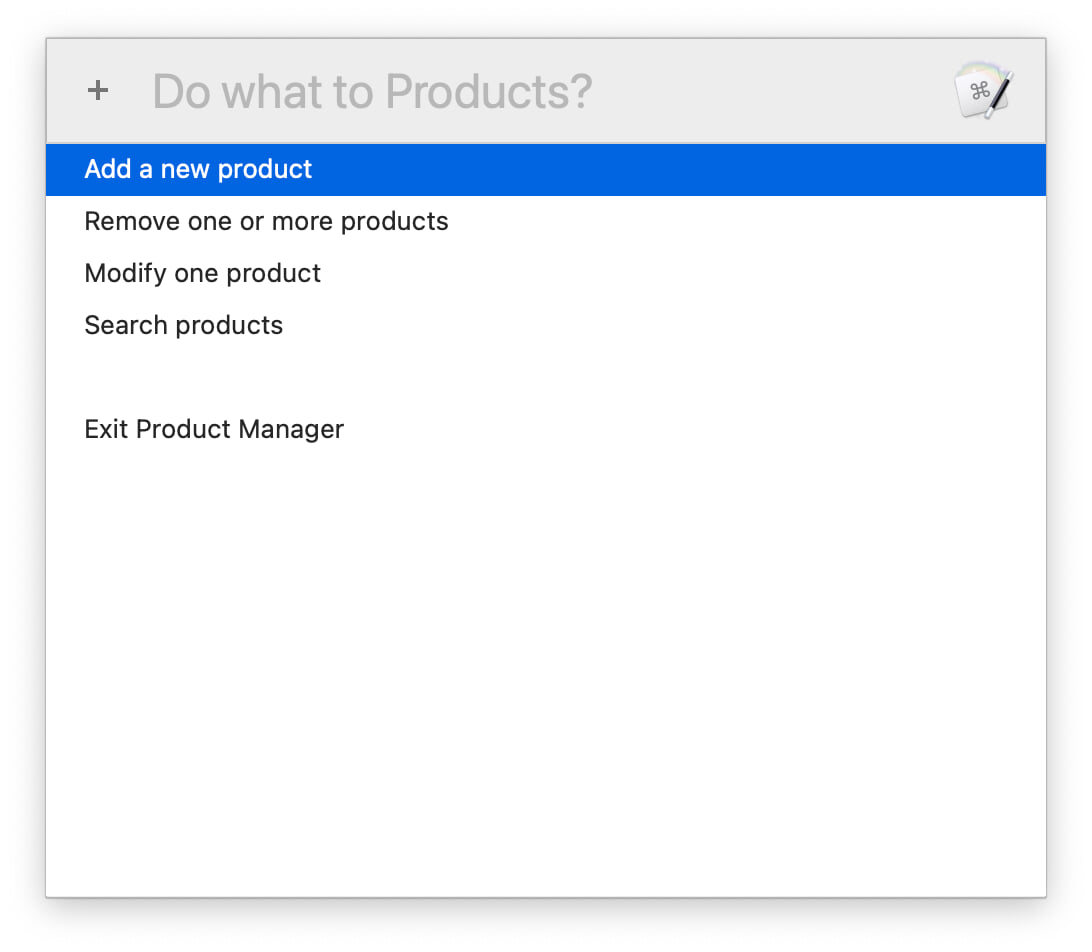
Let's start by selecting "Add a new product" from the Product Manager.
Macro: Product: Add
When launched, you'll see a new product data input box:
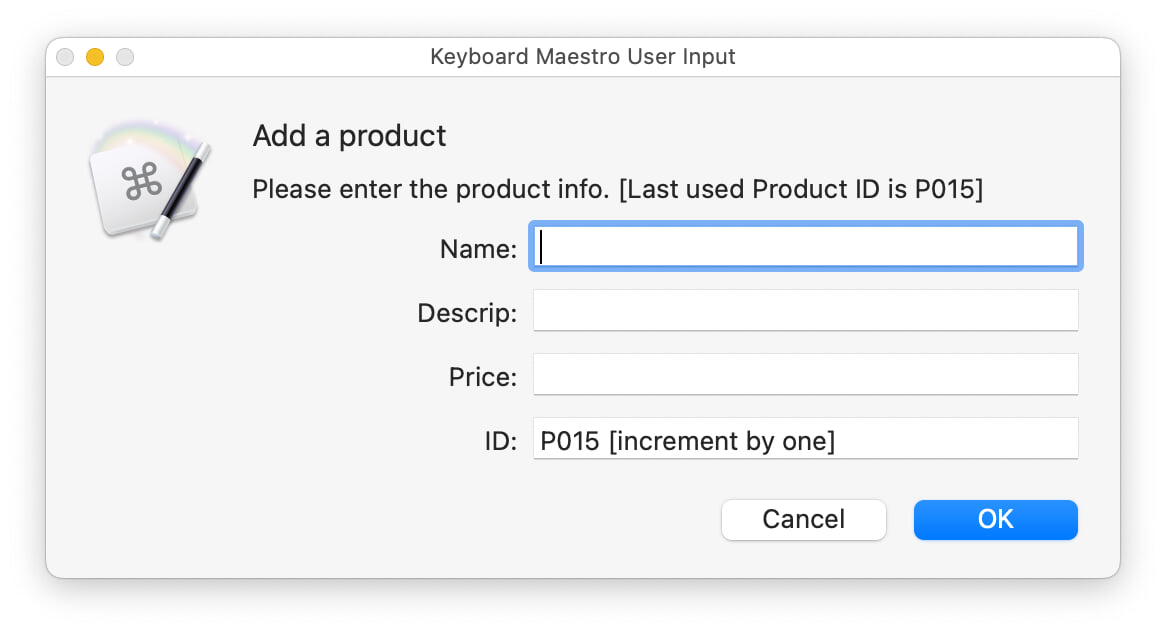
Notice that it includes the latest product number in use, as well as a hint about incrementing it by one. In a real system, this would definitely be a data item that you'd want to make sure was properly formatted, in line with company standards, etc. In the demo macro, I don't worry about any of that. Go ahead and enter a new product, making sure to set its ID to P016 before you click OK. (When entering the price, do not use a dollar sign; just enter numbers and a decimal.)
You'll see a message about your newly-added product, and then you're back at the Product Manager. Try to enter another product, but this time, leave a field or two blank. Or make the record number P001 or anything less than 16. You should see some error messages and not be allowed to proceed until you correct those errors. Click Cancel when done testing to return to the Product Manager.
I used this product add demo to show how you can verify data before allowing it into the system. Open the "Product: Add" macro, and you'll see a large orange box that handles all the input and verification. This is an Until action with a Prompt for Input box. After checking for Cancel, you can see a whole bunch of tests that run on the various fields. A regex search is used to make sure the ID number is unique—the first steps in this macro retrieved all the product IDs in order, then clipped off the last one as our latest number to use in the input box.
Only after satisfying all the tests will the macro proceed to the next step—you guessed it, protecting the apostrophes! The SQL is then set in the familiar INSERT INTO form, and sent to the SQL Runner to process. And again, you'll see I did zero error checking, but you really should.
Macro: Product: Del
So much for adding, what about deleting? Get back to the Product Manager and select "Remove one or more products." You'll soon see a list of all products in the database, in a multi-select enabled list. Highlight all the products you'd like to delete, then double-click on an already-highlighted row (as there's no "OK" button in Prompt with List):
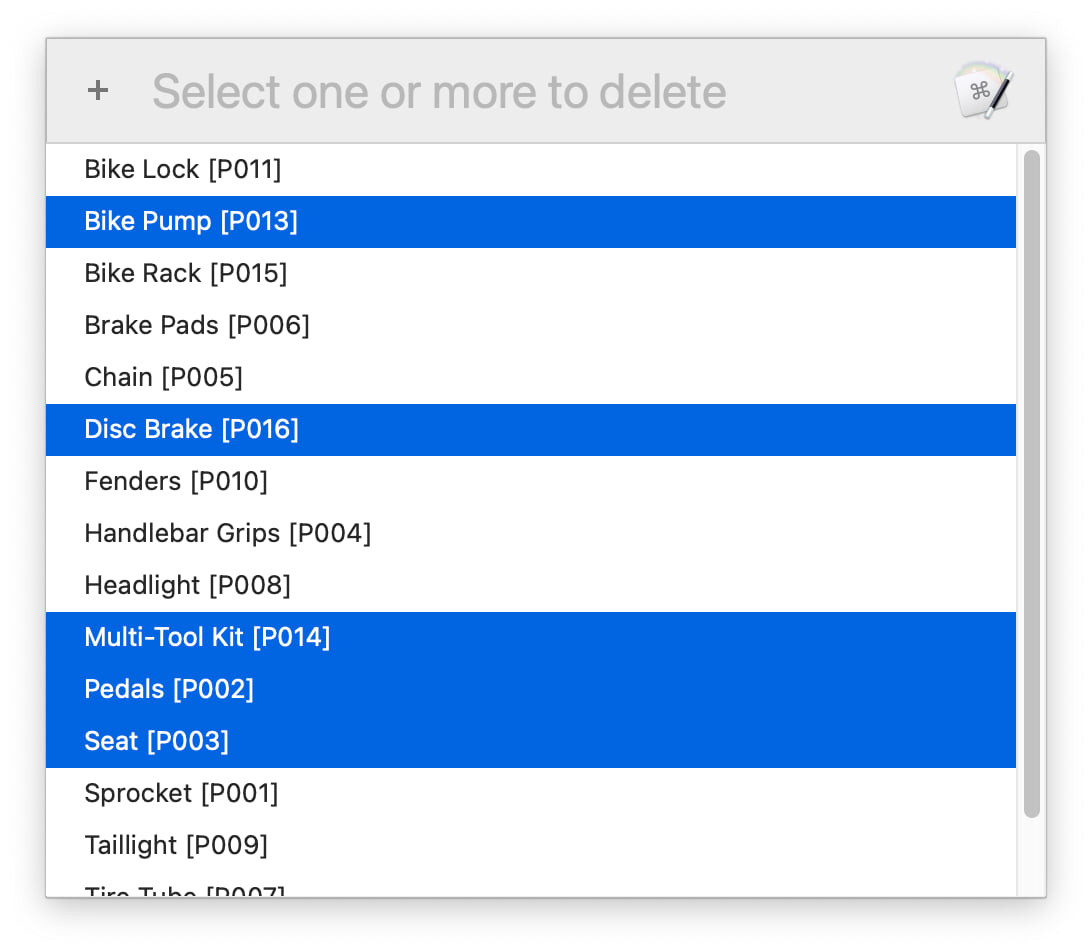
You'll see an "are you sure?!" last-chance dialog; click OK there, and those products are gone. Switch back to the macro and open "Product: Del" to see how this works.
The first orange box builds the entries for the list, sorted by product name but with the product ID visible in brackets. The list is then presented and the choices saved, which takes you to the second orange box, labeled "Massage into SQL format." And this really is some pretty serious massaging. The first regex is one that was used earlier; it drops everything but the ID from the data, and wraps that ID in single quotes. (The (?m) bit means "apply to all each row in the data.") Then the line breaks are removed, and any lingering white space trimmed out.
The next regex wraps the entire thing in parentheses, and the final one takes out a needless trailing comma. This is relatively tricky to explain, but easier to show. Here's what the data looks like as returned from Prompt with List and five items selected:
Bike Rack [P015]
Headlight [P008]
Seat [P003]
Sprocket [P001]
Water Bottle Holder [P012]
And here's that same data after the regex massaging:
('P015','P008','P003','P001','P012')
The reason it's in this format is so that it can be used with SQL's DELETE FROM syntax:
DELETE FROM
    Products
WHERE
    Product_ID IN %Variable%local_toDeleteSQL%;
That's how you delete multiple items from one table in one pass: By setting them up in a parentheses-enclosed list. It looks complicated, but it's really not that bad—and most importantly, it's easily reused.
After that, the SQL Runner does its thing and deletes the records, and I again don't even pretend to try to verify they were deleted, and then a final message appears confirming the deletion.
Macro: Product: Edit
Go back to the Product Manager and select "Modify one product." You'll see a somewhat-familar dialog with a pop-up showing all products (with IDs). Select any product and click OK to see the modification screen:
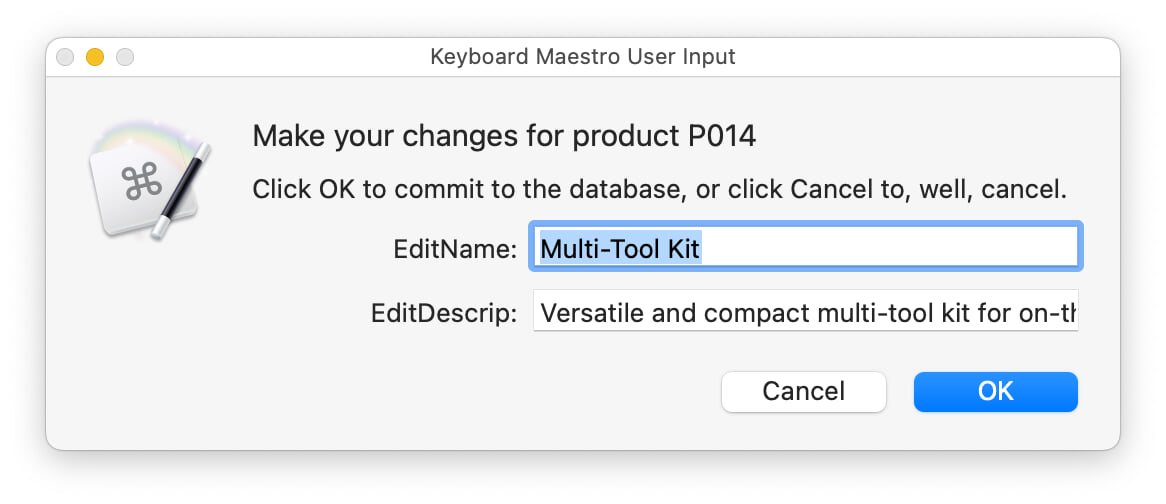
Make some changes, click OK, and they'll be sent to the database. Now open up the "Product: Edit" macro, because (finally) there's something a bit different about SQL Runner this time out. The first orange box is familiar; it pulls the product name and ID for the first pop-up list. After selecting a product to edit, the ID is stripped from the selection and used to pull the full matching record in the Products database, which happens in the second orange box.
Notice the call to SQL Runner there: It finally has a value in the _DotCommands field: .separator ###.
Now, I know in the last part I told you not to use ### as a delimiter, and that's still great advice. But in this demo, given I know the data in use, I went with it just for ease of reading. But you can use something else if you wish (though you'll have to modify the regex if you change it).
The reason for adding a separator is that I needed to be able to split the returned data into three separate variables, which is what happens in the Search box immediately below the orange box:
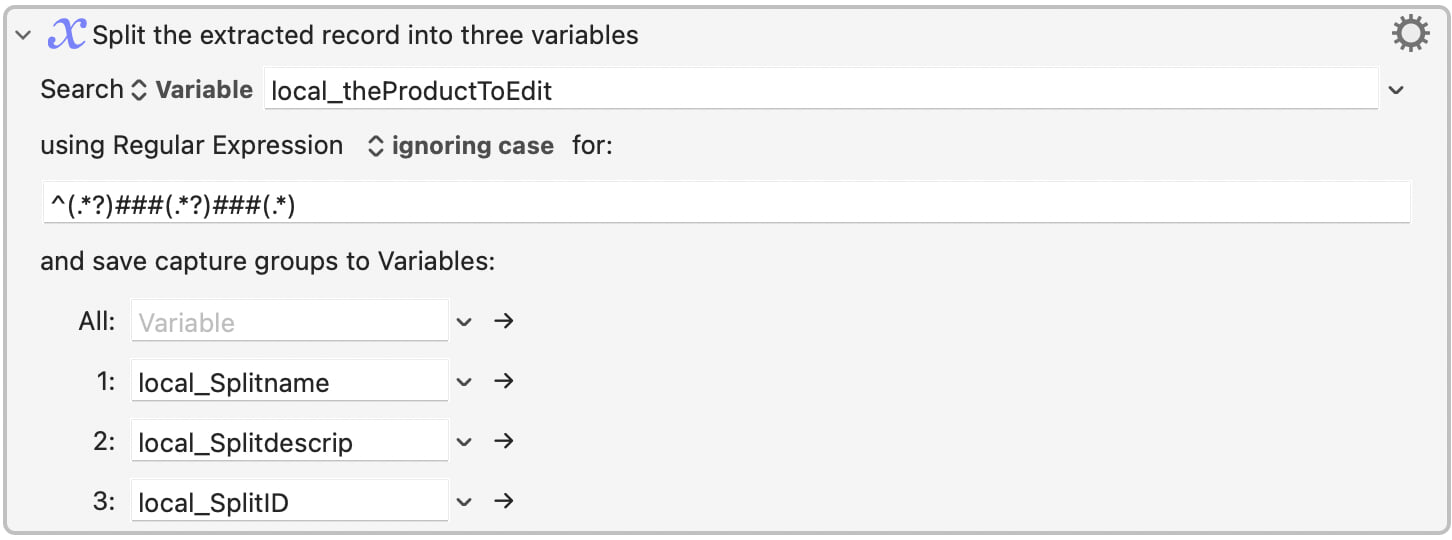
The regex looks for the delimters, and splits the data between them into the name, description, and ID of the selected product. The name and description then appear in the input prompt, ready for editing. (As an aside, it would be great if there were a multi-line box in the input prompt, but there's not. If you want that, you have to use a custom HTML prompt as was shown earlier.)
The above construct is used a lot when working with databases. Get used to splitting things apart by searching for the delimiters between items.
Notice, too, another yellow comment: I don't actually verify that the user changed anything before writing it. I do, though (next orange box) quote the single quotes before (next orange box) building the SQL that does the modification. You modify records with the UPDATE command, which is almost always used with a WHERE clause to restrict the records it will affect:
UPDATE
    Products
SET
    Product_Name = '%Variable%local__Name%',
    Product_Descrip = '%Variable%local__Description%'
WHERE
    Product_ID = '%Variable%local_SplitID%';
And once again (notice a trend?) I don't verify anything but just put a message up saying it all worked.
Macro: Product: Find
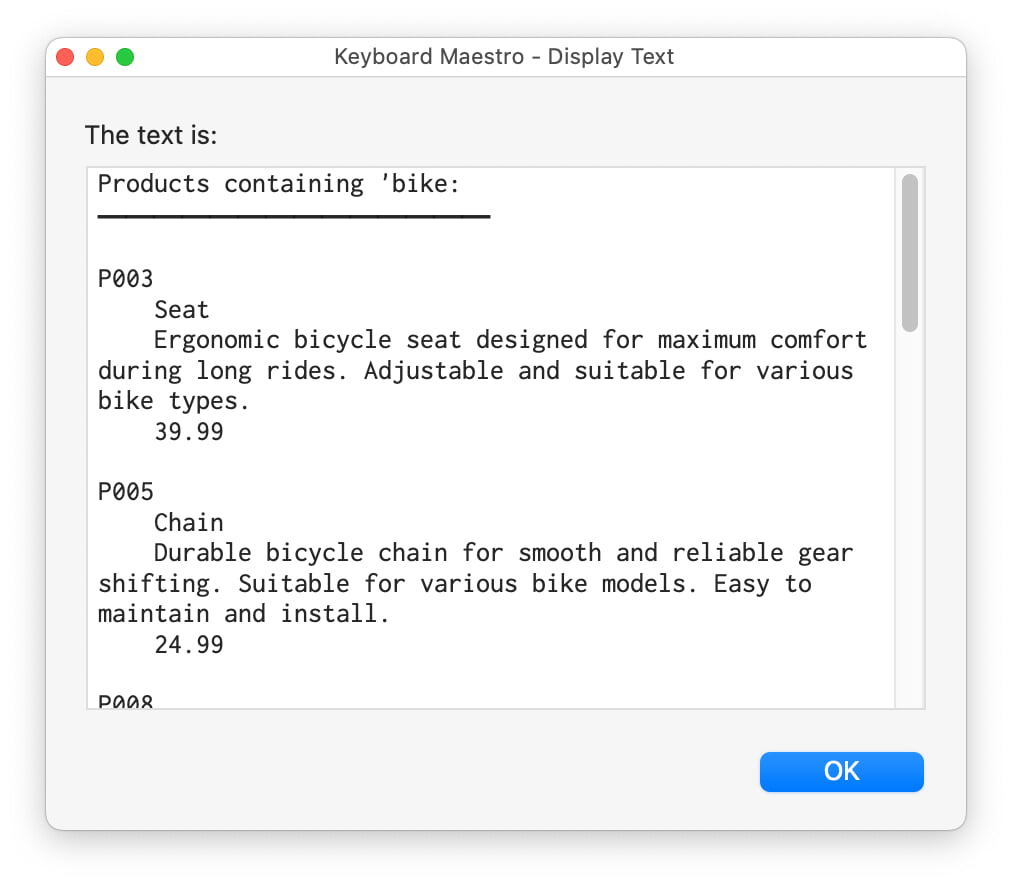
What about finding things in the database? Get back to the Product Manager and select "Search products." When the search input box appears, enter bike and click OK, and you should then see the search results appear:
Searching in sqlite3 is done with the LIKE modifier on WHERE. This routine is relatively simple, except for one bit; open up the "Product: Find" macro and follow along. The first orange box is one that, once again, protects the apostrophes. The second orange box is a regex that wraps the user's search term in percent signs, so that bike becomes %bike%. Why?
Because in sqlite3, the percent sign is the wildcard for "zero or more characters." You can also use an underscore to match "exactly one character," but that's not all that useful in a general search. You may be wondering, though, why I didn't just put the % signs int he SQL, around the variable. That was my first thought, but that leads to this:
... LIKE '%%Variable%local__FindSQL%%'
And I think there's some way around this double-percent issue in Keyboard Maestro, I didn't know it so I just pre-wrapped the variable with percent signs, so I could use the normal variable reference in the SQL command.
Continue reading down, and you'll see that the SQL Runner is again using the separator—this time we're getting back four values, so the regex in orange is set to look for three separators. The replace looks weird, but it's actually a great demonstration of the power of regex. The data as it comes back from the database looks like this (each row):
Product ID###Product Name###Product Description###Product Price
That weird looking replacement ... $1\n $2\n $3\n $4\n ... inserts new lines (\n) and spacing which changes that one-row output into this:
Product ID
    Product Name
    Product Description
    Product Price
And it's that form that's then displayed in the final search results, after a header is added. And that's also it for the Product Manager; return to the top-level Action Manager, and we'll take a look at the last option, running reports.
Macro: Action: Sales Reports
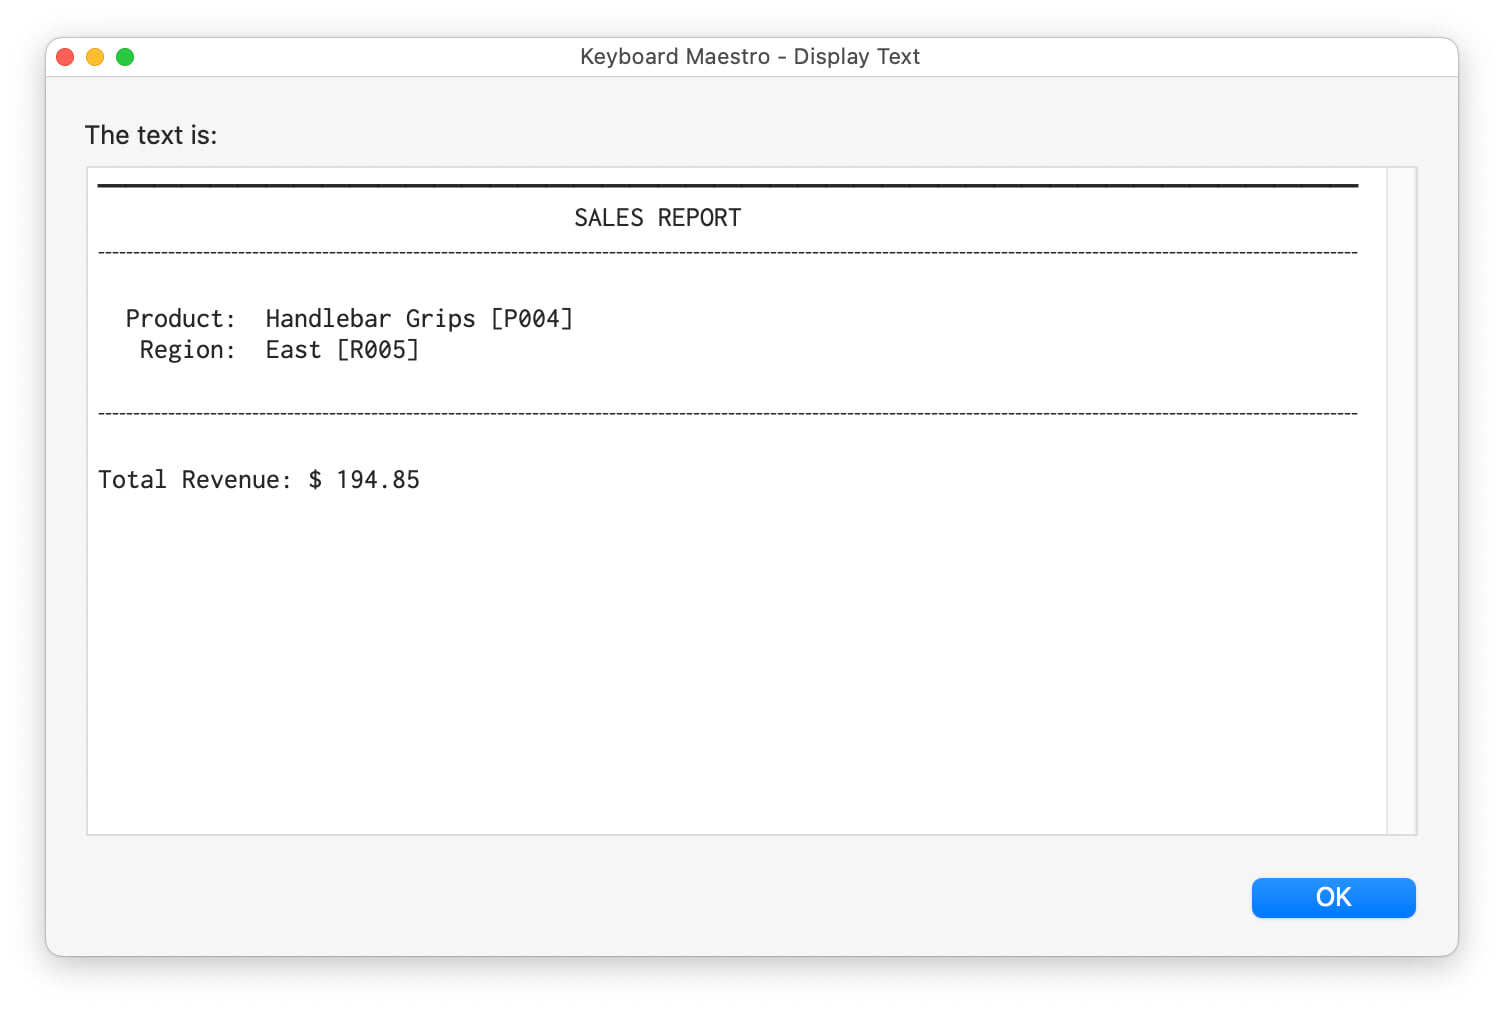
Select the "Produce Sales Reports" macro, and you'll be greeted by an input dialog with three pop-ups, used to select a product, region and employee. You can select any or all of the categories, though with the limited data set, your odds of getting a match with all three filled in are low. For now, select Handlebar Grips as the Product and East as the region, then click OK to see the sales report:
To see how this report is produced, open the "Action: Sales Reports" macro. At the top, the first orange block should be familiar by now: It creates the name-ID pop-ups used in the report dialog. The next three orange blocks process the responses for Product, Region, and Employee. Within each block, the ID is pulled off the full text string, and then two variables—one for the search SQL and the other for the report—are updated.
The If-Then blocks in the Region and Employee section make sure that no blank lines are added (to either the search SQL or the report) if a user leaves one of the criteria blank. At the end, what's built is a WHERE clause for the SQL statement, and all the data needed for the report. The SQL statement is a bit long because it has to JOIN all three of the support tables, and then the variable containing the WHERE clause is appended.
The SQL runner is then called, and then a bit of work is needed to handle situations with no revenue: If you select a mix that returns no matches, the return variable is blank (but with a line break). The line break is trimmed out, and then a 0.00 value is set to indicate no revenue for that mix. Finally, the sales report is displayed.
A word about logging
Remember how we set up the instance_DebugMode variable in the main macro in Part Two? We haven't used it yet, but if you want to see how it works, just set its value to TRUE, then use this macro to do a bunch of stuff in your database. Switch to Terminal, then run this cat command to see the logged activities:
$ cat ~/Library/Logs/Keyboard\ Maestro/Engine.log | grep "SQL task"
2023-12-01 15:12:47 Log: Sales Tracking SQL task: Finding matching products in Products table
2023-12-01 15:12:59 Log: Sales Tracking SQL task: Pull existing IDs from Products table when editing Products
2023-12-01 15:13:20 Log: Sales Tracking SQL task: Writing new product to Products table
⋅
In the demo, I just used static text to point me to where I need to look, but I recently learned about the [%ExecutingThisMacro%] token, which I've now added to all my logging calls. This returns the name of the particular submacro or subroutine that's running the code. So now I use custom text, but with the token at the end to point me to the right macro in which to look for the trouble source.
Without the logging variable (and text in each call to the SQL Runner), any failures in SQL Runner might only show that it failed, without any detail as to what went wrong when it did so. The logging variable can be invaluable—and you can obviously add Log calls anywhere else in your code you'd like to see while trying to figure out an issue.
Conclusion
If you made it this far, pat yourself on the back: You've worked through a fully-functional macro that works with a sqlite database. I tried to represent the most common actions you'll be using to work with databases, so you can use this macro suite as a reference going forward. That's not to say this is "production ready" code—far from it. There's almost no data verification, and a lot of things could be done more efficiently (which I'll cover in Part Four). But it works, and it demonstrates how your macros can manage a sqlite3 database.
In Part Four, we'll set up a user preferences table in the database, and cover how to get settings into and out of the database. I'll also try to provide a summary of key points to keep in mind while working with sqlite3 databases in your macros.