Many folks nowadays have a Mac with Retina display. Me too. When you are posting a Retina screenshot on this forum it is displayed at double size. This is annoying and ugly.
As far as I know the reason for this is the Discourse forum software which doesn't know how to handle resolutions other than 72ppi.
What can you do about this?
To prevent oversized images on this forum you have basically two methods:
-
Resize (downscale) the screenshot before uploading.
-
Reduce the preview dimensions ("width" and "height" attributes) of each uploaded image in the forum's post editor (composer).
Both things can be automized. But each of them has advantages and disadvantages:
Resizing image before uploading:
- Good: Smaller images => less server load and bandwidth consumption
- Bad: Image quality will suffer. The downscaled images appear pretty blurry.
Reducing the preview dimensions in the post composer:
- Good: Sharp and crisp images
- Bad: More image data to upload
- Bad: Not really suitable for images with a width greater than 690px
What's the issue with 690px image width?
Basically on this forum there are two types of images:
- Images with a width greater than 690px
- Images with a width up to 690px
In case of Retina screenshots both types will be displayed at double size. But there is an important difference that affects how we should treat Retina images (if we want the best possible result):
When you upload a wide image (width >690px) the following will happen:
- The forum software automatically reduces the dimensions ("width" and "height" attributes) of the preview image so that the width is exactly 690px.
- If a visitor clicks the preview he will see the image in its original size.
When you upload a narrow image (width ≤690px) none of the above will happen:
- The preview will have the exact dimensions of the original image
- If a visitor clicks the image nothing will happen, since it is already displayed at max. dimensions.
Here some examples to illustrate that:
A. The original images:


All the above images are unmodified Retina screenshots, obviously they are displayed at double size, and "truncated" to 690px.
B. Now, each image file — before uploading — resized to 50%:
![]()
![]()
![]()
![]()
![]()
The images now correspond to the actual size on a Retina display. But quality has suffered. (Blur.)
C. Now again the original, unmodified image files, but with all width and height attributes reduced to 50% in the post composer window:
![]()
![]()
All the above images are unmodified Retina screenshots, obviously they are displayed at double size, and "truncated" to 690px.
If you are seeing this on a Retina display you will notice that the quality/resolution of the smaller ones (up to 690px) is way better. However, for the larger ones this method doesn't seem to yield any benefits:
- To calculate the width and height attributes of the larger images (>690px), you have to know the original image dimensions (because the forum has changed the attributes). That is: difficult to automize.
- The larger images trigger the generation of the preview image which seems to be at single resolution anyway.
- A click on the larger images brings back the oversized images, which is not helpful.
OK, since we have understood that now, let's move on to the macros 
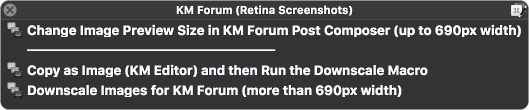
Macro #1: "Change Image Preview Size in KM Forum Post Composer (up to 690px width)"
[If you don't care about the display quality of your screenshots on the forum, then you can skip forward to Macro #2. Otherwise read on.]

If the width of your images is less or equal to 690px than use this macro. Typical small images are screenshots of menus, small areas of windows, etc.
This macro does not alter your image files. It merely runs on the text in the forum post composer window of your browser.
How to
- Drag your screenshots into the composer window as usual. Do not downscale them before.
- Once you have finished composing your post, select the entire text in the composer window and launch the macro.
- The macro will search for all attributes like (example)
width="420"andheight="240" - Each found width and height will be scaled by a factor of
0.5 - The adjusted text will be pasted back into the composer window.
- The macro will search for all attributes like (example)
Instead of selecting the entire text you can also select only one paragraph, or just the line with the image link. (But always select at least an entire line, not only the "width" attribute or such.)
I do not recommend using this macro for images with a width greater than 690px.
Why?
- As explained above, wide images (>690px) are automatically downscaled to a preview width of 690px when you drag them into the composer. Applying this macro would mean downscaling them again by a factor of 0.5. This will result in too small previews. To get the correct dimensions you would have to calculate them based on the original dimensions of the images.
- If the visitor clicks the preview he will be presented with the image in its original dimensions. In case of Retina this means: the double-sized monster appears again.
- Since the wider images tend to have an elevated file size, it is more server-friendly anyway to really downscale them, instead of uploading the "double-sized" images and only changing the attributes.
Since you probably will forget to check the preview sizes of the dragged images, the macro does that for you: If it finds a 690px image you'll get a warning. You can ignore the warning or stop the macro.
So, for wide images (>690px) the best choice seems to be to really downscale the original images before upload. This leads us to macro #2:
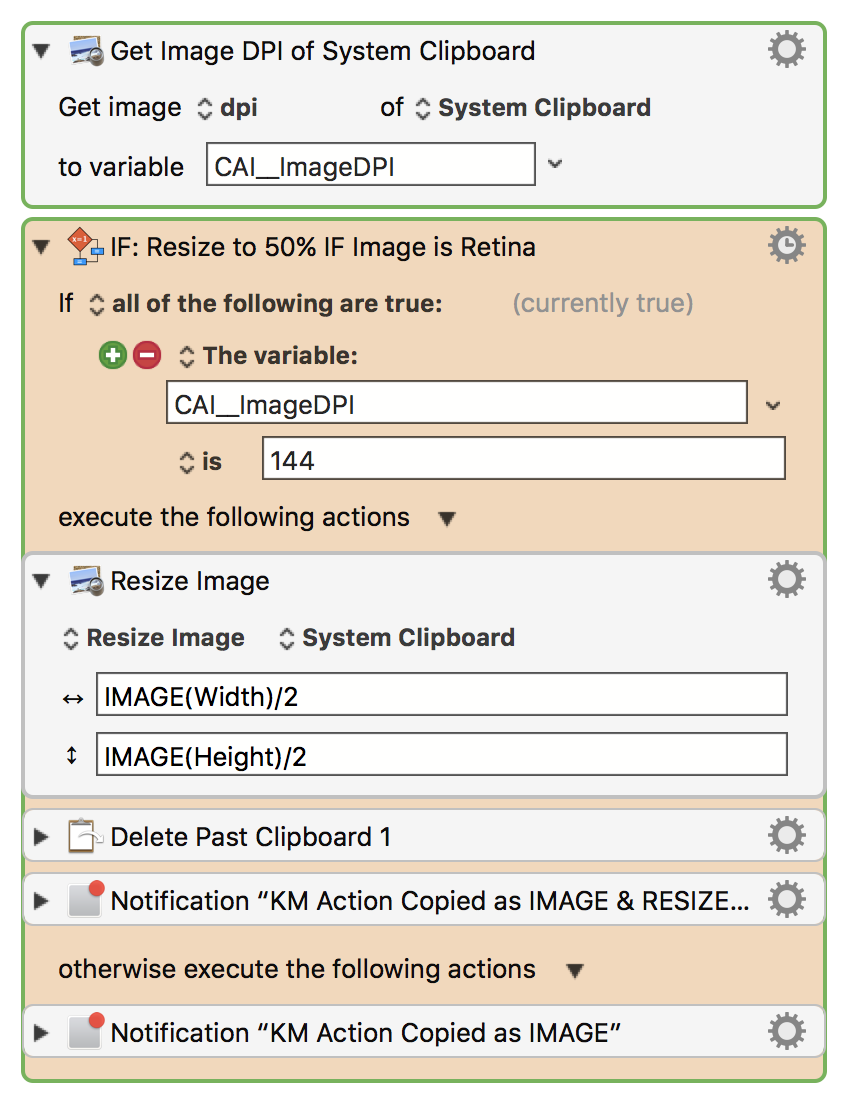
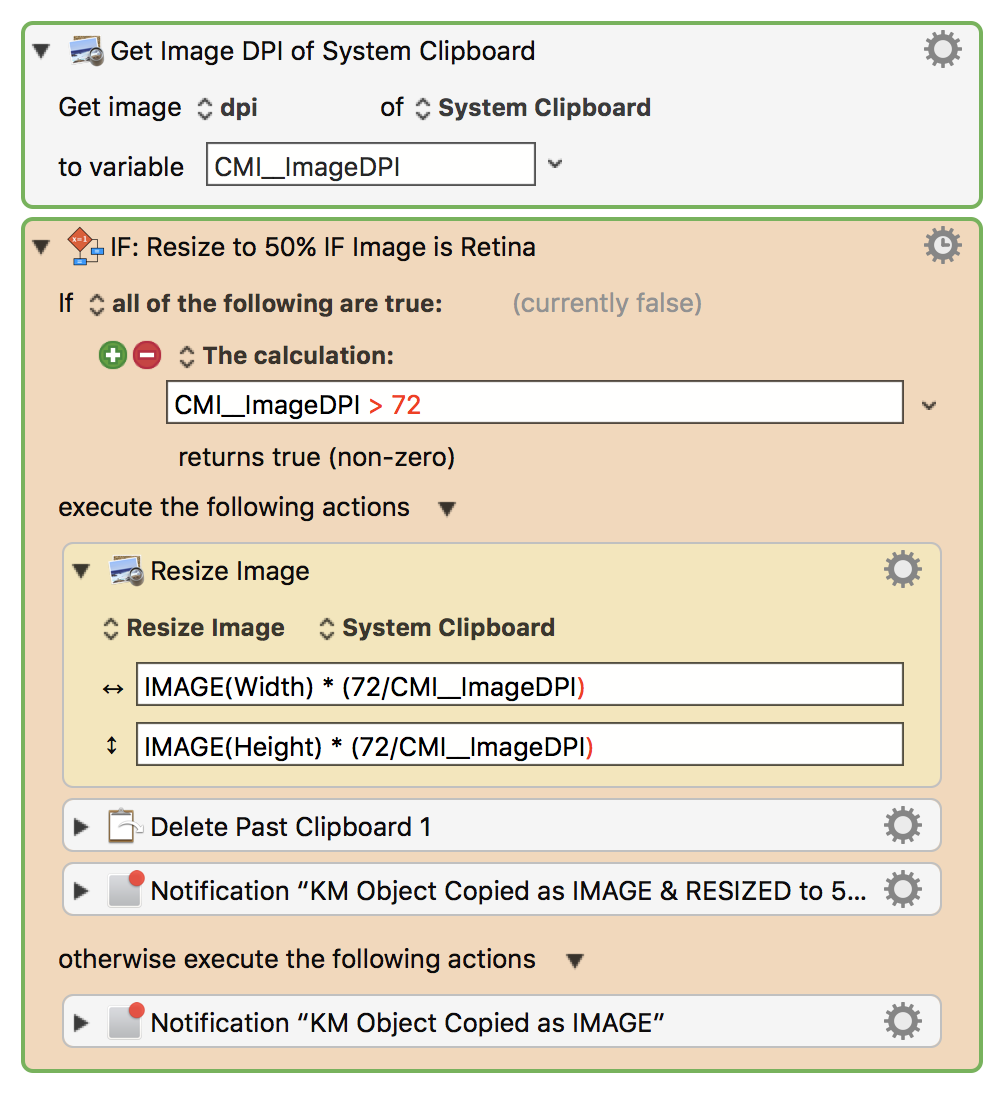
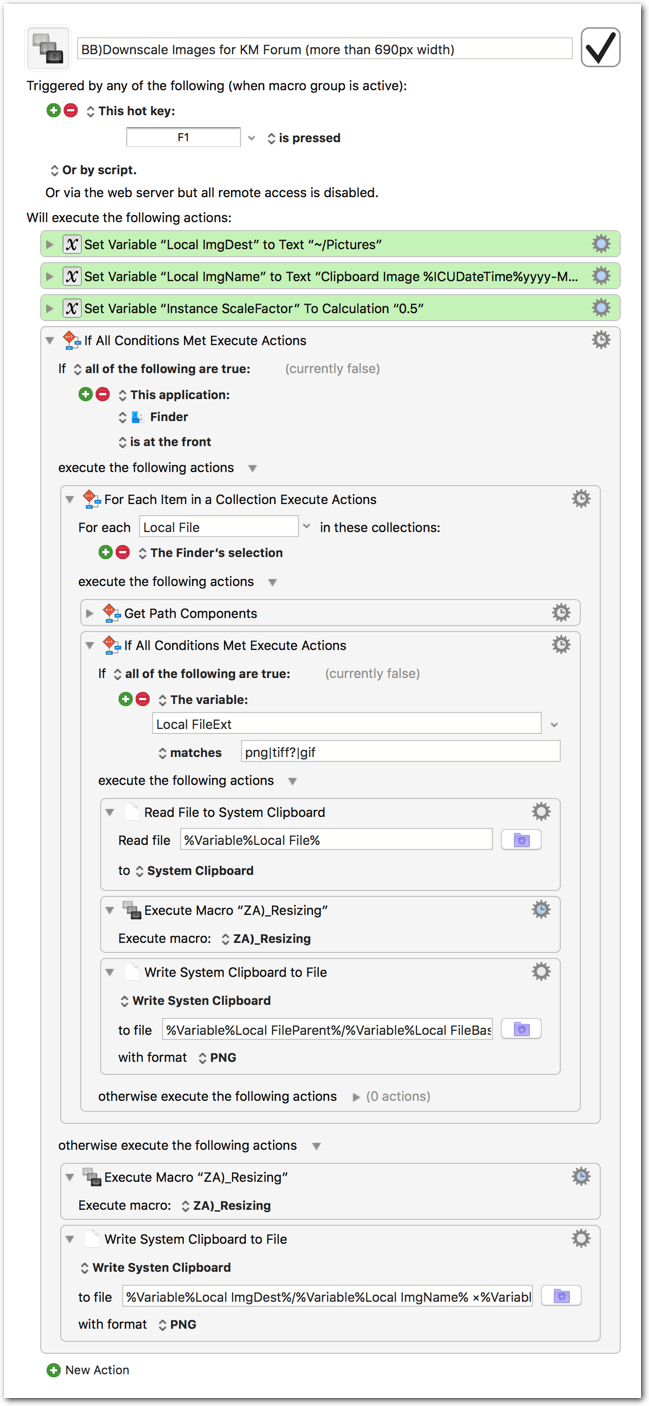
Macro #2: "Downscale Images for KM Forum (more than 690px width)"
This is the macro for wide images. The typical screenshots of a KM macro (as you see it below) falls into that category.
How to
The macro operates in two (auto-)modes:
In the Finder
If the Finder is frontmost then the macro presumes that you want to downscale an image file. So, …
- Select the screenshot file(s) in the Finder.
- Run the macro.
- The downscaled files will be saved in the original folder and with the original name, plus a suffix consisting of the scaling factor.
- Drag the file(s) into the composer window of your forum post, as usual.
Not in the Finder
If you are in any app other than the Finder then the macro presumes you want to downscale an image on the clipboard. This is typically the case when you are in KM Editor and just have selected "Copy [macro] as Image".
- Once the image is on the clipboard launch the macro.
- The image will be downscaled and saved to a file (default location: Pictures folder). Please set the destination folder in the macro. (It's the first, green action.)
- The file will be named with date and time, suffixed with the scaling factor.
- Drag the file into the composer window of your forum post, as usual.
Similar as with Macro #1, the macro will check the width of the image. If it finds an image with a width less than 690px then it will remind you that the better option would be to use Macro #1.
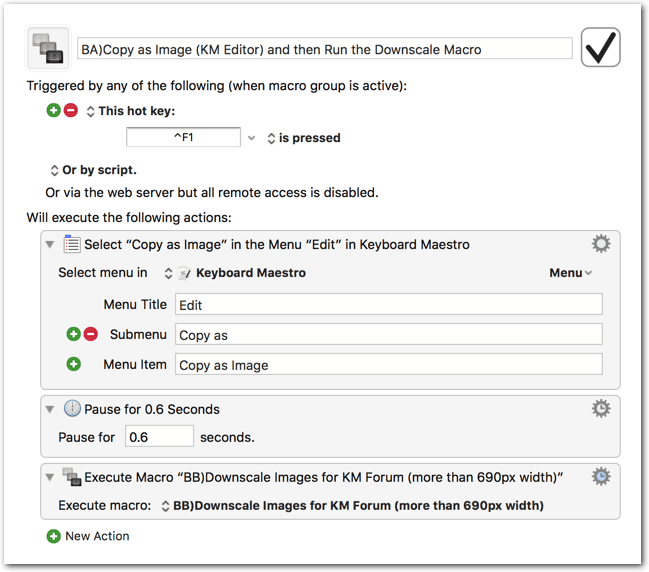
Macro #2A: "Copy as Image (KM Editor) and then Run the Downscale Macro"
This is just an optional "prefix" macro for Macro #2: It selects Copy as Image from KM Editor's menu and then it executes Macro #2. This saves you one keystroke in KM Editor.
If you don't wish that you can always run Macro #2 without Macro #2A, for example when you are in the Finder or when the image is already on the clipboard.
Download:
KM Forum (Retina Screenshots) Macros.kmmacros (20.9 KB)
Usage tips
-
If you don't care about quality then ignore Macro #1 and just use Macro #2 all the time. In that case you may want to disable the image-width warning in the macro.
-
If the screenshots for your post are a mixed bag of wide (>690px) and narrow (≤690px) screenshots:
- Drag the narrow images into the composer window.
- Run Macro #1 on the composer window.
- Run Macro #2 on the files of the remaining wide images (or on the image on the clipboard).
- Drag the downscaled wide images to the composer window.
-
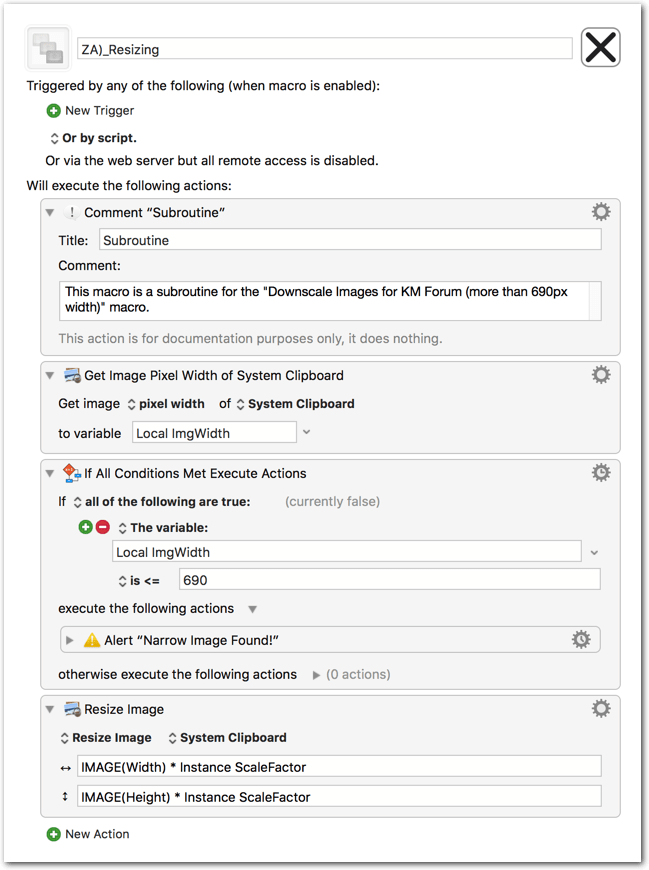
The resizing macro (Macro #2) is saving the clipboard to file, because in Safari you can't directly paste an image from the clipboard to the composer. If you are using a browser that allows you to do that, then feel free to disable the "Write to File" actions.
-
The resizing macro (Macro #2) is divided into the main macro and a subroutine. Leave the subroutine disabled so that it doesn't appear in a palette. It will work nevertheless.
-
I you need a different scaling factor you can set it in the macros.
-
You have different possibilities to launch the macros:
-
By default Macros #1 and #2 have the same F1 hotkey, so you get a Conflict palette and can choose. (Macro #2A has a different shortcut, because when launched from a Conflict palette it will not see the "Copy as Image" menu item.)
-
You can open the group palette from the KM menu or from the Global palette:
-
Assign the macros to different groups: For example Macro #1 to your Safari (or Chrome) group, Macro #2A to your KM Editor group.
-
Assign different hotkeys.
-
Assign shorter names to the macros. The default names are very explanatory, so that it becomes more obvious what each macro does.
To sum it up:
For optimal results:
Screenshots ≤ 690px wide:
- Drag image file(s) to the composer of the forum as usual, then run Macro #1 on the text selection in the composer.
Screenshots > 690px wide:
-
New screenshot via KM Editor's "Copy as Image" --> Macro #2A
-
Resized image will be saved to file
-
Screenshot is already on the clipboard --> Macro #2 (Finder must not be frontmost)
-
Resized image will be saved to file
-
Screenshot is a file --> Select file(s) in Finder --> Macro #2
-
Resized image will be saved with a new name
Update (2017-09-25):
- Replaced sample images in post with unoptimized raw screenshots.
- Added Macro #2A "Copy as Image (KM Editor) and then Run the Other Macro":