Napkin v0.9k Macro
Napkin v0.9k.kmmacros (180 KB)
Introducing Napkin
[NB: I've been using various versions of this macro for several months through several rewrites, code cleanups and bright ideas. While it works for me running High Sierra with Keyboard Maestro v9, I'd be interested to learn if it works equally well on Keyboard Maestro v8 and other versions of macOS.]
You're at a diner having coffee with a friend and discussing some half-baked plan. Ideas flow like either clogged catsup or spilled water. So you scribble down a thought on a napkin or you sketch out some diagram that could be mistaken for a plot. Just to control the flow. Nothing may be any clearer but there's a pile of napkins to prove you tried.
Can you automate that with Keyboard Maestro? Sure.
I got a glimmer of the solution with Brian Kammer's Quick Note Taking System. I liked the idea of having a window handy to copy a paragraph and make a note about it as I was reading something intriguing on a Web site.
So Napkin was born.
And over the course of several weeks it evolved into a notation system for both text and images.
To be clear, though, this is not a replacement for note-taking applications like Evernote any more than it's a free version of Photoshop. It's just a replacement for napkins as a way to save text, record doodles and play with photo edits.
ABOUT FILES
One design goal was to minimize interaction with the file system without losing your work. That led to different behaviors for text and images.
Text, I found, was mostly being appended to an existing file. So Napkin lets you store your favorite files in a list and remembers the last one you used. It shows you the active file it will append to when you hit the Save button.
To start to a new file, just change the file name or the directory name.
That makes it easy to both continue building a file of notes for a particular project or switch to another file.
Image files, on the other hand, are constantly massaged in memory but rarely written to disk. And those disk files can't be added to, strictly speaking. So when you hit the Save button, Napkin asks you what you want to do. Write a new file or, if you've previously saved the image, overwrite the old one?
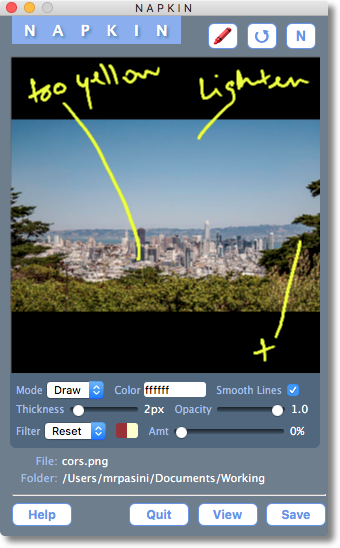
It allows you to branch off into that diagram that could be mistaken for a plot as well. Or to drop in an image and annotate it as if you had a grease pencil in any color you like.
In either text or draw mode, you can View the current file or canvas in another application. If a text files already exists, it's simply opened. Otherwise it's written to disk first. If it's an image, the image is saved first.
DETAILING THE DETAILS
Text and Draw modes are distinguished by different window contents and accessed by a Mode button. Text mode has a miniscule fountain pen emoji ![]() and Draw mode uses an equally tiny red crayon
and Draw mode uses an equally tiny red crayon ![]() emoji.
emoji.
Each mode has a Help button that explains the user interface in detail and offers a few usage tips.
In addition to the Help button at the bottom of the window, both modes have Quit, View and Save buttons.
-
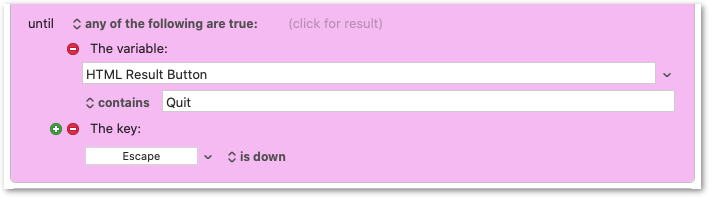
Quit closes Napkin. It's the only way to exit the macro.
-
View opens your napkin in the default application. On my system BBEdit opens the text notes and Preview opens the images (after saving the current canvas).
-
Save writes the current work to the active File.
Let's look at each mode in more detail.
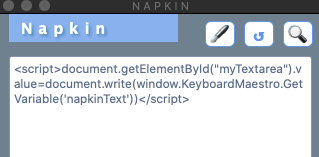
TEXT MODE
In Text mode, the dashboard below the text entry area has a Slug, File and Folder field.

Slugs are optional but the thing you change the most if you use them. I use them to identify the source of the material I'm annotating. They appear just before the timestamp applied to each Saved text section.
File and Folder need no introduction. You simply pick an existing one or create one by typing a new name in the field.
There are also popup menus of favorite Files and Slugs. You'll have to plug in your own but the Help button shows you how to do it. A sample set is included.
The buttons in Text mode on top are: Mode, Restore and Search.
-
Mode switches between Text and Draw modes.
-
Restore will put any backed up text (saved automatically) into the text field.
-
Search calls Textcavator, a Keyboard Maestro you'll have to download and install separately, that can search directories for text. You can certainly point it to whatever search utility you prefer, too.
The heart of Text mode, though, is the text entry area.
You can type notes in there. But you can also dictate them. And, of course, you can drag-and-drop or copy and paste them from whatever you're reading.
But you can also use tabs to create outlines, promoting or demoting selections.
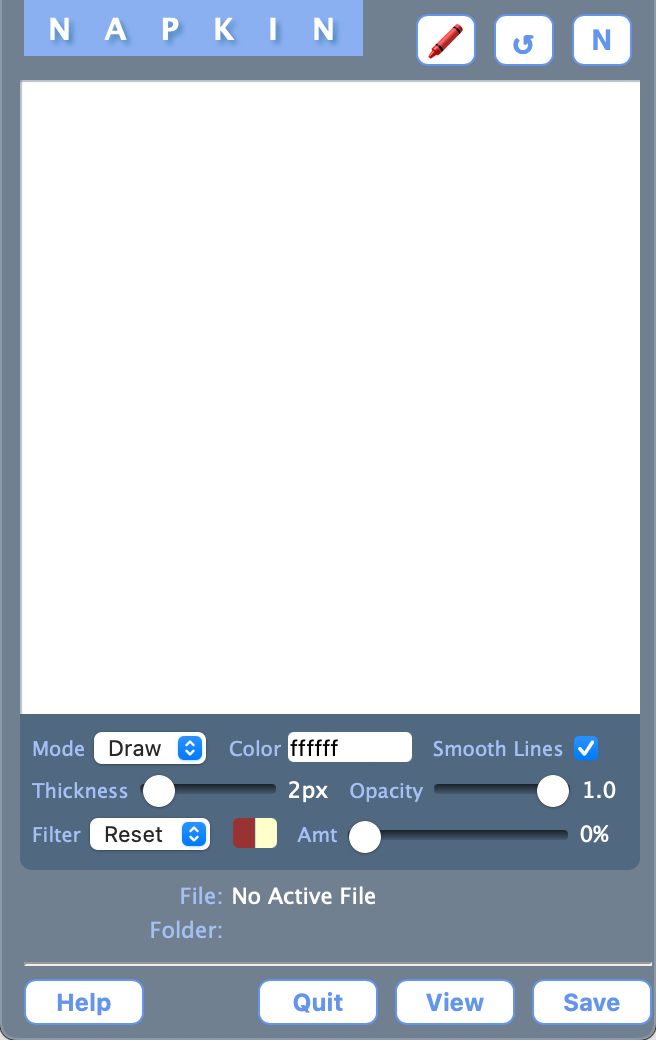
DRAW MODE
Draw mode is a little different. The dashboard below the canvas displays the Status and File and Folder names.
The buttons on top are: Mode, Reload and New.
-
Mode switches between Draw and Text modes.
-
Reload will prompt for an existing Napkin-sized image in the current Folder.
-
New wipes the canvas clean, presenting a new napkin canvas.
The heart of Draw mode, though, is the canvas area.
The 310x317-pixel canvas itself is transparent. When you enter Draw mode, it is painted white for drawings. The canvas itself is actually transparent so if you use Erase mode, you'll see nothing at all.
If you drop a JPEG, PNG or GIF image onto the canvas, the canvas is first painted with a black background and then with the image, preserving the image's aspect ratio. The black background provides a margin that helps any annotations stand out.
At the bottom of the canvas is a palette of controls that include both drawing controls and image editing filters.
On the first line you'll find:
-
Mode offers Draw, Fill and Erase options. Draw for line drawing, Fill to fill shapes or the background with the current color in a single click and Erase to erase to the transparent layer.
-
Color displays a palette of hues and a slider for tones to set the Active Color that is represented in the background of the field as well as in "rrggbb" format.
-
Smooth Lines enables antialiased line strokes. Turn it off if it slows down your system.
On the second line:
-
Thickness is the width in pixels of the line you are drawing.
-
Opacity is the opacity of the line you are drawing on a scale of 0.0 to 1.0.
On the third line:
-
Filter offers a number of options that make global changes to the image. You can convert a color image to black and white, turn the image into a negative, posterize it to varying degrees, brighten it up or darken it, correct its color or repaint it as a duotone. You can also recover the starting image.
-
Duotone Color buttons set the Shadow color and the Highlight color. We don't actually create a traditional lihtographic duotone but apply a gradient based on those colors to a grayscale rendering of the image.
-
Amount varies the effect of filters marked with a check mark after their name. The slider disappears if the filter doesn't support variations (like Duotone or Negative).

I've tried to make Napkin reasonable about what data it uses when applying filters and when adjusting their strength. When Napkin misbehaves, I've found it easy enough to recreate what I was doing but you can also save the last stage that survives, Reload that and continue editing.
You can also View images in the default application while working on them to confirm changes. On my system that application is Preview.
Saved PNG images tend to be well under 200K each for photos (130-150K) while simple drawings come in under 20K. Napkin only writes PNG files but it can read PNG or JPEG files (even GIFs but just the first frame and, surprisingly, even the JPEG thumbnail embedded in a DNG file).
The .png extension is enforced regardless of what you name the file because PNGs are what Napkin writes to preserve any transparency.
INSTALLATION
There's no special installation process. Simply import the macro by double clicking on it, make sure it's enabled and set the hot key to whatever you like (Command-Right is the default).
You'll be prompted for anything Napkin needs, like default directories.
Napkin will detect whether you are running Keyboard Maestro 8 or 9 and use the appropriate actions for each. That's different directory choosers and, in Keyboard Maestro 9, commands to hide and show the application palette.
But if you want to use the popup menus in Text mode, you'll have to edit the source to point to your own directories. I've left mine in as examples and the Help button provides all the details you need to put your own in.
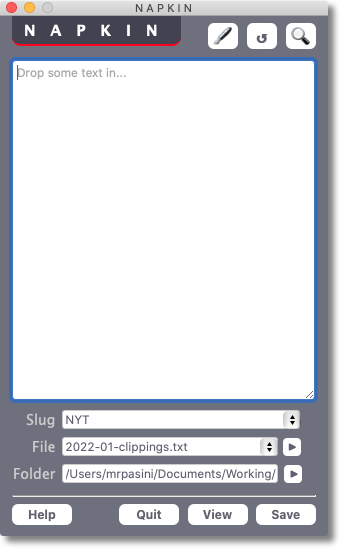
THE VARIABLES
The names of all the variables used by Napkin begin with "napkin," a great convenience to me during development if, admittedly, less efficient in production. Variables are remembered from session to session.
The main variable is napkinMode which determines whether you are in Text or Draw mode.
Text mode includes the following variables (at last count):
-
napkinKMversion is the Keyboard Maestro version Napkin has detected
-
napkinTextDir has the current Folder name for the current text file
-
napkinTextFile (note.txt) has the current text file name
-
napkinHeader has the text of the item header
-
napkinSlug is the slug used in the napkin header
-
napkinText is the content of the text area
-
napkinTextBackup is as copy of the text area content
-
napkinPickFav is the selected file popup
-
napkinPickSlug is the selected slug popup
Draw mode includes the following variables:
-
napkinImageStatus reflects the file/canvas relationship
-
napkinStatus indicates whether or not you've save the canvas
-
napkinImageDir has the current Folder name for the current image file
-
napkinImageFile (napkin.png) has the current image file name
-
napkinImageData has the content of the canvas area
-
napkinReloadImageFile is the Folder and File name of an image to be loaded
-
napkinImageFileRoot is the root file nameof the current image file
Variables are in a state of flux. I intend to convert the transient variables from global to local variables, for example, but development never seems to end.
FILTERS
There are quite a few image filters. The strength of those followed by a check mark can be varied using the Amount slider but if you set the value to 0, it will use a reasonable (but hidden) default value.
The original image data is saved in a JavaScript variable so if you get lost, you can return to it without dragging the original file onto the canvas. Just select Reset from the Filter menu.
OPTIONS
Here are a few behaviors you may prefer to modify:
-
The Keyboard Maestro Application Palette is hidden if running v9 while Napkin is running because Napkin appears where I keep my palette: in the top right corner. If you prefer to keep your palette visible, just delete the first and last actions.
-
Image files dropped on the canvas use a black background. You may prefer gray or some other arrangement. Look for ctx.fillStyle="#000000" in the Draw Mode Form and change that to whatever suits you.
-
Napkin runs on either v8 or v9 of Keyboard Maestro (it configures itself appropriately). If you're running v9, it uses two v9 actions. One is the newly-expanded Prompt for File actions (v8 uses AppleScript) the other is the new Hide/Show Applications palette actions (omitted if you're running v8) to set the variables napkinTextDir and napkinImageDir.
-
There's really nothing special about the size of the textarea and canvas. I found this a happy medium between visibility and file szie so have stuck with it. Feel free to resize it.
-
There are a lot of ways to add text to the textarea in Text mode. But if you're running Keyboard Maestro v9, you can add Chris Stone's "OCR -- user-Selected Area Macro (OCR -- User-Selected Area Macro (v9.0.1)) to the list. It lets you select an area of the screen to OCR, putting the text on the clipboard where you an just paste it into the textarea of Text mode.
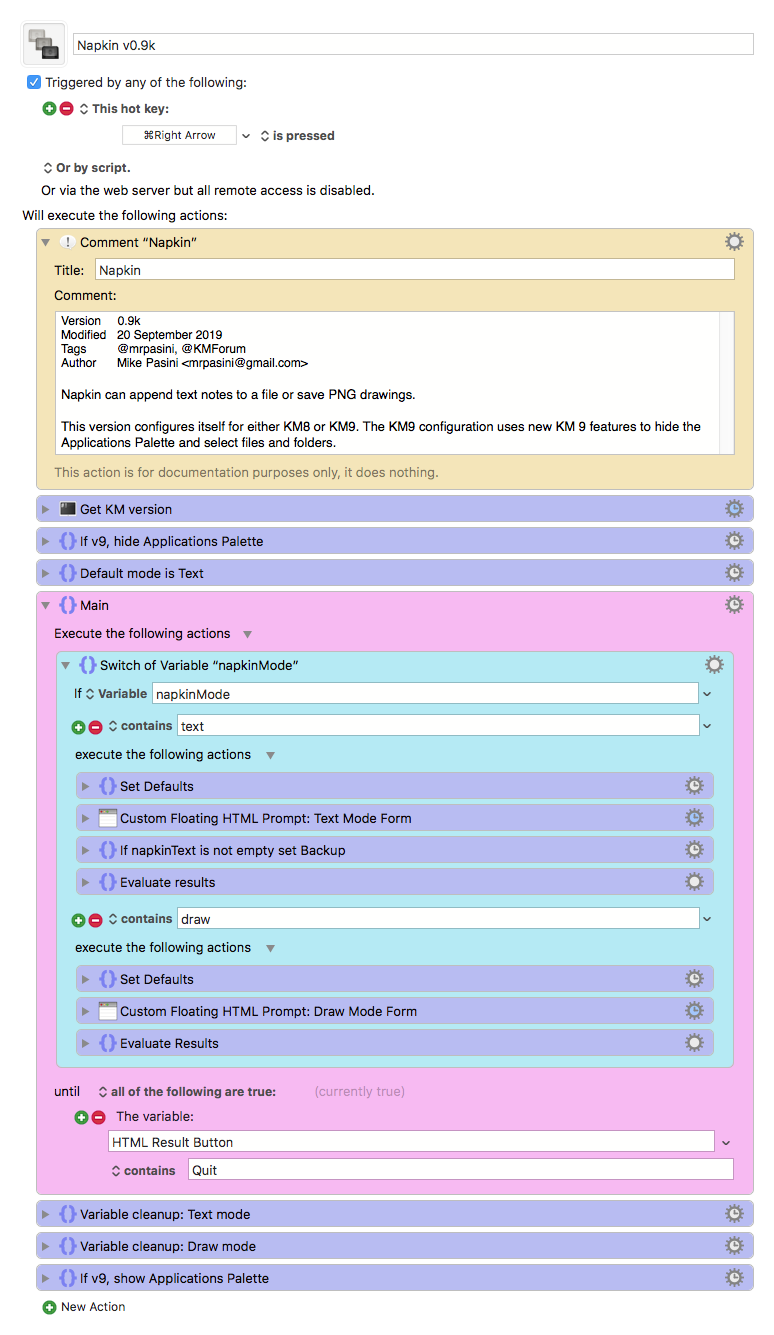
UNDER THE HOOD
The basic framework underlying Napkin is simply a Keyboard Maestro Custom Floating HTML Prompt. It's dressed up with some CSS.
The Text entry area owes its unconventional handling of tabs to Bill Bryant's Tab Override JavaScript library, minified for use here.
The Draw mode tools owe their existence to Jakub Fiala's Atrament JavaScript module, also minified here.
Because the Custom HTML Prompt does not support the HTML5 color field, we dropped in Jan Odvárko's jscolor.js, a small JavaScript equivalent, again minified. We added a hidetext configuration option to paint the text color the same as the background for our duotone color buttons.
And there is some other custom JavaScript code of our own to define characteristics of the canvas and drag-and-drop behavior like resizing images, including Sadique Ali's code to fit an image into a canvas.
Filters started with a set described by Ilmari Heikkinen here and were greatly informed by Alexander Dayan here. The duotone code that applies a gradient to a grayscale rendering came from Matt Kandler. We've also picked up a filter or two from other more comprehensive sources too numerous to mention.
We added some of our own formulas as well, including the Posterize, Luminance, Contrast and Hue Shifts. Once you get how simple it is to change pixel values, there's no stopping you.
ISSUES
I've been using Napkin in various stages of development for months now and find it useful for scrapbooking text notes from my onscreen reading and making visual notes to myself about improvements in images I'm working on or even just trying out effects.
It provides an endless supply of smart napkins to make notes on or doodle on or scribble images on while the spirit moves me. Which can be saved for future reference. And this does that.
Great fun when stuck on the phone with someone elses who thinks they have an original idea, too.
HELP
This document is intended as a read-once introduction to the macro. Click each mode's Help button for a concise but complete explanation of the mode's options. Note that Draw mode does not preserve the canvas when you use Help.
This version goes very light on error checking, so test your footing before transferring your full weight.
I'll respond to queries in this topoic and at the address below to discuss any other issues.
—- Mike Pasini
mrpasini@gmail.com
Development: 9 July 2019 to 25 September 2019
Released: 14 October 2019